To take screenShots
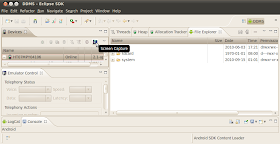
Switch to DDMS Perspective in Eclipse
- Click Windows on the manu bar of Eclipse
- Select Open Perspective
- Select DDMS(or from other...)
Select the device in Devices pane
(The device can be Android Emulator, or connected true device)
Click Screen Capture icon in Device pane
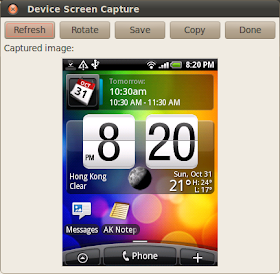
It's the screen captured of a true device, HTC Wildfire.
Sunday, October 31, 2010
Tuesday, October 26, 2010
Google are giving away 10,000 Google TV devices. To you.
In order to encourage a new generation of TV developers to come forward, Google are planning to give away 10,000 Google TV devices to help developers start building for TV.
In Adobe MAX conference, Google gave away more than 3,000 Google TV devices to attendees. Additionally, Google will be reaching out to thousands of web developers in the Google Code community to offer them a free device. Finally, if you are a professional web developer who wants to help make the Google TV experience even better and you don’t happen to fall into one of those two groups, you can submit an entry to our Google TV Web Developer Promotion and include a short summary about the type of interesting website your company would like to create or optimize for Google TV. Google are planning to select 2,500 winners from those entries to receive a free Google TV device.
To get started building websites for Google TV, we’ve provided new documentation and a Google TV Web forum to help developers better engage in the process. We’re excited to see what you all come up with. Happy coding!
Source: Google Code Blog: We’re giving away 10,000 Google TV devices. To you.
Saturday, October 23, 2010
Home Screen Battery Widget
It's a simple Battery Widget, with battery level and charging status displayed on Android Home Screen.
Create a layout file of our widget, simple with a TextView only - /res/layout/androidbatterywidget_layout.xml.
The provider info, /res/xml/androidbatterywidgetproviderinfo.xml.
Implement AndroidBatteryWidgetProvider.java, it's our AppWidgetProvider.
It show "waiting" initially, and start our Service in onUpdate() method.
Implement MyBatteryReceiver.java.
In onCreate(), it register the BroadcastReceiver, myReceiver, to receive the event of Intent.ACTION_BATTERY_CHANGED. And also update widget in myReceiver.onReceive().
Modify AndroidManifest.xml to include receiver and server in our application.
Download the files.
Related Article:
- A simple Home Screen App Widget to get Date/Time.
- android.app.Service
- Detect Battery Info.
Create a layout file of our widget, simple with a TextView only - /res/layout/androidbatterywidget_layout.xml.
<?xml version="1.0" encoding="utf-8"?>
<LinearLayout xmlns:android="http://schemas.android.com/apk/res/android"
android:orientation="vertical"
android:layout_width="fill_parent"
android:layout_height="fill_parent"
>
<TextView
android:id="@+id/level"
android:layout_width="fill_parent"
android:layout_height="wrap_content"
android:gravity="center"
android:textColor="#000000"
/>
</LinearLayout>
The provider info, /res/xml/androidbatterywidgetproviderinfo.xml.
<appwidget-provider xmlns:android="http://schemas.android.com/apk/res/android"
android:minWidth="146dp"
android:minHeight="72dp"
android:initialLayout="@layout/androidbatterywidget_layout"
>
</appwidget-provider>
Implement AndroidBatteryWidgetProvider.java, it's our AppWidgetProvider.
It show "waiting" initially, and start our Service in onUpdate() method.
package com.exercise.AndroidBatteryWidget;
import android.appwidget.AppWidgetManager;
import android.appwidget.AppWidgetProvider;
import android.content.ComponentName;
import android.content.Context;
import android.content.Intent;
import android.widget.RemoteViews;
public class AndroidBatteryWidgetProvider extends AppWidgetProvider {
@Override
public void onUpdate(Context context, AppWidgetManager appWidgetManager,
int[] appWidgetIds) {
// TODO Auto-generated method stub
updateWidget(context);
context.startService(new Intent(context, MyBatteryReceiver.class));
}
public void updateWidget(Context context){
RemoteViews updateViews = new RemoteViews(context.getPackageName(), R.layout.androidbatterywidget_layout);
updateViews.setTextViewText(R.id.level, "waiting!");
ComponentName myComponentName = new ComponentName(context, AndroidBatteryWidgetProvider.class);
AppWidgetManager manager = AppWidgetManager.getInstance(context);
manager.updateAppWidget(myComponentName, updateViews);
}
}
Implement MyBatteryReceiver.java.
In onCreate(), it register the BroadcastReceiver, myReceiver, to receive the event of Intent.ACTION_BATTERY_CHANGED. And also update widget in myReceiver.onReceive().
package com.exercise.AndroidBatteryWidget;
import android.app.Service;
import android.appwidget.AppWidgetManager;
import android.content.BroadcastReceiver;
import android.content.ComponentName;
import android.content.Context;
import android.content.Intent;
import android.content.IntentFilter;
import android.os.BatteryManager;
import android.os.IBinder;
import android.widget.RemoteViews;
public class MyBatteryReceiver extends Service {
private int batterylevel = 0;
private String batteryStatus ="";
private BroadcastReceiver myReceiver = new BroadcastReceiver()
{
@Override
public void onReceive(Context context, Intent intent)
{
String action = intent.getAction();
if (action.equals(Intent.ACTION_BATTERY_CHANGED))
{
batterylevel = intent.getIntExtra("level", 0);
int status = intent.getIntExtra("status", BatteryManager.BATTERY_STATUS_UNKNOWN);
String strStatus;
if (status == BatteryManager.BATTERY_STATUS_CHARGING){
batteryStatus = "Charging";
} else if (status == BatteryManager.BATTERY_STATUS_DISCHARGING){
batteryStatus = "Dis-charging";
} else if (status == BatteryManager.BATTERY_STATUS_NOT_CHARGING){
batteryStatus = "Not charging";
} else if (status == BatteryManager.BATTERY_STATUS_FULL){
batteryStatus = "Full";
} else {
batteryStatus = "";
}
updateAppWidget(context);
}
}
public void updateAppWidget(Context context){
RemoteViews updateViews = new RemoteViews(context.getPackageName(), R.layout.androidbatterywidget_layout);
updateViews.setTextViewText(R.id.level,
"Bat. Status:\n" +
"Level: " + batterylevel + "%\n" +
"Status: " + batteryStatus);
ComponentName myComponentName = new ComponentName(context, AndroidBatteryWidgetProvider.class);
AppWidgetManager manager = AppWidgetManager.getInstance(context);
manager.updateAppWidget(myComponentName, updateViews);
}
};
@Override
public IBinder onBind(Intent arg0) {
// TODO Auto-generated method stub
return null;
}
@Override
public void onCreate() {
// TODO Auto-generated method stub
super.onCreate();
IntentFilter intentFilter = new IntentFilter();
intentFilter.addAction(Intent.ACTION_BATTERY_CHANGED);
registerReceiver(myReceiver, intentFilter);
}
@Override
public void onDestroy() {
// TODO Auto-generated method stub
super.onDestroy();
unregisterReceiver(myReceiver);
}
}
Modify AndroidManifest.xml to include receiver and server in our application.
<?xml version="1.0" encoding="utf-8"?>
<manifest xmlns:android="http://schemas.android.com/apk/res/android"
package="com.exercise.AndroidBatteryWidget"
android:versionCode="1"
android:versionName="1.0">
<application android:icon="@drawable/icon" android:label="@string/app_name" android:debuggable="true">
<receiver android:name=".AndroidBatteryWidgetProvider" >
<intent-filter>
<action android:name="android.appwidget.action.APPWIDGET_UPDATE" />
</intent-filter>
<meta-data android:name="android.appwidget.provider"
android:resource="@xml/androidbatterywidgetproviderinfo" />
</receiver>
<service android:name=".MyBatteryReceiver" android:label="MyBatteryReceiver">
<intent-filter>
<action android:name="android.intent.action.BATTERY_CHANGED" />
</intent-filter>
</service>
</application>
<uses-sdk android:minSdkVersion="4" />
</manifest>
Download the files.
Related Article:
- A simple Home Screen App Widget to get Date/Time.
- android.app.Service
- Detect Battery Info.
Wednesday, October 20, 2010
Check and prompt user to enable GPS
To check if the GPS have been enabled or not, the following code can be used:
String provider = Settings.Secure.getString(getContentResolver(), Settings.Secure.LOCATION_PROVIDERS_ALLOWED);
If it's empty, means the GPS have not been enabled. You can start activity with intent Settings.ACTION_SECURITY_SETTINGS, to switch to GPS setting page.
Download the files.
String provider = Settings.Secure.getString(getContentResolver(), Settings.Secure.LOCATION_PROVIDERS_ALLOWED);
If it's empty, means the GPS have not been enabled. You can start activity with intent Settings.ACTION_SECURITY_SETTINGS, to switch to GPS setting page.
package com.exercise.AndroidEnableGPS;
import android.app.Activity;
import android.content.Intent;
import android.os.Bundle;
import android.provider.Settings;
import android.widget.Toast;
public class AndroidEnableGPS extends Activity {
/** Called when the activity is first created. */
@Override
public void onCreate(Bundle savedInstanceState) {
super.onCreate(savedInstanceState);
setContentView(R.layout.main);
CheckEnableGPS();
}
private void CheckEnableGPS(){
String provider = Settings.Secure.getString(getContentResolver(),
Settings.Secure.LOCATION_PROVIDERS_ALLOWED);
if(!provider.equals("")){
//GPS Enabled
Toast.makeText(AndroidEnableGPS.this, "GPS Enabled: " + provider,
Toast.LENGTH_LONG).show();
}else{
Intent intent = new Intent(Settings.ACTION_SECURITY_SETTINGS);
startActivity(intent);
}
}
}
Download the files.
Tuesday, October 19, 2010
Update Widget in onReceive() method
In my previous exercise of App Widget (Refer "App Widget using Alarm Manager" and "Cancel Alarm Service in onDisabled()"), Alarm Service was used t trigger onReceive() method of AppWidgetProvider object. It simple prompt user with a Toast only, without update widgets. This exercise, onReceive() method will update widgets.
In order to retrieve the list of appWidgetIds, the following code can be used:
then call onUpdate() method to update all widgets.
HelloWidgetProvider.java
Download the files.
In order to retrieve the list of appWidgetIds, the following code can be used:
ComponentName thisAppWidget = new ComponentName(context.getPackageName(), HelloWidgetProvider.class.getName());
int[] appWidgetIds = appWidgetManager.getAppWidgetIds(thisAppWidget);
then call onUpdate() method to update all widgets.
HelloWidgetProvider.java
package com.exercise.HelloWidget;
import java.text.SimpleDateFormat;
import java.util.Date;
import android.app.AlarmManager;
import android.app.PendingIntent;
import android.appwidget.AppWidgetManager;
import android.appwidget.AppWidgetProvider;
import android.content.ComponentName;
import android.content.Context;
import android.content.Intent;
import android.os.Bundle;
import android.widget.RemoteViews;
import android.widget.Toast;
public class HelloWidgetProvider extends AppWidgetProvider {
static AlarmManager myAlarmManager;
static PendingIntent myPendingIntent;
private static SimpleDateFormat formatter = new SimpleDateFormat("dd MMM yyyy hh:mm:ss a");
static String strWidgetText = "";
public static String MY_WIDGET_UPDATE = "MY_OWN_WIDGET_UPDATE";
@Override
public void onReceive(Context context, Intent intent) {
// TODO Auto-generated method stub
super.onReceive(context, intent);
if(MY_WIDGET_UPDATE.equals(intent.getAction())){
Bundle extras = intent.getExtras();
if(extras!=null) {
AppWidgetManager appWidgetManager = AppWidgetManager.getInstance(context);
ComponentName thisAppWidget = new ComponentName(context.getPackageName(), HelloWidgetProvider.class.getName());
int[] appWidgetIds = appWidgetManager.getAppWidgetIds(thisAppWidget);
onUpdate(context, appWidgetManager, appWidgetIds);
}
//Toast.makeText(context, "onReceiver()", Toast.LENGTH_LONG).show();
}
}
@Override
public void onDeleted(Context context, int[] appWidgetIds) {
// TODO Auto-generated method stub
//super.onDeleted(context, appWidgetIds);
Toast.makeText(context, "onDeleted()", Toast.LENGTH_LONG).show();
}
@Override
public void onDisabled(Context context) {
// TODO Auto-generated method stub
//super.onDisabled(context);
myAlarmManager.cancel(myPendingIntent);
Toast.makeText(context, "onDisabled()", Toast.LENGTH_LONG).show();
}
@Override
public void onEnabled(Context context) {
// TODO Auto-generated method stub
//super.onEnabled(context);
Toast.makeText(context, "onEnabled()", Toast.LENGTH_LONG).show();
}
@Override
public void onUpdate(Context context, AppWidgetManager appWidgetManager,
int[] appWidgetIds) {
// TODO Auto-generated method stub
super.onUpdate(context, appWidgetManager, appWidgetIds);
final int N = appWidgetIds.length;
for (int i=0; i<N; i++) {
int appWidgetId = appWidgetIds[i];
updateAppWidget(context, appWidgetManager, appWidgetId);
Toast.makeText(context, "onUpdate(): " + String.valueOf(i) + " : " + String.valueOf(appWidgetId), Toast.LENGTH_LONG).show();
}
}
public static void updateAppWidget(Context context, AppWidgetManager appWidgetManager,
int appWidgetId){
String currentTime = formatter.format(new Date());
strWidgetText = currentTime;
RemoteViews updateViews = new RemoteViews(context.getPackageName(), R.layout.hellowidget_layout);
updateViews.setTextViewText(R.id.widgettext, "[" + String.valueOf(appWidgetId) + "]" + strWidgetText);
appWidgetManager.updateAppWidget(appWidgetId, updateViews);
Toast.makeText(context, "updateAppWidget(): " + String.valueOf(appWidgetId) + "\n" + strWidgetText, Toast.LENGTH_LONG).show();
}
static void SaveAlarmManager(AlarmManager tAlarmManager, PendingIntent tPendingIntent)
{
myAlarmManager = tAlarmManager;
myPendingIntent = tPendingIntent;
}
}
Download the files.
Monday, October 18, 2010
Cancel Alarm Service in onDisabled()
It's a follow-up work on last exercise "App Widget using Alarm Manager". As mentioned, the code haven't cancel the Alarm Service when all widgets removed from home screen. It's can be done in onDisabled() method of AppWidgetProvider.
First of all, we have to pass the value of alarmManager and pendingIntent to HelloWidgetProvider(which extends AppWidgetProvider) when created in HelloWidgetConfig(the configure activity).
In configOkButtonOnClickListener.onClick() of HelloWidgetConfig.java, add the code to pass the value of alarmManager and pendingIntent to HelloWidgetProvider()
In HelloWidgetProvider.java, define static instance of AlarmManager and PendingIntent. Implement a method SaveAlarmManager() to sve the values, it will be called from HelloWidgetConfig.java.
Override onDisabled() method to cancel the alarm service.
next: Update Widget in onReceive() method
First of all, we have to pass the value of alarmManager and pendingIntent to HelloWidgetProvider(which extends AppWidgetProvider) when created in HelloWidgetConfig(the configure activity).
In configOkButtonOnClickListener.onClick() of HelloWidgetConfig.java, add the code to pass the value of alarmManager and pendingIntent to HelloWidgetProvider()
private Button.OnClickListener configOkButtonOnClickListener
= new Button.OnClickListener(){
@Override
public void onClick(View arg0) {
// TODO Auto-generated method stub
final Context context = HelloWidgetConfig.this;
AppWidgetManager appWidgetManager = AppWidgetManager.getInstance(context);
//RemoteViews views = new RemoteViews(context.getPackageName(), R.layout.hellowidget_layout);
//appWidgetManager.updateAppWidget(mAppWidgetId, views);
HelloWidgetProvider.updateAppWidget(context, appWidgetManager, mAppWidgetId);
Toast.makeText(context, "HelloWidgetConfig.onClick(): " + String.valueOf(mAppWidgetId) , Toast.LENGTH_LONG).show();
//prepare Alarm Service to trigger Widget
Intent intent = new Intent(HelloWidgetProvider.MY_WIDGET_UPDATE);
pendingIntent = PendingIntent.getBroadcast(HelloWidgetConfig.this, 0, intent, 0);
AlarmManager alarmManager = (AlarmManager)getSystemService(ALARM_SERVICE);
Calendar calendar = Calendar.getInstance();
calendar.setTimeInMillis(System.currentTimeMillis());
calendar.add(Calendar.SECOND, 10);
alarmManager.setRepeating(AlarmManager.RTC_WAKEUP, calendar.getTimeInMillis(), 20*1000, pendingIntent);
HelloWidgetProvider.SaveAlarmManager(alarmManager, pendingIntent);
Intent resultValue = new Intent();
resultValue.putExtra(AppWidgetManager.EXTRA_APPWIDGET_ID, mAppWidgetId);
setResult(RESULT_OK, resultValue);
finish();
}
In HelloWidgetProvider.java, define static instance of AlarmManager and PendingIntent. Implement a method SaveAlarmManager() to sve the values, it will be called from HelloWidgetConfig.java.
Override onDisabled() method to cancel the alarm service.
static AlarmManager myAlarmManager;
static PendingIntent myPendingIntent;
@Override
public void onDisabled(Context context) {
// TODO Auto-generated method stub
//super.onDisabled(context);
myAlarmManager.cancel(myPendingIntent);
Toast.makeText(context, "onDisabled()", Toast.LENGTH_LONG).show();
}
static void SaveAlarmManager(AlarmManager tAlarmManager, PendingIntent tPendingIntent)
{
myAlarmManager = tAlarmManager;
myPendingIntent = tPendingIntent;
}
next: Update Widget in onReceive() method
Friday, October 15, 2010
App Widget using Alarm Manager
In the old exercise "A simple Home Screen App Widget with configure activity", it have a minimum rate of 30 minutes in android:updatePeriodMillis. In order to make the Home Screen App Widget do something faster than 30 minutes, Alarm Manager can be used.
In the preiouse exercise "Schedule a repeating alarm", we know how to triger a repeating service using Alarm Manager. It will be used here to trigger the onReceive() method of the AppWidgetProvider.
Modify AndroidManifest.xml to add a new custom intent-filter, "MY_OWN_WIDGET_UPDATE".
Modify HelloWidgetProvider.java to implement onReceive() method, to handle the "MY_OWN_WIDGET_UPDATE" action.
Modify HelloWidgetConfig.java to start Alarm Manager.
Known Issues:
Please note that it's a simple exercise to implement App Widget using Alarm Manager, not a completed code. There are some issues:
- It's strongly recommanded that NOT to set Widget in such high repeating rate if not necessage, otherwise your battery will go low soon.
- The exercise haven't cancel the Alarm Service, it will not stop even all the Widget removed from Home Screen. (Refer to the article: Cancel Alarm Service in onDisabled()).
- There are no appWidgetManager and appWidgetId passed to onReceive() method, how to handle the individual Widget is another issue. (Refer to the article: Update Widget in onReceive() method).
In the preiouse exercise "Schedule a repeating alarm", we know how to triger a repeating service using Alarm Manager. It will be used here to trigger the onReceive() method of the AppWidgetProvider.
Modify AndroidManifest.xml to add a new custom intent-filter, "MY_OWN_WIDGET_UPDATE".
<?xml version="1.0" encoding="utf-8"?>
<manifest xmlns:android="http://schemas.android.com/apk/res/android"
package="com.exercise.HelloWidget"
android:versionCode="1"
android:versionName="1.0">
<application android:icon="@drawable/icon" android:label="@string/app_name">
<receiver android:name="HelloWidgetProvider" >
<intent-filter>
<action android:name="android.appwidget.action.APPWIDGET_UPDATE" />
</intent-filter>
<intent-filter>
<action android:name="MY_OWN_WIDGET_UPDATE" />
</intent-filter>
<meta-data android:name="android.appwidget.provider"
android:resource="@xml/hellowidgetproviderinfo" />
</receiver>
<activity android:name=".HelloWidgetConfig"
android:label="Hello Widget Config">
<intent-filter>
<action android:name="android.appwidget.action.APPWIDGET_CONFIGURE" />
</intent-filter>
</activity>
</application>
<uses-sdk android:minSdkVersion="7" />
</manifest>
Modify HelloWidgetProvider.java to implement onReceive() method, to handle the "MY_OWN_WIDGET_UPDATE" action.
package com.exercise.HelloWidget;
import java.text.SimpleDateFormat;
import java.util.Date;
import android.appwidget.AppWidgetManager;
import android.appwidget.AppWidgetProvider;
import android.content.Context;
import android.content.Intent;
import android.widget.RemoteViews;
import android.widget.Toast;
public class HelloWidgetProvider extends AppWidgetProvider {
private static SimpleDateFormat formatter = new SimpleDateFormat("dd MMM yyyy hh:mm:ss a");
static String strWidgetText = "";
public static String MY_WIDGET_UPDATE = "MY_OWN_WIDGET_UPDATE";
@Override
public void onReceive(Context context, Intent intent) {
// TODO Auto-generated method stub
super.onReceive(context, intent);
if(MY_WIDGET_UPDATE.equals(intent.getAction())){
Toast.makeText(context, "onReceiver()", Toast.LENGTH_LONG).show();
}
}
@Override
public void onDeleted(Context context, int[] appWidgetIds) {
// TODO Auto-generated method stub
//super.onDeleted(context, appWidgetIds);
Toast.makeText(context, "onDeleted()", Toast.LENGTH_LONG).show();
}
@Override
public void onDisabled(Context context) {
// TODO Auto-generated method stub
//super.onDisabled(context);
Toast.makeText(context, "onDisabled()", Toast.LENGTH_LONG).show();
}
@Override
public void onEnabled(Context context) {
// TODO Auto-generated method stub
//super.onEnabled(context);
Toast.makeText(context, "onEnabled()", Toast.LENGTH_LONG).show();
}
@Override
public void onUpdate(Context context, AppWidgetManager appWidgetManager,
int[] appWidgetIds) {
// TODO Auto-generated method stub
super.onUpdate(context, appWidgetManager, appWidgetIds);
final int N = appWidgetIds.length;
for (int i=0; i<N; i++) {
int appWidgetId = appWidgetIds[i];
updateAppWidget(context, appWidgetManager, appWidgetId);
Toast.makeText(context, "onUpdate(): " + String.valueOf(i) + " : " + String.valueOf(appWidgetId), Toast.LENGTH_LONG).show();
}
}
public static void updateAppWidget(Context context, AppWidgetManager appWidgetManager,
int appWidgetId){
String currentTime = formatter.format(new Date());
strWidgetText = currentTime;
RemoteViews updateViews = new RemoteViews(context.getPackageName(), R.layout.hellowidget_layout);
updateViews.setTextViewText(R.id.widgettext, "[" + String.valueOf(appWidgetId) + "]" + strWidgetText);
appWidgetManager.updateAppWidget(appWidgetId, updateViews);
Toast.makeText(context, "updateAppWidget(): " + String.valueOf(appWidgetId) + "\n" + strWidgetText, Toast.LENGTH_LONG).show();
}
}
Modify HelloWidgetConfig.java to start Alarm Manager.
package com.exercise.HelloWidget;
import java.util.Calendar;
import android.app.Activity;
import android.app.AlarmManager;
import android.app.PendingIntent;
import android.appwidget.AppWidgetManager;
import android.content.Context;
import android.content.Intent;
import android.os.Bundle;
import android.view.View;
import android.widget.Button;
import android.widget.Toast;
public class HelloWidgetConfig extends Activity {
Button configOkButton;
int mAppWidgetId = AppWidgetManager.INVALID_APPWIDGET_ID;
@Override
protected void onCreate(Bundle savedInstanceState) {
// TODO Auto-generated method stub
super.onCreate(savedInstanceState);
setResult(RESULT_CANCELED);
setContentView(R.layout.config);
configOkButton = (Button)findViewById(R.id.okconfig);
configOkButton.setOnClickListener(configOkButtonOnClickListener);
Intent intent = getIntent();
Bundle extras = intent.getExtras();
if (extras != null) {
mAppWidgetId = extras.getInt(
AppWidgetManager.EXTRA_APPWIDGET_ID,
AppWidgetManager.INVALID_APPWIDGET_ID);
}
// If they gave us an intent without the widget id, just bail.
if (mAppWidgetId == AppWidgetManager.INVALID_APPWIDGET_ID) {
finish();
}
}
private Button.OnClickListener configOkButtonOnClickListener
= new Button.OnClickListener(){
@Override
public void onClick(View arg0) {
// TODO Auto-generated method stub
final Context context = HelloWidgetConfig.this;
AppWidgetManager appWidgetManager = AppWidgetManager.getInstance(context);
//RemoteViews views = new RemoteViews(context.getPackageName(), R.layout.hellowidget_layout);
//appWidgetManager.updateAppWidget(mAppWidgetId, views);
HelloWidgetProvider.updateAppWidget(context, appWidgetManager, mAppWidgetId);
Toast.makeText(context, "HelloWidgetConfig.onClick(): " + String.valueOf(mAppWidgetId) , Toast.LENGTH_LONG).show();
//prepare Alarm Service to trigger Widget
Intent intent = new Intent(HelloWidgetProvider.MY_WIDGET_UPDATE);
PendingIntent pendingIntent = PendingIntent.getBroadcast(HelloWidgetConfig.this, 0, intent, 0);
AlarmManager alarmManager = (AlarmManager)getSystemService(ALARM_SERVICE);
Calendar calendar = Calendar.getInstance();
calendar.setTimeInMillis(System.currentTimeMillis());
calendar.add(Calendar.SECOND, 10);
alarmManager.setRepeating(AlarmManager.RTC_WAKEUP, calendar.getTimeInMillis(), 20*1000, pendingIntent);
Intent resultValue = new Intent();
resultValue.putExtra(AppWidgetManager.EXTRA_APPWIDGET_ID, mAppWidgetId);
setResult(RESULT_OK, resultValue);
finish();
}};
}
Known Issues:
Please note that it's a simple exercise to implement App Widget using Alarm Manager, not a completed code. There are some issues:
- It's strongly recommanded that NOT to set Widget in such high repeating rate if not necessage, otherwise your battery will go low soon.
- The exercise haven't cancel the Alarm Service, it will not stop even all the Widget removed from Home Screen. (Refer to the article: Cancel Alarm Service in onDisabled()).
- There are no appWidgetManager and appWidgetId passed to onReceive() method, how to handle the individual Widget is another issue. (Refer to the article: Update Widget in onReceive() method).
Thursday, October 14, 2010
Schedule a repeating alarm
In the last exercise "A simple example of Alarm Service, using AlarmManager" implement a Alarm Service with a one shoot alarm. It will be modified here to have a repeating alarm in duration of 5 seconds.
Just modify the code alarmManager.set(AlarmManager.RTC_WAKEUP, calendar.getTimeInMillis(), pendingIntent) in AndroidAlarmService class to alarmManager.setRepeating(AlarmManager.RTC_WAKEUP, calendar.getTimeInMillis(), 5*1000, pendingIntent).
public void setRepeating (int type, long triggerAtTime, long interval, PendingIntent operation), like set(int, long, PendingIntent), except you can also supply a rate at which the alarm will repeat.
Related article:
- App Widget using Alarm Manager
Just modify the code alarmManager.set(AlarmManager.RTC_WAKEUP, calendar.getTimeInMillis(), pendingIntent) in AndroidAlarmService class to alarmManager.setRepeating(AlarmManager.RTC_WAKEUP, calendar.getTimeInMillis(), 5*1000, pendingIntent).
public void onClick(View arg0) {
// TODO Auto-generated method stub
Intent myIntent = new Intent(AndroidAlarmService.this, MyAlarmService.class);
pendingIntent = PendingIntent.getService(AndroidAlarmService.this, 0, myIntent, 0);
AlarmManager alarmManager = (AlarmManager)getSystemService(ALARM_SERVICE);
Calendar calendar = Calendar.getInstance();
calendar.setTimeInMillis(System.currentTimeMillis());
calendar.add(Calendar.SECOND, 10);
//alarmManager.set(AlarmManager.RTC_WAKEUP, calendar.getTimeInMillis(), pendingIntent);
alarmManager.setRepeating(AlarmManager.RTC_WAKEUP, calendar.getTimeInMillis(), 5*1000, pendingIntent);
Toast.makeText(AndroidAlarmService.this, "Start Alarm", Toast.LENGTH_LONG).show();
}});
public void setRepeating (int type, long triggerAtTime, long interval, PendingIntent operation), like set(int, long, PendingIntent), except you can also supply a rate at which the alarm will repeat.
Related article:
- App Widget using Alarm Manager
Wednesday, October 13, 2010
A simple example of Alarm Service, using AlarmManager
AlarmManager class provides access to the system alarm services. These allow you to schedule your application to be run at some point in the future. When an alarm goes off, the Intent that had been registered for it is broadcast by the system, automatically starting the target application if it is not already running.
In this exercise, a scheduled alarm of 10 seconds will start a service, MyAlarmService.
Modify main.xml to have two button to start and cancel the alarm.
AndroidAlarmService.java, the main activity.
MyAlarmService.java, it will be started in 10 seconds triggered by AlarmManager
Finally, modify AndroidManifest.xml to have our MyAlarmService listed as service.
Download the files.
Related articles:
- Schedule a repeating alarm
- App Widget using Alarm Manager
- Send SMS in Alarm Service at a pre-defined time
- Using AlarmManager to start a Scheduled Activity
In this exercise, a scheduled alarm of 10 seconds will start a service, MyAlarmService.
Modify main.xml to have two button to start and cancel the alarm.
<?xml version="1.0" encoding="utf-8"?>
<LinearLayout xmlns:android="http://schemas.android.com/apk/res/android"
android:orientation="vertical"
android:layout_width="fill_parent"
android:layout_height="fill_parent"
>
<TextView
android:layout_width="fill_parent"
android:layout_height="wrap_content"
android:text="@string/hello"
/>
<Button
android:id="@+id/startalarm"
android:layout_width="fill_parent"
android:layout_height="wrap_content"
android:text="Start"
/>
<Button
android:id="@+id/cancelalarm"
android:layout_width="fill_parent"
android:layout_height="wrap_content"
android:text="Cancel"
/>
</LinearLayout>
AndroidAlarmService.java, the main activity.
package com.exercise.AndroidAlarmService;
import java.util.Calendar;
import android.app.Activity;
import android.app.AlarmManager;
import android.app.PendingIntent;
import android.content.Intent;
import android.os.Bundle;
import android.os.SystemClock;
import android.view.View;
import android.widget.Button;
import android.widget.Toast;
public class AndroidAlarmService extends Activity {
private PendingIntent pendingIntent;
/** Called when the activity is first created. */
@Override
public void onCreate(Bundle savedInstanceState) {
super.onCreate(savedInstanceState);
setContentView(R.layout.main);
Button buttonStart = (Button)findViewById(R.id.startalarm);
Button buttonCancel = (Button)findViewById(R.id.cancelalarm);
buttonStart.setOnClickListener(new Button.OnClickListener(){
@Override
public void onClick(View arg0) {
// TODO Auto-generated method stub
Intent myIntent = new Intent(AndroidAlarmService.this, MyAlarmService.class);
pendingIntent = PendingIntent.getService(AndroidAlarmService.this, 0, myIntent, 0);
AlarmManager alarmManager = (AlarmManager)getSystemService(ALARM_SERVICE);
Calendar calendar = Calendar.getInstance();
calendar.setTimeInMillis(System.currentTimeMillis());
calendar.add(Calendar.SECOND, 10);
alarmManager.set(AlarmManager.RTC_WAKEUP, calendar.getTimeInMillis(), pendingIntent);
Toast.makeText(AndroidAlarmService.this, "Start Alarm", Toast.LENGTH_LONG).show();
}});
buttonCancel.setOnClickListener(new Button.OnClickListener(){
@Override
public void onClick(View arg0) {
// TODO Auto-generated method stub
AlarmManager alarmManager = (AlarmManager)getSystemService(ALARM_SERVICE);
alarmManager.cancel(pendingIntent);
// Tell the user about what we did.
Toast.makeText(AndroidAlarmService.this, "Cancel!", Toast.LENGTH_LONG).show();
}});
}
}
MyAlarmService.java, it will be started in 10 seconds triggered by AlarmManager
package com.exercise.AndroidAlarmService;
import android.app.Service;
import android.content.Intent;
import android.os.IBinder;
import android.widget.Toast;
public class MyAlarmService extends Service {
@Override
public void onCreate() {
// TODO Auto-generated method stub
Toast.makeText(this, "MyAlarmService.onCreate()", Toast.LENGTH_LONG).show();
}
@Override
public IBinder onBind(Intent intent) {
// TODO Auto-generated method stub
Toast.makeText(this, "MyAlarmService.onBind()", Toast.LENGTH_LONG).show();
return null;
}
@Override
public void onDestroy() {
// TODO Auto-generated method stub
super.onDestroy();
Toast.makeText(this, "MyAlarmService.onDestroy()", Toast.LENGTH_LONG).show();
}
@Override
public void onStart(Intent intent, int startId) {
// TODO Auto-generated method stub
super.onStart(intent, startId);
Toast.makeText(this, "MyAlarmService.onStart()", Toast.LENGTH_LONG).show();
}
@Override
public boolean onUnbind(Intent intent) {
// TODO Auto-generated method stub
Toast.makeText(this, "MyAlarmService.onUnbind()", Toast.LENGTH_LONG).show();
return super.onUnbind(intent);
}
}
Finally, modify AndroidManifest.xml to have our MyAlarmService listed as service.
<?xml version="1.0" encoding="utf-8"?>
<manifest xmlns:android="http://schemas.android.com/apk/res/android"
package="com.exercise.AndroidAlarmService"
android:versionCode="1"
android:versionName="1.0">
<application android:icon="@drawable/icon" android:label="@string/app_name">
<activity android:name=".AndroidAlarmService"
android:label="@string/app_name">
<intent-filter>
<action android:name="android.intent.action.MAIN" />
<category android:name="android.intent.category.LAUNCHER" />
</intent-filter>
</activity>
<service android:name=".MyAlarmService" />
</application>
<uses-sdk android:minSdkVersion="4" />
</manifest>
Download the files.
Related articles:
- Schedule a repeating alarm
- App Widget using Alarm Manager
- Send SMS in Alarm Service at a pre-defined time
- Using AlarmManager to start a Scheduled Activity
Friday, October 8, 2010
How to create sub-folder in SD Card, using Java code
If you want to create sub-folder in SD Card using Java code, you can use the mkdir() method of java.io.File class.
ex.
And also, AndroidManifest.xml have to be modify to add permission of "android.permission.WRITE_EXTERNAL_STORAGE"
Related Article:
- Save file to SD Card
- How to create sub-folder in SD Card of Android Emulator, using adb
If you want to create sub-folder in SD Card using Java code, you can use the mkdir() method of java.io.File class.
ex.
String newFolder = "/myFolder2";
String extStorageDirectory = Environment.getExternalStorageDirectory().toString();
File myNewFolder = new File(extStorageDirectory + newFolder);
myNewFolder.mkdir();
And also, AndroidManifest.xml have to be modify to add permission of "android.permission.WRITE_EXTERNAL_STORAGE"
<?xml version="1.0" encoding="utf-8"?>
<manifest xmlns:android="http://schemas.android.com/apk/res/android"
package="com.exercise.AndroidNewFolder"
android:versionCode="1"
android:versionName="1.0">
<application android:icon="@drawable/icon" android:label="@string/app_name">
<activity android:name=".AndroidNewFolder"
android:label="@string/app_name">
<intent-filter>
<action android:name="android.intent.action.MAIN" />
<category android:name="android.intent.category.LAUNCHER" />
</intent-filter>
</activity>
</application>
<uses-sdk android:minSdkVersion="4" />
<uses-permission android:name="android.permission.WRITE_EXTERNAL_STORAGE" />
</manifest>
Related Article:
- Save file to SD Card
- How to create sub-folder in SD Card of Android Emulator, using adb
How to create sub-folder in SD Card of Android Emulator, using adb
If you want to create sub-folder in SD Card of Android Emulator, Android Debug Bridge(adb) can be used. Android Debug Bridge(adb) is a versatile tool lets you manage the state of an emulator instance or Android-powered device.
With Android Emulator running, start a Terminal (in Linux), switch to the <android sdk>/tools folder. type the command:
$./adb shell "mkdir /sdcard/myFolder"
where:
<android sdk> is the location of your installed android sdk.
myFolder is the folder you want to create.
Related article: Create SD Card in Android Emulator and copy files into, in Eclipse, Emulator and DDMS.
Thursday, October 7, 2010
android.app.Service
android.app.Service is an application component representing either an application's desire to perform a longer-running operation while not interacting with the user or to supply functionality for other applications to use. Each service class must have a corresponding
This exercise is a simple app with a dummy Local Service. Through the exercise, what can be noted are the life-cycle of a Service, how to link with Service with Start Service, Stop Service, Bind Service and Unbind Service, also the steps to implement the app with Service.
Create a New Android Application as normal, with the main activity AndroidService.
Create a new class MyService extends Service. It's our service.
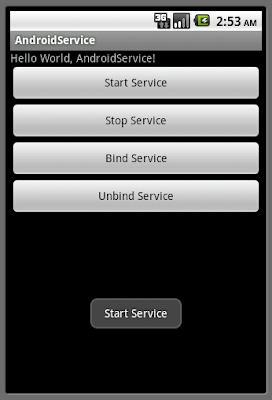
Modify main.xml to have four button to involve our expected task, Start Service, Stop Service, Bind Service and Unbind Service.
Modify the main activity, AndroidService.java.
In with, ServiceConnection is the interface for monitoring the state of an application service.
Finally, modify AndroidManifest.xml to add the <service> element.
Download the files.
declaration in its package's AndroidManifest.xml
. Services can be started with Context.startService()
and Context.bindService()
. (Ref: Service | Android Developers)This exercise is a simple app with a dummy Local Service. Through the exercise, what can be noted are the life-cycle of a Service, how to link with Service with Start Service, Stop Service, Bind Service and Unbind Service, also the steps to implement the app with Service.
Create a New Android Application as normal, with the main activity AndroidService.
Create a new class MyService extends Service. It's our service.
package com.exercise.AndroidService;
import android.app.Service;
import android.content.Intent;
import android.os.Binder;
import android.os.IBinder;
import android.widget.Toast;
public class MyService extends Service {
@Override
public IBinder onBind(Intent arg0) {
// TODO Auto-generated method stub
Toast.makeText(this,
"-MyService.onBind()-", Toast.LENGTH_LONG).show();
return null;
}
@Override
public void onCreate() {
// TODO Auto-generated method stub
Toast.makeText(this,
"-MyService.onCreate()-", Toast.LENGTH_LONG).show();
}
@Override
public void onDestroy() {
// TODO Auto-generated method stub
Toast.makeText(this,
"-MyService.onDestroy()-", Toast.LENGTH_LONG).show();
}
@Override
public void onRebind(Intent intent) {
// TODO Auto-generated method stub
Toast.makeText(this,
"-MyService.onRebind()-", Toast.LENGTH_LONG).show();
}
@Override
public void onStart(Intent intent, int startId) {
// TODO Auto-generated method stub
Toast.makeText(this,
"-MyService.onStart()-", Toast.LENGTH_LONG).show();
}
@Override
public boolean onUnbind(Intent intent) {
// TODO Auto-generated method stub
Toast.makeText(this,
"-MyService.onUnbind()-", Toast.LENGTH_LONG).show();
return false;
}
public class LocalBinder extends Binder{
MyService getService(){
return MyService.this;
}
}
}
Modify main.xml to have four button to involve our expected task, Start Service, Stop Service, Bind Service and Unbind Service.
<?xml version="1.0" encoding="utf-8"?>
<LinearLayout xmlns:android="http://schemas.android.com/apk/res/android"
android:orientation="vertical"
android:layout_width="fill_parent"
android:layout_height="fill_parent"
>
<TextView
android:layout_width="fill_parent"
android:layout_height="wrap_content"
android:text="@string/hello"
/>
<Button
android:id="@+id/startservice"
android:layout_width="fill_parent"
android:layout_height="wrap_content"
android:text="Start Service"
/>
<Button
android:id="@+id/stopservice"
android:layout_width="fill_parent"
android:layout_height="wrap_content"
android:text="Stop Service"
/>
<Button
android:id="@+id/bindservice"
android:layout_width="fill_parent"
android:layout_height="wrap_content"
android:text="Bind Service"
/>
<Button
android:id="@+id/unbindservice"
android:layout_width="fill_parent"
android:layout_height="wrap_content"
android:text="Unbind Service"
/>
</LinearLayout>
Modify the main activity, AndroidService.java.
package com.exercise.AndroidService;
import android.app.Activity;
import android.content.ComponentName;
import android.content.Context;
import android.content.Intent;
import android.content.ServiceConnection;
import android.os.Bundle;
import android.os.IBinder;
import android.view.View;
import android.widget.Button;
import android.widget.Toast;
public class AndroidService extends Activity {
private MyService myService;
private boolean serviceIsBinding;
/** Called when the activity is first created. */
@Override
public void onCreate(Bundle savedInstanceState) {
super.onCreate(savedInstanceState);
setContentView(R.layout.main);
Button buttonStartService = (Button)findViewById(R.id.startservice);
Button buttonStopService = (Button)findViewById(R.id.stopservice);
Button buttonBindService = (Button)findViewById(R.id.bindservice);
Button buttonUnbindService = (Button)findViewById(R.id.unbindservice);
buttonStartService.setOnClickListener(new Button.OnClickListener(){
@Override
public void onClick(View v) {
// TODO Auto-generated method stub
startService();
Toast.makeText(AndroidService.this,
"Start Service", Toast.LENGTH_LONG).show();
}});
buttonStopService.setOnClickListener(new Button.OnClickListener(){
@Override
public void onClick(View v) {
// TODO Auto-generated method stub
stopService();
Toast.makeText(AndroidService.this,
"Stop Service", Toast.LENGTH_LONG).show();
}});
buttonBindService.setOnClickListener(new Button.OnClickListener(){
@Override
public void onClick(View v) {
// TODO Auto-generated method stub
bindService();
Toast.makeText(AndroidService.this,
"Bind Service", Toast.LENGTH_LONG).show();
}});
buttonUnbindService.setOnClickListener(new Button.OnClickListener(){
@Override
public void onClick(View v) {
// TODO Auto-generated method stub
unbindService();
Toast.makeText(AndroidService.this,
"Unbind Service", Toast.LENGTH_LONG).show();
}});
}
private ServiceConnection serviceConnection = new ServiceConnection(){
@Override
public void onServiceConnected(ComponentName arg0, IBinder arg1) {
// TODO Auto-generated method stub
myService = ((MyService.LocalBinder)arg1).getService();
Toast.makeText(AndroidService.this,
"onServiceConnected()", Toast.LENGTH_LONG).show();
}
@Override
public void onServiceDisconnected(ComponentName arg0) {
// TODO Auto-generated method stub
myService = null;
Toast.makeText(AndroidService.this,
"onServiceDisconnected()", Toast.LENGTH_LONG).show();
}};
private void startService(){
Intent intentService = new Intent(this, MyService.class);
this.startService(intentService);
}
private void stopService(){
Intent intentService = new Intent(this, MyService.class);
this.stopService(intentService);
}
private void bindService(){
Intent intentService = new Intent(this, MyService.class);
bindService(intentService, serviceConnection, Context.BIND_AUTO_CREATE);
serviceIsBinding = true;
}
private void unbindService(){
if(serviceIsBinding){
unbindService(serviceConnection);
serviceIsBinding = false;
}
}
}
In with, ServiceConnection is the interface for monitoring the state of an application service.
Finally, modify AndroidManifest.xml to add the <service> element.
<?xml version="1.0" encoding="utf-8"?>
<manifest xmlns:android="http://schemas.android.com/apk/res/android"
package="com.exercise.AndroidService"
android:versionCode="1"
android:versionName="1.0">
<application android:icon="@drawable/icon" android:label="@string/app_name">
<activity android:name=".AndroidService"
android:label="@string/app_name">
<intent-filter>
<action android:name="android.intent.action.MAIN" />
<category android:name="android.intent.category.LAUNCHER" />
</intent-filter>
</activity>
<service android:enabled="true" android:name="MyService"></service>
</application>
<uses-sdk android:minSdkVersion="7" />
</manifest>
Download the files.
Tuesday, October 5, 2010
Notes on updatePeriodMillis in Home App Widget
updatePeriodMillis in Widget Provider Information XML file define How often, in milliseconds, that this AppWidget wants to be updated. The AppWidget manager may place a limit on how often a AppWidget is updated.
If you tried and run the exercise in "A simple Home Screen App Widget with configure activity", it can be noted that:
- The updatePeriodMillis attribute defines how often the App Widget framework should request an update from the AppWidgetProvider by calling the onUpdate() method. The actual update is not guaranteed to occur exactly on time with this value. Refer "App Widget using Alarm Manager" to implement App Widget with higher rate.
- Updates requested with updatePeriodMillis will not be delivered more than once every 30 minutes.
- Only one updatePeriodMillis schedule will be managed for all instances of the App Widget. For example, if the update schedule is defined to be every two hours, and a second instance of the App Widget is added one hour after the first one, then they will both be updated on the period defined by the first one and the second update period will be ignored (they'll both be updated every two hours, not every hour).
Sunday, October 3, 2010
A simple Home Screen App Widget with configure activity
In the former article "A simple Home Screen App Widget to get Date/Time", we have a very minimal widget: simple self-described as a widget with update duration, then update the widget with current time. In the exercise, no configure activity have been defined; such that the update() method of the provider activity will be call when add the widget in home screen, and when update period is reached.
In this exercise, a configure activity wil be implemented; the onCreate() method of the configure activity will be called when the widget is added on home screen. And also, the onUpdate() method of the HelloWidgetProvider cass (extends AppWidgetProvider) will be modified to handle each appWidgetIds separately.
Modify onUpdate() of HelloWidgetProvider.java, and implemented updateAppWidget() method which will be called by onUpdate() and the new added configure activity.
onUpdate() includes a loop that iterates through each entry in appWidgetIds, which is an array of IDs that identify each App Widget created by this provider. In this way, if the user creates more than one instance of the App Widget, then they are all updated simultaneously.
Implement /res/layout/config.xml which is the layout of the configure activity
Implement the configure activity, HelloWidgetConfig extends Activity. Actually, it do nothing except prompt the user to click on the OK button.
Modify hellowidgetproviderinfo.xml to include android:configure="com.exercise.HelloWidget.HelloWidgetConfig"
Modify AndroidManifest.xml to add HelloWidgetConfig as a activity with intent-filter of "android.appwidget.action.APPWIDGET_CONFIGURE".
Download the files.
Related Article:
- Notes on updatePeriodMillis in Home App Widget
- App Widget using Alarm Manager
Reference: Android Developers - App Widgets
In this exercise, a configure activity wil be implemented; the onCreate() method of the configure activity will be called when the widget is added on home screen. And also, the onUpdate() method of the HelloWidgetProvider cass (extends AppWidgetProvider) will be modified to handle each appWidgetIds separately.
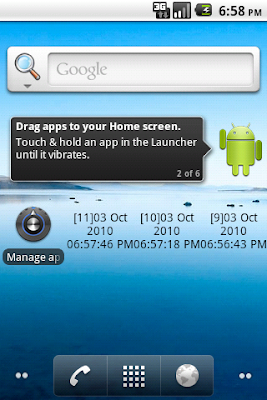
Modify onUpdate() of HelloWidgetProvider.java, and implemented updateAppWidget() method which will be called by onUpdate() and the new added configure activity.
onUpdate() includes a loop that iterates through each entry in appWidgetIds, which is an array of IDs that identify each App Widget created by this provider. In this way, if the user creates more than one instance of the App Widget, then they are all updated simultaneously.
package com.exercise.HelloWidget;
import java.text.SimpleDateFormat;
import java.util.Date;
import android.appwidget.AppWidgetManager;
import android.appwidget.AppWidgetProvider;
import android.content.Context;
import android.widget.RemoteViews;
import android.widget.Toast;
public class HelloWidgetProvider extends AppWidgetProvider {
private static SimpleDateFormat formatter = new SimpleDateFormat("dd MMM yyyy hh:mm:ss a");
static String strWidgetText = "";
@Override
public void onDeleted(Context context, int[] appWidgetIds) {
// TODO Auto-generated method stub
//super.onDeleted(context, appWidgetIds);
Toast.makeText(context, "onDeleted()", Toast.LENGTH_LONG).show();
}
@Override
public void onDisabled(Context context) {
// TODO Auto-generated method stub
//super.onDisabled(context);
Toast.makeText(context, "onDisabled()", Toast.LENGTH_LONG).show();
}
@Override
public void onEnabled(Context context) {
// TODO Auto-generated method stub
//super.onEnabled(context);
Toast.makeText(context, "onEnabled()", Toast.LENGTH_LONG).show();
}
@Override
public void onUpdate(Context context, AppWidgetManager appWidgetManager,
int[] appWidgetIds) {
// TODO Auto-generated method stub
super.onUpdate(context, appWidgetManager, appWidgetIds);
final int N = appWidgetIds.length;
for (int i=0; i<N; i++) {
int appWidgetId = appWidgetIds[i];
updateAppWidget(context, appWidgetManager, appWidgetId);
Toast.makeText(context, "onUpdate(): " + String.valueOf(i) + " : " + String.valueOf(appWidgetId), Toast.LENGTH_LONG).show();
}
}
public static void updateAppWidget(Context context, AppWidgetManager appWidgetManager,
int appWidgetId){
String currentTime = formatter.format(new Date());
strWidgetText = currentTime;
RemoteViews updateViews = new RemoteViews(context.getPackageName(), R.layout.hellowidget_layout);
updateViews.setTextViewText(R.id.widgettext, "[" + String.valueOf(appWidgetId) + "]" + strWidgetText);
appWidgetManager.updateAppWidget(appWidgetId, updateViews);
Toast.makeText(context, "updateAppWidget(): " + String.valueOf(appWidgetId) + "\n" + strWidgetText, Toast.LENGTH_LONG).show();
}
}
Implement /res/layout/config.xml which is the layout of the configure activity
<?xml version="1.0" encoding="utf-8"?>
<LinearLayout xmlns:android="http://schemas.android.com/apk/res/android"
android:orientation="vertical"
android:layout_width="fill_parent"
android:layout_height="fill_parent"
>
<TextView
android:layout_width="fill_parent"
android:layout_height="wrap_content"
android:text="@string/hello"
/>
<Button
android:id="@+id/okconfig"
android:layout_width="fill_parent"
android:layout_height="wrap_content"
android:text="OK"
/>
</LinearLayout>
Implement the configure activity, HelloWidgetConfig extends Activity. Actually, it do nothing except prompt the user to click on the OK button.
package com.exercise.HelloWidget;
import android.app.Activity;
import android.appwidget.AppWidgetManager;
import android.content.Context;
import android.content.Intent;
import android.os.Bundle;
import android.view.View;
import android.widget.Button;
import android.widget.Toast;
public class HelloWidgetConfig extends Activity {
Button configOkButton;
int mAppWidgetId = AppWidgetManager.INVALID_APPWIDGET_ID;
@Override
protected void onCreate(Bundle savedInstanceState) {
// TODO Auto-generated method stub
super.onCreate(savedInstanceState);
setResult(RESULT_CANCELED);
setContentView(R.layout.config);
configOkButton = (Button)findViewById(R.id.okconfig);
configOkButton.setOnClickListener(configOkButtonOnClickListener);
Intent intent = getIntent();
Bundle extras = intent.getExtras();
if (extras != null) {
mAppWidgetId = extras.getInt(
AppWidgetManager.EXTRA_APPWIDGET_ID,
AppWidgetManager.INVALID_APPWIDGET_ID);
}
// If they gave us an intent without the widget id, just bail.
if (mAppWidgetId == AppWidgetManager.INVALID_APPWIDGET_ID) {
finish();
}
}
private Button.OnClickListener configOkButtonOnClickListener
= new Button.OnClickListener(){
@Override
public void onClick(View arg0) {
// TODO Auto-generated method stub
final Context context = HelloWidgetConfig.this;
AppWidgetManager appWidgetManager = AppWidgetManager.getInstance(context);
//RemoteViews views = new RemoteViews(context.getPackageName(), R.layout.hellowidget_layout);
//appWidgetManager.updateAppWidget(mAppWidgetId, views);
HelloWidgetProvider.updateAppWidget(context, appWidgetManager, mAppWidgetId);
Toast.makeText(context, "HelloWidgetConfig.onClick(): " + String.valueOf(mAppWidgetId) , Toast.LENGTH_LONG).show();
Intent resultValue = new Intent();
resultValue.putExtra(AppWidgetManager.EXTRA_APPWIDGET_ID, mAppWidgetId);
setResult(RESULT_OK, resultValue);
finish();
}};
}
Modify hellowidgetproviderinfo.xml to include android:configure="com.exercise.HelloWidget.HelloWidgetConfig"
<appwidget-provider xmlns:android="http://schemas.android.com/apk/res/android"
android:minWidth="72dp"
android:minHeight="72dp"
android:updatePeriodMillis="1800000"
android:initialLayout="@layout/hellowidget_layout"
android:configure="com.exercise.HelloWidget.HelloWidgetConfig"
>
</appwidget-provider>
Modify AndroidManifest.xml to add HelloWidgetConfig as a activity with intent-filter of "android.appwidget.action.APPWIDGET_CONFIGURE".
<?xml version="1.0" encoding="utf-8"?>
<manifest xmlns:android="http://schemas.android.com/apk/res/android"
package="com.exercise.HelloWidget"
android:versionCode="1"
android:versionName="1.0">
<application android:icon="@drawable/icon" android:label="@string/app_name">
<receiver android:name="HelloWidgetProvider" >
<intent-filter>
<action android:name="android.appwidget.action.APPWIDGET_UPDATE" />
</intent-filter>
<meta-data android:name="android.appwidget.provider"
android:resource="@xml/hellowidgetproviderinfo" />
</receiver>
<activity android:name=".HelloWidgetConfig"
android:label="Hello Widget Config">
<intent-filter>
<action android:name="android.appwidget.action.APPWIDGET_CONFIGURE" />
</intent-filter>
</activity>
</application>
<uses-sdk android:minSdkVersion="7" />
</manifest>
Download the files.
Related Article:
- Notes on updatePeriodMillis in Home App Widget
- App Widget using Alarm Manager
Reference: Android Developers - App Widgets