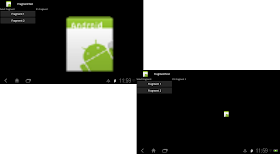
Modify from the last exercise, keep MyFragment.java and fragmentlayout.xml no change.
Create a new /res/layout/fragmentlayout2.xml to define our second fragment.
<?xml version="1.0" encoding="utf-8"?>
<LinearLayout xmlns:android="http://schemas.android.com/apk/res/android"
   android:layout_width="fill_parent"
   android:layout_height="fill_parent"
   android:orientation="vertical" >
   <TextView
       android:layout_width="match_parent"
       android:layout_height="wrap_content"
       android:text="It's Fragment 2" />
   <ImageView
       android:layout_width="match_parent"
       android:layout_height="match_parent"
       android:scaleType="center"
       android:src="@drawable/ic_launcher"/>
</LinearLayout>
Create MyFragment2.java to implement our second fragment class.
package com.exercise.FragmentTest;

import android.app.Fragment;
import android.os.Bundle;
import android.view.LayoutInflater;
import android.view.View;
import android.view.ViewGroup;

public class MyFragment2 extends Fragment {

 @Override
 public View onCreateView(LayoutInflater inflater, ViewGroup container,
   Bundle savedInstanceState) {
  // TODO Auto-generated method stub
  View myFragmentView = inflater.inflate(R.layout.fragmentlayout2, container, false);

  return myFragmentView;
 }

}
Modify main.xml, to add buttons to change fragment.
<?xml version="1.0" encoding="utf-8"?>
<LinearLayout xmlns:android="http://schemas.android.com/apk/res/android"
   android:layout_width="fill_parent"
   android:layout_height="fill_parent"
   android:orientation="horizontal" >

   <LinearLayout
       android:layout_width="0px"
       android:layout_weight="1"
       android:layout_height="match_parent"
       android:orientation="vertical" >
   <TextView
       android:layout_width="match_parent"
       android:layout_height="wrap_content"
       android:text="Select Fragment:" />
   <Button
       android:id="@+id/displayfragment1"
       android:layout_width="match_parent"
       android:layout_height="wrap_content"
       android:text="Fragment 1" />
   <Button
       android:id="@+id/displayfragment2"
       android:layout_width="match_parent"
       android:layout_height="wrap_content"
       android:text="Fragment 2" />
   </LinearLayout>
   <LinearLayout
       android:id="@+id/myfragment"
       android:layout_width="0px"
       android:layout_weight="3"
       android:layout_height="match_parent" />

</LinearLayout>
Modify main activity FragmentTestActivity.java to switch between fragments when button click. You should try to switch between fragments and the BACK key, to see how the fragment transaction work.
package com.exercise.FragmentTest;

import android.app.Activity;
import android.app.Fragment;
import android.app.FragmentManager;
import android.app.FragmentTransaction;
import android.os.Bundle;
import android.view.View;
import android.widget.Button;

public class FragmentTestActivity extends Activity{

Fragment fragment;
Button btnFragment1, btnFragment2;

   /** Called when the activity is first created. */
   @Override
   public void onCreate(Bundle savedInstanceState) {
       super.onCreate(savedInstanceState);
       setContentView(R.layout.main);
       btnFragment1 = (Button)findViewById(R.id.displayfragment1);
       btnFragment2 = (Button)findViewById(R.id.displayfragment2);

       // get an instance of FragmentTransaction from your Activity
       FragmentManager fragmentManager = getFragmentManager();
       FragmentTransaction fragmentTransaction = fragmentManager.beginTransaction();

       //add a fragment
       MyFragment myFragment = new MyFragment();
       fragmentTransaction.add(R.id.myfragment, myFragment);
       fragmentTransaction.commit();

       btnFragment1.setOnClickListener(btnFragmentOnClickListener);
       btnFragment2.setOnClickListener(btnFragmentOnClickListener);
   }

   Button.OnClickListener btnFragmentOnClickListener
   = new Button.OnClickListener(){

 @Override
 public void onClick(View v) {
  // TODO Auto-generated method stub
  Fragment newFragment;

  // Create new fragment
  if(v == btnFragment1){
   newFragment = new MyFragment();
  }else{
   newFragment = new MyFragment2();
  }

  // Create new transaction
  FragmentTransaction transaction = getFragmentManager().beginTransaction();

  // Replace whatever is in the fragment_container view with this fragment,
  // and add the transaction to the back stack
  transaction.replace(R.id.myfragment, newFragment);
  transaction.addToBackStack(null);

  // Commit the transaction
  transaction.commit();
 }};

}
Related article:
- Lifecycle of Fragment: onCreate(), onCreateView() and onPause().
most helpful tutorial ever
ReplyDeleteFinally a working tutorial for dynamic fragment ! Thanks !
ReplyDeletelife saver
ReplyDeleteI'am happy found this articel
ReplyDelete