Wednesday, February 29, 2012
Windows 8 Consumer Preview is available now!
Note before you download: Windows 8 Consumer Preview is prerelease software that may be substantially modified before it’s commercially released. Microsoft makes no warranties, express or implied, with respect to the information provided here. Some product features and functionality may require additional hardware or software. If you decide to go back to your previous operating system, you'll need to reinstall it from the recovery or installation media that came with your PC.
Download Windows 8 Consumer Preview
Tuesday, February 28, 2012
Get info of a specified item in MediaStore.Audio.Media
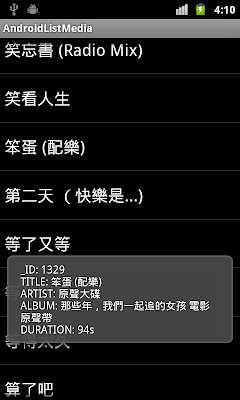
package com.exercise.AndroidListMedia;

import android.app.ListActivity;
import android.database.Cursor;
import android.net.Uri;
import android.os.Bundle;
import android.provider.MediaStore;
import android.provider.MediaStore.Video.Media;
import android.view.View;
import android.widget.ListAdapter;
import android.widget.ListView;
import android.widget.SimpleCursorAdapter;
import android.widget.Toast;

public class AndroidListMediaActivity extends ListActivity {

 SimpleCursorAdapter adapter;

  /** Called when the activity is first created. */
  @Override
  public void onCreate(Bundle savedInstanceState) {
      super.onCreate(savedInstanceState);
      String[] from = {
        MediaStore.MediaColumns.TITLE};
      int[] to = {
        android.R.id.text1};

      Cursor cursor = managedQuery(
        MediaStore.Audio.Media.EXTERNAL_CONTENT_URI,
        null,
        null,
        null,
        MediaStore.Audio.Media.TITLE);

      adapter = new SimpleCursorAdapter(this,
        android.R.layout.simple_list_item_1, cursor, from, to);
      setListAdapter(adapter);
  }

 @Override
 protected void onListItemClick(ListView l, View v, int position, long id) {
  Cursor cursor = adapter.getCursor();
  cursor.moveToPosition(position);

  String _id = cursor.getString(cursor.getColumnIndex(MediaStore.Audio.Media._ID));
  String title = cursor.getString(cursor.getColumnIndex(MediaStore.Audio.Media.TITLE));
  String artist = cursor.getString(cursor.getColumnIndex(MediaStore.Audio.Media.ARTIST));
  String album = cursor.getString(cursor.getColumnIndex(MediaStore.Audio.Media.ALBUM));
  int duration = cursor.getInt(cursor.getColumnIndex(MediaStore.Audio.Media.DURATION));

  String info = "_ID: " + _id + "\n"
     + "TITLE: " + title + "\n"
     + "ARTIST: " + artist + "\n"
     + "ALBUM: " + album + "\n"
     + "DURATION: " + duration/1000 + "s";

  Toast.makeText(this, info, Toast.LENGTH_LONG).show();
 }


}
Next:
- Retrieve playable Uri from MediaStore, pointed by cursor.
Android-x86 4.0-RC1 is released
Release note: http://www.android-x86.org/releases/releasenote-4-0-rc1
Android-x86 is a project to port Android open source project to x86 platform.
Monday, February 27, 2012
List audio media in MediaStore.Audio.Media

package com.exercise.AndroidListMedia;

import android.app.ListActivity;
import android.database.Cursor;
import android.os.Bundle;
import android.provider.MediaStore;
import android.widget.ListAdapter;
import android.widget.SimpleCursorAdapter;

public class AndroidListMediaActivity extends ListActivity {
  /** Called when the activity is first created. */
  @Override
  public void onCreate(Bundle savedInstanceState) {
      super.onCreate(savedInstanceState);
      String[] from = {
        MediaStore.MediaColumns.TITLE};
      int[] to = {
        android.R.id.text1};

      Cursor cursor = managedQuery(
        MediaStore.Audio.Media.EXTERNAL_CONTENT_URI,
        null,
        null,
        null,
        MediaStore.Audio.Media.TITLE);

      ListAdapter adapter = new SimpleCursorAdapter(this,
        android.R.layout.simple_list_item_1, cursor, from, to);
      setListAdapter(adapter);
  }
}Next:
- Get info of a specified item in MediaStore.Audio.Media
Remark:
Please notice that both managedQuery(Uri uri, String[] projection, String selection, String[] selectionArgs, String sortOrder) and SimpleCursorAdapter(Context context, int layout, Cursor c, String[] from, int[] to) are deprecated. See how to use CursorLoader here.
Friday, February 24, 2012
Repackage Android APK to make it run on BlackBerry Playbook, on Runtime for Android apps.
BlackBerry provide a online tools to package for Android Apps. It's a simple web interface that allows you to verify, repackage, and sign your app without any additional software downloads.
To repackage Android APK to BlackBerry PlayBook, visit https://bdsc.webapps.blackberry.com/android/bpaa/ in your browser. This tool will package your Android 2.3.3 application to run on the BlackBerry PlayBook.
Enter email and check to agree the RIM SDK License Agreement, and click "Let's get started>>".
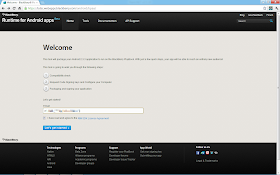
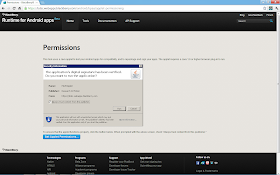
Make sure you have installed correct Java plug-in. Click "Set Applet Permissions...".
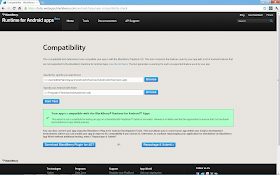
Specify the APK file, and Android SDK folder. And click "Start Test".
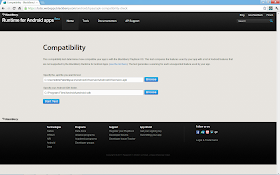
Tested OK, to continue repackaging your application for distribution on BlackBerry App World without additional testing, select "Repackage & Submit".
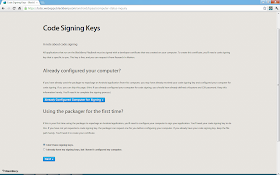
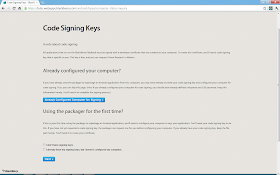
If this is your first time using the packager to repackage an Android application, you'll need to configure your computer to sign your application. You'll need your code signing key to do this. If you have not yet requested a code signing key, the packager can request one for you before configuring your computer. If you already have your code signing key, keep the file path handy. You'll need it to create your certificate.
Check "I don't have signing keys" and click "Next>>".
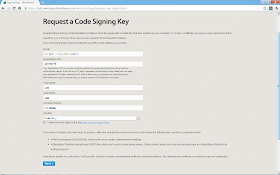
Request a Code Signing Key, fill-in the blank, check to agree the RIM SDK License Agreement, and click "Next>>".
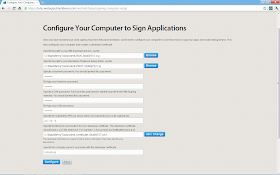
Configure Your Computer to Sign Applications.
Your BlackBerry Tablet Code Signing Key order will be send to BlackBerry, and will be processed. It could take up to 2 hours to fully process. Your code signing keys will be sent you via email.
Once you have received your code signing keys from Research In Motion, you'll need to configure your computer to use these keys to sign your apps and create debug tokens. This step configures your computer and creates a developer certificate.
Fill in the blank, and click "Configure".
Click Next after finished.
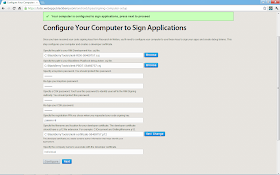
You will be re-direct to the "Welcome, start submit page" again.
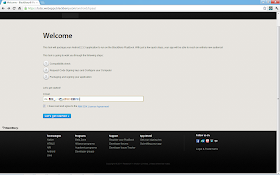
Make sure you have installed correct Java plug-in. Click "Set Applet Permissions...".
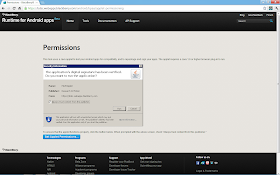
Specify the APK file, and Android SDK folder. And click "Start Test".
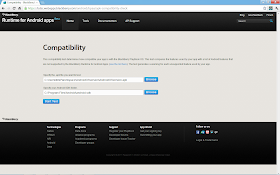
Tested OK, to continue repackaging your application for distribution on BlackBerry App World without additional testing, select "Repackage & Submit".
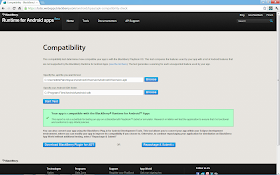
Click "Already Configured Computer for Signing>>"
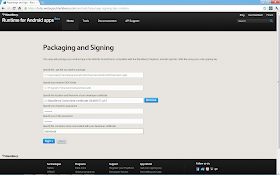
Packaging and Signing, fill in the blank and click "Sign>>"
BAR file created and signed, press "Next" to proceed.
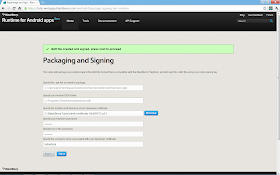
Finished! BAR file generated.
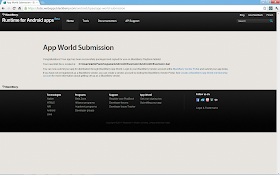
Try my repackaged BAR here: http://goo.gl/S8A73
Thursday, February 23, 2012
Generate signed APK for Android Application
- In Eclipse IDE, right click on your project in Package Explorer. -> Android Tools -> Export Signed Application Package...
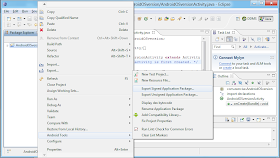
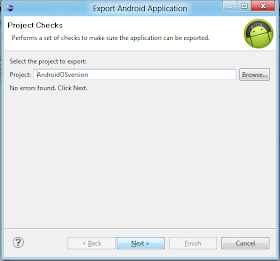
- Make sure the correct project is selected, and click Next.
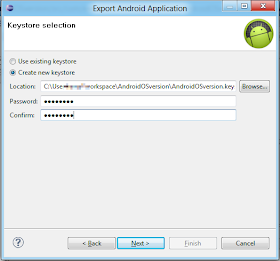
- Select the keystore file location, and enter password. Then click Next.
- Enter Alias, password, number of validity years, and at least one Certificate issuer field.
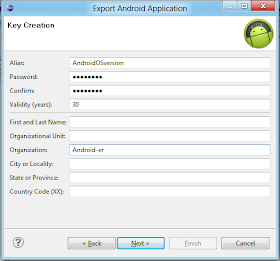
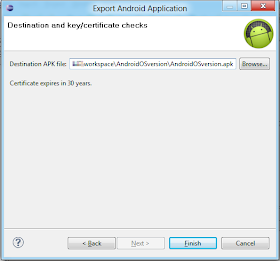
- Select destination of the APK file. and click Finish.
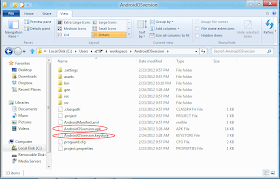
- The keystore and apk files will be generated.
Get system properties of os name and version
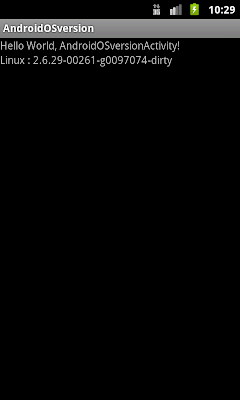
package com.exercise.AndroidOSversion;

import android.app.Activity;
import android.os.Bundle;
import android.widget.TextView;

public class AndroidOSversionActivity extends Activity {
    /** Called when the activity is first created. */
    @Override
    public void onCreate(Bundle savedInstanceState) {
        super.onCreate(savedInstanceState);
        setContentView(R.layout.main);

        TextView msg = (TextView)findViewById(R.id.msg);
        msg.setText(System.getProperty("os.name")
          + " : "
          + System.getProperty("os.version"));
    }
}
Tuesday, February 21, 2012
Detect Android device rotation around the Z, X and Y axis
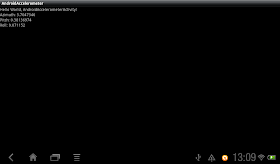
package com.exercise.AndroidAccelerometer;

import android.app.Activity;
import android.os.Bundle;
import android.widget.TextView;

import android.hardware.Sensor;
import android.hardware.SensorEvent;
import android.hardware.SensorEventListener;
import android.hardware.SensorManager;

public class AndroidAccelerometerActivity extends Activity
 implements SensorEventListener{

 private SensorManager sensorManager;
 private Sensor sensorAccelerometer;

 TextView readingAzimuth, readingPitch, readingRoll;

  /** Called when the activity is first created. */
  @Override
  public void onCreate(Bundle savedInstanceState) {
      super.onCreate(savedInstanceState);
      setContentView(R.layout.main);

      sensorManager = (SensorManager)getSystemService(SENSOR_SERVICE);
      sensorAccelerometer = sensorManager.getDefaultSensor(
        Sensor.TYPE_ACCELEROMETER);

      readingAzimuth = (TextView)findViewById(R.id.azimuth);
      readingPitch = (TextView)findViewById(R.id.pitch);
      readingRoll = (TextView)findViewById(R.id.roll);

  }

 @Override
 protected void onPause() {
  super.onPause();
  sensorManager.unregisterListener(this);
 }

 @Override
 protected void onResume() {
  super.onResume();
  sensorManager.registerListener(this,
    sensorAccelerometer,
    SensorManager.SENSOR_DELAY_NORMAL);
 }

 @Override
 public void onAccuracyChanged(Sensor arg0, int arg1) {
  // TODO Auto-generated method stub

 }

 @Override
 public void onSensorChanged(SensorEvent event) {

  /*
   * event.values[0]: azimuth, rotation around the Z axis.
   * event.values[1]: pitch, rotation around the X axis.
   * event.values[2]: roll, rotation around the Y axis.
   */

  float valueAzimuth = event.values[0];
  float valuePitch = event.values[1];
  float valueRoll = event.values[2];

  readingAzimuth.setText("Azimuth: " + String.valueOf(valueAzimuth));
      readingPitch.setText("Pitch: " + String.valueOf(valuePitch));
      readingRoll.setText("Roll: " + String.valueOf(valueRoll));


 }
}
<?xml version="1.0" encoding="utf-8"?>
<LinearLayout xmlns:android="http://schemas.android.com/apk/res/android"
  android:layout_width="fill_parent"
  android:layout_height="fill_parent"
  android:orientation="vertical" >

  <TextView
      android:layout_width="fill_parent"
      android:layout_height="wrap_content"
      android:text="@string/hello" />

  <TextView
      android:id="@+id/azimuth"
      android:layout_width="fill_parent"
      android:layout_height="wrap_content"/>
  <TextView
      android:id="@+id/pitch"
      android:layout_width="fill_parent"
      android:layout_height="wrap_content"/>
  <TextView
      android:id="@+id/roll"
      android:layout_width="fill_parent"
      android:layout_height="wrap_content"/>

</LinearLayout>
Wednesday, February 15, 2012
ObjectAnimator - Animation in Honeycomb
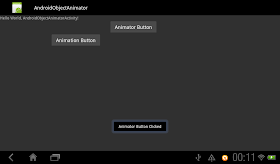
Refer to the video, the upper button (Animator Button) animate using ObjectAnimator. The lower button (Animation Button) animate using TranslateAnimation. You can see, Animation change the visual only: user cannot click on the lower button (Animation Button) to trigger the OnClickListener(). The actual button is still in the original position defined in main.xml, so user have to click on the original space to trigger it. For the upper button animate using ObjectAnimator for Honeycomb, user can click on the button on the shown position.
package com.exercise.AndroidObjectAnimator;

import android.animation.ObjectAnimator;
import android.app.Activity;
import android.os.Bundle;
import android.view.View;
import android.view.animation.Animation;
import android.view.animation.AnimationSet;
import android.view.animation.TranslateAnimation;
import android.widget.Button;
import android.widget.Toast;

public class AndroidObjectAnimatorActivity extends Activity {
    /** Called when the activity is first created. */
    @Override
    public void onCreate(Bundle savedInstanceState) {
        super.onCreate(savedInstanceState);
        setContentView(R.layout.main);
        Button animatorButton = (Button)findViewById(R.id.animatorbutton);
        Button animationButton = (Button)findViewById(R.id.animationbutton);

        ObjectAnimator objectAnimatorButton
        = ObjectAnimator.ofFloat(animatorButton, "translationX", 0f, 400f);
        objectAnimatorButton.setDuration(1000);
        objectAnimatorButton.start();

        AnimationSet animSetAnimationButton = new AnimationSet(true);
        TranslateAnimation translateAnimAnimationButton
        = new TranslateAnimation(
         Animation.RELATIVE_TO_SELF, 0,
         Animation.RELATIVE_TO_SELF, 1f,
         Animation.RELATIVE_TO_SELF, 0,
         Animation.RELATIVE_TO_SELF, 0);
        animSetAnimationButton.addAnimation(translateAnimAnimationButton);
        animSetAnimationButton.setDuration(500);
        animSetAnimationButton.setFillAfter(true);
        animationButton.setAnimation(animSetAnimationButton);

        animatorButton.setOnClickListener(new Button.OnClickListener(){

      @Override
      public void onClick(View arg0) {
       Toast.makeText(getApplicationContext(),
         "Animator Button Clicked",
         Toast.LENGTH_SHORT).show();
      }});

        animationButton.setOnClickListener(new Button.OnClickListener(){

      @Override
      public void onClick(View arg0) {
       Toast.makeText(getApplicationContext(),
         "Animation Button Clicked",
         Toast.LENGTH_SHORT).show();
      }});
    }


}
<?xml version="1.0" encoding="utf-8"?>
<LinearLayout xmlns:android="http://schemas.android.com/apk/res/android"
    android:layout_width="fill_parent"
    android:layout_height="fill_parent"
    android:orientation="vertical"
    android:background="#303030">

    <TextView
        android:layout_width="fill_parent"
        android:layout_height="wrap_content"
        android:text="@string/hello" />
    <Button
        android:id="@+id/animatorbutton"
        android:layout_width="wrap_content"
        android:layout_height="wrap_content"
        android:text="Animator Button" />
    <Button
        android:id="@+id/animationbutton"
        android:layout_width="wrap_content"
        android:layout_height="wrap_content"
        android:text="Animation Button" />
</LinearLayout>
Game and Graphics Programming for iOS and Android with OpenGL ES 2.0
Develop graphically sophisticated apps and games today!
The smart phone app market is progressively growing, and there is new market gap to fill that requires more graphically sophisticated applications and games. Game and Graphics Programming for iOS and Android with OpenGL ES 2.0 quickly gets you up to speed on understanding how powerful OpenGL ES 2.0 technology is in creating apps and games for amusement and effectiveness. Leading you through the development of a real-world mobile app with live code, this text lets you work with all the best features and tools that Open GL ES 2.0 has to offer.
- Provides a project template for iOS and Android platforms
- Delves into OpenGL features including drawing canvas, geometry, lighting effects, character animation, and more
- Offers explanation of full-function 2D and 3D graphics on embedded systems
- Addresses the principal technology for hardware-accelerated graphical rendering
Game and Graphics Programming for iOS and Android with OpenGL ES 2.0offers important, need-to-know information if you're interested in striking a perfect balance between aesthetics and functionality in apps.
Monday, February 13, 2012
The European Commission approves acquisition of Motorola Mobility by Google
Joaquín Almunia, Commission Vice President in charge of competition policy, said: "We have approved the acquisition of Motorola Mobility by Google because, upon careful examination, this transaction does not itself raise competition issues. Of course, the Commission will continue to keep a close eye on the behaviour of all market players in the sector, particularly the increasingly strategic use of patents"
Details: European Commission - Press release
Implement Animation using Java code
Remove /res/anim folder and the XML animation files.
Modify AndroidViewFlipperActivity.java, implement AnimationSet animSetFlipInForeward, animSetFlipOutForeward, animSetFlipInBackward and animSetFlipOutBackward; to replace animFlipInForeward, animFlipOutForeward, animFlipInBackward and animFlipOutBackward.
package com.exercise.AndroidViewFlipper;

import android.app.Activity;
import android.os.Bundle;
import android.view.GestureDetector;
import android.view.GestureDetector.SimpleOnGestureListener;
import android.view.MotionEvent;
import android.view.animation.Animation;
import android.view.animation.AnimationSet;
import android.view.animation.OvershootInterpolator;
import android.view.animation.TranslateAnimation;
import android.widget.ViewFlipper;

public class AndroidViewFlipperActivity extends Activity {

ViewFlipper page;

  AnimationSet animSetFlipInForeward;
  AnimationSet animSetFlipOutForeward;
  AnimationSet animSetFlipInBackward;
  AnimationSet animSetFlipOutBackward;

  /** Called when the activity is first created. */
  @Override
  public void onCreate(Bundle savedInstanceState) {
      super.onCreate(savedInstanceState);
      setContentView(R.layout.main);

      page = (ViewFlipper)findViewById(R.id.flipper);

      animSetFlipInForeward = new AnimationSet(true);
      TranslateAnimation translateAnimFlipInForeward
      = new TranslateAnimation(
       Animation.RELATIVE_TO_SELF, 1f,
       Animation.RELATIVE_TO_SELF, 0,
       Animation.RELATIVE_TO_SELF, 0,
       Animation.RELATIVE_TO_SELF, 0);
      animSetFlipInForeward.addAnimation(translateAnimFlipInForeward);
      animSetFlipInForeward.setDuration(500);
      animSetFlipInForeward.setInterpolator(new OvershootInterpolator());

      animSetFlipOutForeward = new AnimationSet(true);
      TranslateAnimation translateAnimFlipOutForeward
      = new TranslateAnimation(
       Animation.RELATIVE_TO_SELF, 0,
       Animation.RELATIVE_TO_SELF, -1f,
       Animation.RELATIVE_TO_SELF, 0,
       Animation.RELATIVE_TO_SELF, 0);
      animSetFlipOutForeward.addAnimation(translateAnimFlipOutForeward);
      animSetFlipOutForeward.setDuration(500);
      animSetFlipOutForeward.setInterpolator(new OvershootInterpolator());

      animSetFlipInBackward = new AnimationSet(true);
      TranslateAnimation translateAnimFlipInBackward
      = new TranslateAnimation(
       Animation.RELATIVE_TO_SELF, -1f,
       Animation.RELATIVE_TO_SELF, 0,
       Animation.RELATIVE_TO_SELF, 0,
       Animation.RELATIVE_TO_SELF, 0);
      animSetFlipInBackward.addAnimation(translateAnimFlipInBackward);
      animSetFlipInBackward.setDuration(500);
      animSetFlipInBackward.setInterpolator(new OvershootInterpolator());

      animSetFlipOutBackward = new AnimationSet(true);
      TranslateAnimation translateAnimFlipOutBackward
      = new TranslateAnimation(
       Animation.RELATIVE_TO_SELF, 0,
       Animation.RELATIVE_TO_SELF, 1f,
       Animation.RELATIVE_TO_SELF, 0,
       Animation.RELATIVE_TO_SELF, 0);
      animSetFlipOutBackward.addAnimation(translateAnimFlipOutBackward);
      animSetFlipOutBackward.setDuration(500);
      animSetFlipOutBackward.setInterpolator(new OvershootInterpolator());

  }

  private void SwipeRight(){
   page.setInAnimation(animSetFlipInBackward);
 page.setOutAnimation(animSetFlipOutBackward);
 page.showPrevious();
  }

  private void SwipeLeft(){
   page.setInAnimation(animSetFlipInForeward);
 page.setOutAnimation(animSetFlipOutForeward);
 page.showNext();
  }

  @Override
public boolean onTouchEvent(MotionEvent event) {
 // TODO Auto-generated method stub
   return gestureDetector.onTouchEvent(event);
}

SimpleOnGestureListener simpleOnGestureListener
  = new SimpleOnGestureListener(){

 @Override
 public boolean onFling(MotionEvent e1, MotionEvent e2, float velocityX,
   float velocityY) {

  float sensitvity = 50;
  if((e1.getX() - e2.getX()) > sensitvity){
   SwipeLeft();
  }else if((e2.getX() - e1.getX()) > sensitvity){
   SwipeRight();
  }

  return true;
 }

  };

  GestureDetector gestureDetector
= new GestureDetector(simpleOnGestureListener);
}
Main.xml, same as last exercise, refer to "Implement swiping page effect using GestureDetector and ViewFlipper".
Friday, February 10, 2012
Implement swiping page effect using GestureDetector and ViewFlipper
Modify the code of the activity from the last exercise "Bi-direction ViewFlipper".
package com.exercise.AndroidViewFlipper;

import android.app.Activity;
import android.os.Bundle;
import android.view.GestureDetector;
import android.view.GestureDetector.SimpleOnGestureListener;
import android.view.MotionEvent;
import android.view.animation.Animation;
import android.view.animation.AnimationUtils;
import android.widget.ViewFlipper;

public class AndroidViewFlipperActivity extends Activity {

ViewFlipper page;

   Animation animFlipInForeward;
   Animation animFlipOutForeward;
   Animation animFlipInBackward;
   Animation animFlipOutBackward;

   /** Called when the activity is first created. */
   @Override
   public void onCreate(Bundle savedInstanceState) {
       super.onCreate(savedInstanceState);
       setContentView(R.layout.main);

       page = (ViewFlipper)findViewById(R.id.flipper);

       animFlipInForeward = AnimationUtils.loadAnimation(this, R.anim.flipin);
       animFlipOutForeward = AnimationUtils.loadAnimation(this, R.anim.flipout);
       animFlipInBackward = AnimationUtils.loadAnimation(this, R.anim.flipin_reverse);
       animFlipOutBackward = AnimationUtils.loadAnimation(this, R.anim.flipout_reverse);

   }

   private void SwipeRight(){
    page.setInAnimation(animFlipInBackward);
 page.setOutAnimation(animFlipOutBackward);
 page.showPrevious();
   }

   private void SwipeLeft(){
    page.setInAnimation(animFlipInForeward);
 page.setOutAnimation(animFlipOutForeward);
 page.showNext();
   }

   @Override
public boolean onTouchEvent(MotionEvent event) {
 // TODO Auto-generated method stub
    return gestureDetector.onTouchEvent(event);
}

SimpleOnGestureListener simpleOnGestureListener
   = new SimpleOnGestureListener(){

 @Override
 public boolean onFling(MotionEvent e1, MotionEvent e2, float velocityX,
   float velocityY) {

  float sensitvity = 50;
  if((e1.getX() - e2.getX()) > sensitvity){
   SwipeLeft();
  }else if((e2.getX() - e1.getX()) > sensitvity){
   SwipeRight();
  }

  return true;
 }

   };

   GestureDetector gestureDetector
= new GestureDetector(simpleOnGestureListener);
}
Modify main.xml to remove buttons.
<?xml version="1.0" encoding="utf-8"?>
<LinearLayout xmlns:android="http://schemas.android.com/apk/res/android"
   android:layout_width="fill_parent"
   android:layout_height="fill_parent"
   android:orientation="vertical" >

   <TextView
       android:layout_width="fill_parent"
       android:layout_height="wrap_content"
       android:text="@string/hello" />

   <ViewFlipper
       android:id="@+id/flipper"
       android:layout_width="fill_parent"
       android:layout_height="fill_parent">

       <LinearLayout
           android:layout_width="fill_parent"
           android:layout_height="fill_parent"
           android:orientation="vertical">
           <ImageView
               android:layout_width="fill_parent"
            android:layout_height="fill_parent"
            android:src="@drawable/ic_launcher"/>
       </LinearLayout>

       <LinearLayout
           android:layout_width="fill_parent"
           android:layout_height="fill_parent"
           android:orientation="vertical"
           android:gravity="center"
           android:background="#C0C0C0">
           <ImageView
               android:layout_width="wrap_content"
            android:layout_height="wrap_content"
            android:layout_weight="1"
            android:src="@drawable/ic_launcher"/>
           <ImageView
               android:layout_width="wrap_content"
            android:layout_height="wrap_content"
            android:layout_weight="1"
            android:src="@drawable/ic_launcher"/>
       </LinearLayout>

       <LinearLayout
           android:layout_width="fill_parent"
           android:layout_height="fill_parent"
           android:orientation="horizontal"
           android:gravity="center"
           android:background="#A0A0A0">
           <ImageView
               android:layout_width="wrap_content"
            android:layout_height="wrap_content"
            android:layout_weight="1"
            android:src="@drawable/ic_launcher"/>
           <ImageView
               android:layout_width="wrap_content"
            android:layout_height="wrap_content"
            android:layout_weight="1"
            android:src="@drawable/ic_launcher"/>
       </LinearLayout>

   </ViewFlipper>
</LinearLayout>
Related exercise: Implement Animation using Java code
Bi-direction ViewFlipper
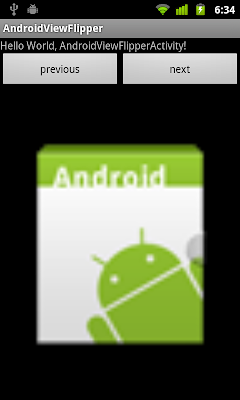
Create two more XML for flipin and flipout in reverse direction:
/res/anim/flipin_reverse.xml
<?xml version="1.0" encoding="utf-8"?>
<set xmlns:android="http://schemas.android.com/apk/res/android"
 android:interpolator="@android:anim/overshoot_interpolator">
 <translate
     android:fromXDelta="-100%p"
     android:toXDelta="0"
     android:duration="500"/>
</set>
/res/anim/flipout_reverse.xml
<?xml version="1.0" encoding="utf-8"?>
<set xmlns:android="http://schemas.android.com/apk/res/android"
 android:interpolator="@android:anim/overshoot_interpolator">
 <translate
     android:fromXDelta="0"
     android:toXDelta="100%p"
     android:duration="500"/>
</set>
Modify main.xml to add button of flip to previous page, and remove android:inAnimation and android:outAnimation of ViewFlipper.
<?xml version="1.0" encoding="utf-8"?>
<LinearLayout xmlns:android="http://schemas.android.com/apk/res/android"
 android:layout_width="fill_parent"
 android:layout_height="fill_parent"
 android:orientation="vertical" >

 <TextView
     android:layout_width="fill_parent"
     android:layout_height="wrap_content"
     android:text="@string/hello" />
  <LinearLayout
      android:layout_width="fill_parent"
      android:layout_height="wrap_content"
      android:orientation="horizontal">
      <Button
       android:id="@+id/previous"
       android:layout_width="fill_parent"
       android:layout_height="wrap_content"
       android:layout_weight="1"
       android:text="previous"/>
      <Button
       android:id="@+id/next"
       android:layout_width="fill_parent"
       android:layout_height="wrap_content"
       android:layout_weight="1"
       android:text="next"/>
  </LinearLayout>


 <ViewFlipper
     android:id="@+id/flipper"
     android:layout_width="fill_parent"
     android:layout_height="fill_parent">

     <LinearLayout
         android:layout_width="fill_parent"
         android:layout_height="fill_parent"
         android:orientation="vertical">
         <ImageView
             android:layout_width="fill_parent"
          android:layout_height="fill_parent"
          android:src="@drawable/ic_launcher"/>
     </LinearLayout>

     <LinearLayout
         android:layout_width="fill_parent"
         android:layout_height="fill_parent"
         android:orientation="vertical"
         android:gravity="center"
         android:background="#C0C0C0">
         <ImageView
             android:layout_width="wrap_content"
          android:layout_height="wrap_content"
          android:layout_weight="1"
          android:src="@drawable/ic_launcher"/>
         <ImageView
             android:layout_width="wrap_content"
          android:layout_height="wrap_content"
          android:layout_weight="1"
          android:src="@drawable/ic_launcher"/>
     </LinearLayout>

     <LinearLayout
         android:layout_width="fill_parent"
         android:layout_height="fill_parent"
         android:orientation="horizontal"
         android:gravity="center"
         android:background="#A0A0A0">
         <ImageView
             android:layout_width="wrap_content"
          android:layout_height="wrap_content"
          android:layout_weight="1"
          android:src="@drawable/ic_launcher"/>
         <ImageView
             android:layout_width="wrap_content"
          android:layout_height="wrap_content"
          android:layout_weight="1"
          android:src="@drawable/ic_launcher"/>
     </LinearLayout>

 </ViewFlipper>
</LinearLayout>
Modify code of the activity:
package com.exercise.AndroidViewFlipper;

import android.app.Activity;
import android.os.Bundle;
import android.view.View;
import android.view.animation.Animation;
import android.view.animation.AnimationUtils;
import android.widget.Button;
import android.widget.ViewFlipper;

public class AndroidViewFlipperActivity extends Activity {
 /** Called when the activity is first created. */
 @Override
 public void onCreate(Bundle savedInstanceState) {
     super.onCreate(savedInstanceState);
     setContentView(R.layout.main);

     final ViewFlipper page = (ViewFlipper)findViewById(R.id.flipper);
     Button btnNext = (Button)findViewById(R.id.next);
     Button btnPrevious = (Button)findViewById(R.id.previous);

     final Animation animFlipInForeward = AnimationUtils.loadAnimation(this, R.anim.flipin);
     final Animation animFlipOutForeward = AnimationUtils.loadAnimation(this, R.anim.flipout);
     final Animation animFlipInBackward = AnimationUtils.loadAnimation(this, R.anim.flipin_reverse);
     final Animation animFlipOutBackward = AnimationUtils.loadAnimation(this, R.anim.flipout_reverse);

     btnNext.setOnClickListener(new Button.OnClickListener(){

   @Override
   public void onClick(View arg0) {
    page.setInAnimation(animFlipInForeward);
    page.setOutAnimation(animFlipOutForeward);
    page.showNext();

   }});

     btnPrevious.setOnClickListener(new Button.OnClickListener(){

   @Override
   public void onClick(View arg0) {
    page.setInAnimation(animFlipInBackward);
    page.setOutAnimation(animFlipOutBackward);
    page.showPrevious();

   }});
 }
}
Thursday, February 9, 2012
Create book-like view switching, ViewFlipper
Create the animation effect XML files
/res/anim/flipin.xml
<?xml version="1.0" encoding="utf-8"?>
<set xmlns:android="http://schemas.android.com/apk/res/android"
   android:interpolator="@android:anim/overshoot_interpolator">
   <translate
       android:fromXDelta="100%p"
       android:toXDelta="0"
       android:duration="500"/>
</set>
/res/anim/flipout.xml
<?xml version="1.0" encoding="utf-8"?>
<set xmlns:android="http://schemas.android.com/apk/res/android"
   android:interpolator="@android:anim/overshoot_interpolator">
   <translate
       android:fromXDelta="0"
       android:toXDelta="-100%p"
       android:duration="500"/>
</set>
main.xml
Each View (LinearLayout in this case) inside <ViewFlipper> is a page.
<?xml version="1.0" encoding="utf-8"?>
<LinearLayout xmlns:android="http://schemas.android.com/apk/res/android"
   android:layout_width="fill_parent"
   android:layout_height="fill_parent"
   android:orientation="vertical" >

   <TextView
       android:layout_width="fill_parent"
       android:layout_height="wrap_content"
       android:text="@string/hello" />
   <Button
       android:id="@+id/next"
       android:layout_width="fill_parent"
       android:layout_height="wrap_content"
       android:text="next"/>

   <ViewFlipper
       android:id="@+id/flipper"
       android:layout_width="fill_parent"
       android:layout_height="fill_parent"
       android:inAnimation="@anim/flipin"
       android:outAnimation="@anim/flipout">

       <LinearLayout
           android:layout_width="fill_parent"
           android:layout_height="fill_parent"
           android:orientation="vertical">
           <ImageView
               android:layout_width="fill_parent"
            android:layout_height="fill_parent"
            android:src="@drawable/ic_launcher"/>
       </LinearLayout>

       <LinearLayout
           android:layout_width="fill_parent"
           android:layout_height="fill_parent"
           android:orientation="vertical"
           android:gravity="center"
           android:background="#C0C0C0">
           <ImageView
               android:layout_width="wrap_content"
            android:layout_height="wrap_content"
            android:layout_weight="1"
            android:src="@drawable/ic_launcher"/>
           <ImageView
               android:layout_width="wrap_content"
            android:layout_height="wrap_content"
            android:layout_weight="1"
            android:src="@drawable/ic_launcher"/>
       </LinearLayout>

       <LinearLayout
           android:layout_width="fill_parent"
           android:layout_height="fill_parent"
           android:orientation="horizontal"
           android:gravity="center"
           android:background="#A0A0A0">
           <ImageView
               android:layout_width="wrap_content"
            android:layout_height="wrap_content"
            android:layout_weight="1"
            android:src="@drawable/ic_launcher"/>
           <ImageView
               android:layout_width="wrap_content"
            android:layout_height="wrap_content"
            android:layout_weight="1"
            android:src="@drawable/ic_launcher"/>
       </LinearLayout>

   </ViewFlipper>
</LinearLayout>
Main activity:
package com.exercise.AndroidViewFlipper;

import android.app.Activity;
import android.os.Bundle;
import android.view.View;
import android.widget.Button;
import android.widget.ViewFlipper;

public class AndroidViewFlipperActivity extends Activity {
   /** Called when the activity is first created. */
   @Override
   public void onCreate(Bundle savedInstanceState) {
       super.onCreate(savedInstanceState);
       setContentView(R.layout.main);

       final ViewFlipper page = (ViewFlipper)findViewById(R.id.flipper);
       Button btnNext = (Button)findViewById(R.id.next);

       btnNext.setOnClickListener(new Button.OnClickListener(){

  @Override
  public void onClick(View arg0) {
   page.showNext();

  }});
   }
}
Next:
- Bi-direction ViewFlipper
Wednesday, February 8, 2012
FREE BlackBerry PlayBook for Android developers
Details: http://us.blackberry.com/developers/tablet/playbook_offer2012.jsp
Repackage your Android App to run on BlackBerry PlayBook
BlackBerry provide tools for developer, to not only repackage your application to BAR file format but also to check how compatible your application is for running on the BlackBerry Tablet OS. Some of the APIs in the Android SDK may not be supported, or only partially supported by the BlackBerry Runtime for Android apps.
Know more: https://bdsc.webapps.blackberry.com/android/
Various effect of interpolator in Android Animation
Create following XML files under /res/anim/ folder.
accelerate_decelerate.xml
<?xml version="1.0" encoding="utf-8"?>
<set xmlns:android="http://schemas.android.com/apk/res/android"
    android:interpolator="@android:anim/accelerate_decelerate_interpolator">
    <translate
        android:fromYDelta="-100%p"
        android:toYDelta="0"
        android:duration="2000"/>
</set>
accelerate.xml
<?xml version="1.0" encoding="utf-8"?>
<set xmlns:android="http://schemas.android.com/apk/res/android"
    android:interpolator="@android:anim/accelerate_interpolator">
    <translate
        android:fromYDelta="-100%p"
        android:toYDelta="0"
        android:duration="2000"/>
</set>
anticipate_overshoot.xml
<?xml version="1.0" encoding="utf-8"?>
<set xmlns:android="http://schemas.android.com/apk/res/android"
    android:interpolator="@android:anim/anticipate_overshoot_interpolator">
    <translate
        android:fromYDelta="-80%p"
        android:toYDelta="0"
        android:duration="2000"/>
</set>
anticipate.xml
<?xml version="1.0" encoding="utf-8"?>
<set xmlns:android="http://schemas.android.com/apk/res/android"
    android:interpolator="@android:anim/anticipate_interpolator">
    <translate
        android:fromYDelta="-80%p"
        android:toYDelta="0"
        android:duration="2000"/>
</set>
bounce.xml
<?xml version="1.0" encoding="utf-8"?>
<set xmlns:android="http://schemas.android.com/apk/res/android"
    android:interpolator="@android:anim/bounce_interpolator">
    <translate
        android:fromYDelta="-100%p"
        android:toYDelta="0"
        android:duration="2000"/>
</set>
cycle.xml
<?xml version="1.0" encoding="utf-8"?>
<set xmlns:android="http://schemas.android.com/apk/res/android"
    android:interpolator="@android:anim/cycle_interpolator">
    <translate
        android:fromYDelta="-50%p"
        android:toYDelta="0"
        android:duration="2000"/>
</set>
decelerate.xml
<?xml version="1.0" encoding="utf-8"?>
<set xmlns:android="http://schemas.android.com/apk/res/android"
    android:interpolator="@android:anim/decelerate_interpolator">
    <translate
        android:fromYDelta="-100%p"
        android:toYDelta="0"
        android:duration="2000"/>
</set>
linear.xml
<?xml version="1.0" encoding="utf-8"?>
<set xmlns:android="http://schemas.android.com/apk/res/android"
    android:interpolator="@android:anim/linear_interpolator">
    <translate
        android:fromYDelta="-100%p"
        android:toYDelta="0"
        android:duration="2000"/>
</set>
overshoot.xml
<?xml version="1.0" encoding="utf-8"?>
<set xmlns:android="http://schemas.android.com/apk/res/android"
    android:interpolator="@android:anim/overshoot_interpolator">
    <translate
        android:fromYDelta="-80%p"
        android:toYDelta="0"
        android:duration="2000"/>
</set>
Modify main.xml
<?xml version="1.0" encoding="utf-8"?>
<LinearLayout xmlns:android="http://schemas.android.com/apk/res/android"
    android:layout_width="fill_parent"
    android:layout_height="fill_parent"
    android:orientation="vertical" >

    <TextView
        android:layout_width="fill_parent"
        android:layout_height="wrap_content"
        android:text="@string/hello" />
    <LinearLayout
        android:layout_width="fill_parent"
        android:layout_height="fill_parent"
        android:orientation="horizontal">
        <LinearLayout
         android:layout_width="wrap_content"
         android:layout_height="fill_parent"
         android:orientation="vertical"
         android:gravity="bottom"
         android:layout_margin="30dp">
         <ImageView
             android:id="@+id/image"
             android:layout_width="wrap_content"
             android:layout_height="wrap_content"
             android:layout_gravity="center"
             android:src="@drawable/ic_launcher"/>
        </LinearLayout>
     <LinearLayout
         android:layout_width="fill_parent"
         android:layout_height="fill_parent"
         android:orientation="vertical">
         <Button
             android:id="@+id/acceleratedecelerate"
             android:layout_width="fill_parent"
             android:layout_height="wrap_content"
             android:text="Accelerate_Decelerate"/>
         <Button
             android:id="@+id/accelerate"
             android:layout_width="fill_parent"
             android:layout_height="wrap_content"
             android:text="Accelerate"/>
         <Button
             android:id="@+id/anticipate"
             android:layout_width="fill_parent"
             android:layout_height="wrap_content"
             android:text="Anticipate"/>
         <Button
             android:id="@+id/anticipateovershoot"
             android:layout_width="fill_parent"
             android:layout_height="wrap_content"
             android:text="Anticipate_Overshoot"/>
         <Button
             android:id="@+id/bounce"
             android:layout_width="fill_parent"
             android:layout_height="wrap_content"
             android:text="Bounce"/>
         <Button
             android:id="@+id/cycle"
             android:layout_width="fill_parent"
             android:layout_height="wrap_content"
             android:text="Cycle"/>
         <Button
             android:id="@+id/decelerate"
             android:layout_width="fill_parent"
             android:layout_height="wrap_content"
             android:text="Decelerate"/>
         <Button
             android:id="@+id/linear"
             android:layout_width="fill_parent"
             android:layout_height="wrap_content"
             android:text="Linear"/>
         <Button
             android:id="@+id/overshoot"
             android:layout_width="fill_parent"
             android:layout_height="wrap_content"
             android:text="Overshoot"/>

        </LinearLayout>
    </LinearLayout>
</LinearLayout>
Main Activity:
package com.exercise.AndroidAnimInterpolator;

import android.app.Activity;
import android.os.Bundle;
import android.view.View;
import android.view.animation.Animation;
import android.view.animation.AnimationUtils;
import android.widget.Button;
import android.widget.ImageView;

public class AndroidAnimInterpolatorActivity extends Activity {
    /** Called when the activity is first created. */
    @Override
    public void onCreate(Bundle savedInstanceState) {
        super.onCreate(savedInstanceState);
        setContentView(R.layout.main);

        final Animation animAccelerateDecelerate = AnimationUtils.loadAnimation(this, R.anim.accelerate_decelerate);
        final Animation animAccelerate = AnimationUtils.loadAnimation(this, R.anim.accelerate);
        final Animation animAnticipate = AnimationUtils.loadAnimation(this, R.anim.anticipate);
        final Animation animAnticipateOvershoot = AnimationUtils.loadAnimation(this, R.anim.anticipate_overshoot);
        final Animation animBounce = AnimationUtils.loadAnimation(this, R.anim.bounce);
        final Animation animCycle = AnimationUtils.loadAnimation(this, R.anim.cycle);
        final Animation animDecelerate = AnimationUtils.loadAnimation(this, R.anim.decelerate);
        final Animation animLinear = AnimationUtils.loadAnimation(this, R.anim.linear);
        final Animation animOvershoot = AnimationUtils.loadAnimation(this, R.anim.overshoot);

        final ImageView image = (ImageView)findViewById(R.id.image);
        Button btnAccelerateDecelerate = (Button)findViewById(R.id.acceleratedecelerate);
        Button btnAccelerate = (Button)findViewById(R.id.accelerate);
        Button btnAnticipate = (Button)findViewById(R.id.anticipate);
        Button btnAnticipateOvershoot = (Button)findViewById(R.id.anticipateovershoot);
        Button btnBounce = (Button)findViewById(R.id.bounce);
        Button btnCycle = (Button)findViewById(R.id.cycle);
        Button btnDecelerate = (Button)findViewById(R.id.decelerate);
        Button btnLinear = (Button)findViewById(R.id.linear);
        Button btnOvershoot = (Button)findViewById(R.id.overshoot);

        btnAccelerateDecelerate.setOnClickListener(new Button.OnClickListener(){

   @Override
   public void onClick(View arg0) {
    image.startAnimation(animAccelerateDecelerate);

   }});

        btnAccelerate.setOnClickListener(new Button.OnClickListener(){

   @Override
   public void onClick(View arg0) {
    image.startAnimation(animAccelerate);

   }});

        btnAnticipate.setOnClickListener(new Button.OnClickListener(){

   @Override
   public void onClick(View arg0) {
    image.startAnimation(animAnticipate);

   }});

        btnAnticipateOvershoot.setOnClickListener(new Button.OnClickListener(){

   @Override
   public void onClick(View arg0) {
    image.startAnimation(animAnticipateOvershoot);

   }});

        btnBounce.setOnClickListener(new Button.OnClickListener(){

   @Override
   public void onClick(View arg0) {
    image.startAnimation(animBounce);

   }});

        btnCycle.setOnClickListener(new Button.OnClickListener(){

   @Override
   public void onClick(View arg0) {
    image.startAnimation(animCycle);

   }});

        btnDecelerate.setOnClickListener(new Button.OnClickListener(){

   @Override
   public void onClick(View arg0) {
    image.startAnimation(animDecelerate);

   }});

        btnLinear.setOnClickListener(new Button.OnClickListener(){

   @Override
   public void onClick(View arg0) {
    image.startAnimation(animLinear);

   }});

        btnOvershoot.setOnClickListener(new Button.OnClickListener(){

   @Override
   public void onClick(View arg0) {
    image.startAnimation(animOvershoot);

   }});

    }
}Updated@2015-10-19:
- Interpolator effect on ObjectAnimator
Tuesday, February 7, 2012
Handle AnimationListener

Modify from last exercise "Apply animation on Button", Keep anim_alpha.xml, anim_rotate.xml, anim_scale.xml and anim_translate.xml no change.
Modify main.xml
<?xml version="1.0" encoding="utf-8"?>
<LinearLayout xmlns:android="http://schemas.android.com/apk/res/android"
 android:layout_width="fill_parent"
 android:layout_height="fill_parent"
 android:orientation="vertical" >

 <TextView
     android:layout_width="fill_parent"
     android:layout_height="wrap_content"
     android:text="@string/hello" />
 <FrameLayout
     android:layout_width="fill_parent"
     android:layout_height="fill_parent">
     <LinearLayout
         android:id="@+id/layer_image"
         android:layout_width="fill_parent"
         android:layout_height="fill_parent"
         android:orientation="vertical"
         android:gravity="center"
         >
         <ImageView
             android:id="@+id/image"
             android:layout_width="wrap_content"
             android:layout_height="wrap_content"
             android:src="@drawable/ic_launcher"/>
     </LinearLayout>
     <LinearLayout
         android:id="@+id/layer_buttons"
         android:layout_width="fill_parent"
         android:layout_height="fill_parent"
         android:orientation="vertical"
         >
         <Button
             android:id="@+id/translate"
             android:layout_width="200dp"
             android:layout_height="wrap_content"
             android:layout_margin="10dp"
             android:text="Translate" />
         <Button
             android:id="@+id/alpha"
             android:layout_width="200dp"
             android:layout_height="wrap_content"
             android:layout_margin="10dp"
             android:text="Alpha" />
         <Button
             android:id="@+id/scale"
             android:layout_width="200dp"
             android:layout_height="wrap_content"
             android:layout_margin="10dp"
             android:text="Scale" />
         <Button
             android:id="@+id/rotate"
             android:layout_width="200dp"
             android:layout_height="wrap_content"
             android:layout_margin="10dp"
             android:text="Rotate" />
     </LinearLayout>

 </FrameLayout>
</LinearLayout>
Main activity
package com.exercise.AndroidAnimButtons;

import android.app.Activity;
import android.os.Bundle;
import android.view.View;
import android.view.animation.Animation;
import android.view.animation.Animation.AnimationListener;
import android.view.animation.AnimationUtils;
import android.widget.Button;
import android.widget.ImageView;
import android.widget.LinearLayout;

public class AndroidAnimButtonsActivity extends Activity {

 LinearLayout layerImage;
 LinearLayout layerButtons;

 /** Called when the activity is first created. */
 @Override
 public void onCreate(Bundle savedInstanceState) {
     super.onCreate(savedInstanceState);
     setContentView(R.layout.main);

     final Animation animTranslate = AnimationUtils.loadAnimation(this, R.anim.anim_translate);
     final Animation animAlpha = AnimationUtils.loadAnimation(this, R.anim.anim_alpha);
     final Animation animScale = AnimationUtils.loadAnimation(this, R.anim.anim_scale);
     final Animation animRotate = AnimationUtils.loadAnimation(this, R.anim.anim_rotate);

     animTranslate.setAnimationListener(animationListener);
     animAlpha.setAnimationListener(animationListener);
     animScale.setAnimationListener(animationListener);
     animRotate.setAnimationListener(animationListener);

     Button btnTranslate = (Button)findViewById(R.id.translate);
     Button btnAlpha = (Button)findViewById(R.id.alpha);
     Button btnScale = (Button)findViewById(R.id.scale);
     Button btnRotate = (Button)findViewById(R.id.rotate);
     final ImageView image = (ImageView)findViewById(R.id.image);

     layerImage = (LinearLayout)findViewById(R.id.layer_image);
     layerButtons = (LinearLayout)findViewById(R.id.layer_buttons);
     layerImage.setVisibility(View.INVISIBLE);
  layerButtons.setVisibility(View.VISIBLE);

     btnTranslate.setOnClickListener(new Button.OnClickListener(){

   @Override
   public void onClick(View arg0) {
    layerImage.setVisibility(View.VISIBLE);
    layerButtons.setVisibility(View.INVISIBLE);
    image.startAnimation(animTranslate);
   }});

     btnAlpha.setOnClickListener(new Button.OnClickListener(){

   @Override
   public void onClick(View arg0) {
    layerImage.setVisibility(View.VISIBLE);
    layerButtons.setVisibility(View.INVISIBLE);
    image.startAnimation(animAlpha);
   }});

     btnScale.setOnClickListener(new Button.OnClickListener(){

   @Override
   public void onClick(View arg0) {
    layerImage.setVisibility(View.VISIBLE);
    layerButtons.setVisibility(View.INVISIBLE);
    image.startAnimation(animScale);
   }});

     btnRotate.setOnClickListener(new Button.OnClickListener(){

   @Override
   public void onClick(View arg0) {
    layerImage.setVisibility(View.VISIBLE);
    layerButtons.setVisibility(View.INVISIBLE);
    image.startAnimation(animRotate);
   }});
 }

 AnimationListener animationListener
 = new AnimationListener(){

  @Override
  public void onAnimationEnd(Animation arg0) {
   // TODO Auto-generated method stub
   layerImage.setVisibility(View.INVISIBLE);
   layerButtons.setVisibility(View.VISIBLE);
  }

  @Override
  public void onAnimationRepeat(Animation animation) {
   // TODO Auto-generated method stub

  }

  @Override
  public void onAnimationStart(Animation animation) {
   // TODO Auto-generated method stub

  }

 };
}Monday, February 6, 2012
AT&T Application Resource Optimizer (ARO)

AT&T Application Resource Optimizer (ARO) is a free diagnostic tool for analyzing the performance of your mobile applications. It can help your app run faster and smarter by providing recommendations to help optimize your mobile application's performance, speed, network impact and battery utilization. The tool is comprised of two parts, the AT&T ARO Data Analyzer and the AT&T ARO Data Collector.
The AT&T ARO Data Analyzer is a tool for measuring and analyzing the energy usage when various applications are running on a device or on the Android Emulator. The Data Analyzer works from application traces gathered through the Data Collector to do its analysis.
Source:
- AT&T Application Resource Optimizer (ARO)
- AT&T ARO Getting Started Guide
Sunday, February 5, 2012
Apply animation on Button
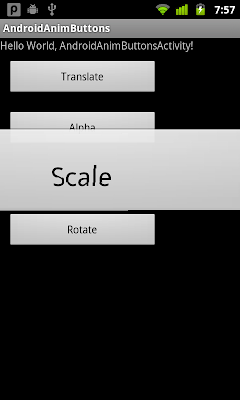
Create four XML files for animation:
/res/anim/anim_alpha.xml
<?xml version="1.0" encoding="utf-8"?>
<set xmlns:android="http://schemas.android.com/apk/res/android"
   android:interpolator="@android:anim/linear_interpolator">
   <alpha
       android:fromAlpha="1.0"
       android:toAlpha="0.1"
       android:duration="500"
       android:repeatCount="1"
       android:repeatMode="reverse" />
</set>
/res/anim/anim_rotate.xml
<?xml version="1.0" encoding="utf-8"?>
<set xmlns:android="http://schemas.android.com/apk/res/android"
   android:interpolator="@android:anim/linear_interpolator">
   <rotate
       android:fromDegrees="0"
       android:toDegrees="360"
       android:pivotX="50%"
       android:pivotY="50%"
       android:duration="500"
       android:startOffset="0"
       android:repeatCount="1"
       android:repeatMode="reverse" />
</set>
/res/anim/anim_scale.xml
<?xml version="1.0" encoding="utf-8"?>
<set xmlns:android="http://schemas.android.com/apk/res/android"
   android:interpolator="@android:anim/linear_interpolator">
   <scale
       android:fromXScale="1.0"
       android:toXScale="3.0"
       android:fromYScale="1.0"
       android:toYScale="3.0"
       android:pivotX="50%"
       android:pivotY="50%"
       android:duration="500"
       android:repeatCount="1"
       android:repeatMode="reverse" />
</set>
/res/anim/anim_translate.xml
<?xml version="1.0" encoding="utf-8"?>
<set xmlns:android="http://schemas.android.com/apk/res/android"
   android:interpolator="@android:anim/linear_interpolator">
   <translate
       android:fromXDelta="0"
       android:toXDelta="100%p"
       android:duration="500"
       android:repeatCount="1"
       android:repeatMode="reverse"/>
</set>
main.xml
<?xml version="1.0" encoding="utf-8"?>
<LinearLayout xmlns:android="http://schemas.android.com/apk/res/android"
   android:layout_width="fill_parent"
   android:layout_height="fill_parent"
   android:orientation="vertical" >

   <TextView
       android:layout_width="fill_parent"
       android:layout_height="wrap_content"
       android:text="@string/hello" />

   <Button
       android:id="@+id/translate"
       android:layout_width="200dp"
       android:layout_height="wrap_content"
       android:layout_margin="10dp"
       android:text="Translate" />
   <Button
       android:id="@+id/alpha"
       android:layout_width="200dp"
       android:layout_height="wrap_content"
       android:layout_margin="10dp"
       android:text="Alpha" />
   <Button
       android:id="@+id/scale"
       android:layout_width="200dp"
       android:layout_height="wrap_content"
       android:layout_margin="10dp"
       android:text="Scale" />
   <Button
       android:id="@+id/rotate"
       android:layout_width="200dp"
       android:layout_height="wrap_content"
       android:layout_margin="10dp"
       android:text="Rotate" />

</LinearLayout>
Main activity:
package com.exercise.AndroidAnimButtons;

import android.app.Activity;
import android.os.Bundle;
import android.view.View;
import android.view.animation.Animation;
import android.view.animation.AnimationUtils;
import android.widget.Button;

public class AndroidAnimButtonsActivity extends Activity {
   /** Called when the activity is first created. */
   @Override
   public void onCreate(Bundle savedInstanceState) {
       super.onCreate(savedInstanceState);
       setContentView(R.layout.main);

       final Animation animTranslate = AnimationUtils.loadAnimation(this, R.anim.anim_translate);
       final Animation animAlpha = AnimationUtils.loadAnimation(this, R.anim.anim_alpha);
       final Animation animScale = AnimationUtils.loadAnimation(this, R.anim.anim_scale);
       final Animation animRotate = AnimationUtils.loadAnimation(this, R.anim.anim_rotate);

       Button btnTranslate = (Button)findViewById(R.id.translate);
       Button btnAlpha = (Button)findViewById(R.id.alpha);
       Button btnScale = (Button)findViewById(R.id.scale);
       Button btnRotate = (Button)findViewById(R.id.rotate);

       btnTranslate.setOnClickListener(new Button.OnClickListener(){

  @Override
  public void onClick(View arg0) {
   arg0.startAnimation(animTranslate);
  }});

       btnAlpha.setOnClickListener(new Button.OnClickListener(){

  @Override
  public void onClick(View arg0) {
   arg0.startAnimation(animAlpha);
  }});

       btnScale.setOnClickListener(new Button.OnClickListener(){

  @Override
  public void onClick(View arg0) {
   arg0.startAnimation(animScale);
  }});

       btnRotate.setOnClickListener(new Button.OnClickListener(){

  @Override
  public void onClick(View arg0) {
   arg0.startAnimation(animRotate);
  }});
   }
}Next:
- Handle AnimationListener
Related:
- Start Animation in Activity start
More:
- Apply animation on buttons to start activity