Friday, January 31, 2014

List UsbDevice, UsbInterface and UsbEndpoint in USB Host mode

I have a simple example "List attached USB devices in USB Host mode" in old post. It's modified to get various UsbDevice, UsbInterface and UsbEndpoint here.

UsbDevice, UsbInterface and UsbEndpoint in USB Host mode
As mentioned in the old post, have to specify the app to be run as UDB Host, add uses-feature of "android.hardware.usb.host", and android:minSdkVersion="12" in AndroidManifest.xml.

MainActivity.java
package com.example.androidusbhost;

import java.util.ArrayList;
import java.util.HashMap;
import java.util.Iterator;

import android.hardware.usb.UsbConstants;
import android.hardware.usb.UsbDevice;
import android.hardware.usb.UsbEndpoint;
import android.hardware.usb.UsbInterface;
import android.hardware.usb.UsbManager;
import android.os.Bundle;
import android.view.View;
import android.view.View.OnClickListener;
import android.widget.AdapterView;
import android.widget.AdapterView.OnItemSelectedListener;
import android.widget.ArrayAdapter;
import android.widget.Button;
import android.widget.Spinner;
import android.widget.TextView;
import android.app.Activity;
import android.content.Context;

public class MainActivity extends Activity {

 Button btnCheck;
 TextView textInfo;
 TextView textInfoInterface;
 TextView textEndPoint;
 
 Spinner spDeviceName;
 ArrayList<String> listDeviceName;
 ArrayList<UsbDevice> listUsbDevice;
 ArrayAdapter<String> adapterDevice;
 
 Spinner spInterface;
 ArrayList<String> listInterface;
 ArrayList<UsbInterface> listUsbInterface;
 ArrayAdapter<String> adapterInterface;
 
 Spinner spEndPoint;
 ArrayList<String> listEndPoint;
 ArrayList<UsbEndpoint> listUsbEndpoint;
 ArrayAdapter<String> adapterEndpoint;

 @Override
 protected void onCreate(Bundle savedInstanceState) {
  super.onCreate(savedInstanceState);
  setContentView(R.layout.activity_main);
  
  spDeviceName = (Spinner)findViewById(R.id.spinnerdevicename);
  spInterface = (Spinner)findViewById(R.id.spinnerinterface);
  spEndPoint = (Spinner)findViewById(R.id.spinnerendpoint);
  textInfo = (TextView) findViewById(R.id.info);
  textInfoInterface = (TextView)findViewById(R.id.infointerface);
  textEndPoint = (TextView)findViewById(R.id.infoendpoint);
  
  btnCheck = (Button) findViewById(R.id.check);
  btnCheck.setOnClickListener(new OnClickListener() {

   @Override
   public void onClick(View arg0) {
    checkDeviceInfo();
   }
  });
 }

 private void checkDeviceInfo() {
  
  listDeviceName = new ArrayList<String>();
  listUsbDevice = new ArrayList<UsbDevice>();
  
  UsbManager manager = (UsbManager) getSystemService(Context.USB_SERVICE);
  HashMap<String, UsbDevice> deviceList = manager.getDeviceList();
  Iterator<UsbDevice> deviceIterator = deviceList.values().iterator();

  while (deviceIterator.hasNext()) {
   UsbDevice device = deviceIterator.next();
   listDeviceName.add(device.getDeviceName());
   listUsbDevice.add(device);
   
  }
  
  textInfo.setText("");
  textInfoInterface.setText("");
  textEndPoint.setText("");
  
  adapterDevice = new ArrayAdapter<String>(this, 
    android.R.layout.simple_spinner_item, listDeviceName);
  adapterDevice.setDropDownViewResource(android.R.layout.simple_spinner_dropdown_item);
  spDeviceName.setAdapter(adapterDevice);
  spDeviceName.setOnItemSelectedListener(deviceOnItemSelectedListener);
 }
 
 OnItemSelectedListener deviceOnItemSelectedListener = 
   new OnItemSelectedListener(){

  @Override
  public void onItemSelected(AdapterView<?> parent, 
    View view, int position, long id) {
   UsbDevice device = listUsbDevice.get(position);
   
   String i = device.toString() + "\n" + 
     "DeviceID: " + device.getDeviceId() + "\n" +
     "DeviceName: " + device.getDeviceName() + "\n" +
     "DeviceClass: " + device.getDeviceClass() + " - " 
      + translateDeviceClass(device.getDeviceClass()) + "\n" +
     "DeviceSubClass: " + device.getDeviceSubclass() + "\n" +
     "VendorID: " + device.getVendorId() + "\n" +
     "ProductID: " + device.getProductId() + "\n" +
     "InterfaceCount: " + device.getInterfaceCount();
   textInfo.setText(i);
   
   checkUsbDevicve(device);
  }

  @Override
  public void onNothingSelected(AdapterView<?> parent) {}
  
 };
 
 private void checkUsbDevicve(UsbDevice d) {
  listInterface = new ArrayList<String>();
  listUsbInterface = new ArrayList<UsbInterface>();
  
  for(int i=0; i<d.getInterfaceCount(); i++){
   UsbInterface usbif = d.getInterface(i);
   listInterface.add(usbif.toString());
   listUsbInterface.add(usbif);
  }
  
  adapterInterface = new ArrayAdapter<String>(this, 
    android.R.layout.simple_spinner_item, listInterface);
  adapterDevice.setDropDownViewResource(android.R.layout.simple_spinner_dropdown_item);
  spInterface.setAdapter(adapterInterface);
  spInterface.setOnItemSelectedListener(interfaceOnItemSelectedListener);
 }
 
 OnItemSelectedListener interfaceOnItemSelectedListener = 
   new OnItemSelectedListener(){

  @Override
  public void onItemSelected(AdapterView<?> parent, 
    View view, int position, long id) {
   
   UsbInterface selectedUsbIf = listUsbInterface.get(position);
   
   String sUsbIf = "\n" + selectedUsbIf.toString() + "\n"
     + "Id: " + selectedUsbIf.getId() + "\n"
     + "InterfaceClass: " + selectedUsbIf.getInterfaceClass() + "\n"
     + "InterfaceProtocol: " + selectedUsbIf.getInterfaceProtocol() + "\n"
     + "InterfaceSubclass: " + selectedUsbIf.getInterfaceSubclass() + "\n"
     + "EndpointCount: " + selectedUsbIf.getEndpointCount();
   
   textInfoInterface.setText(sUsbIf);
   checkUsbInterface(selectedUsbIf);
  }

  @Override
  public void onNothingSelected(AdapterView<?> parent) {}
  
 };
 
 private void checkUsbInterface(UsbInterface uif) {
  listEndPoint = new ArrayList<String>();
  listUsbEndpoint = new ArrayList<UsbEndpoint>();

  for(int i=0; i<uif.getEndpointCount(); i++){
   UsbEndpoint usbEndpoint = uif.getEndpoint(i);
   listEndPoint.add(usbEndpoint.toString());
   listUsbEndpoint.add(usbEndpoint);
  }
  
  adapterEndpoint = new ArrayAdapter<String>(this, 
    android.R.layout.simple_spinner_item, listEndPoint);
  adapterEndpoint.setDropDownViewResource(android.R.layout.simple_spinner_dropdown_item);
  spEndPoint.setAdapter(adapterEndpoint);
  spEndPoint.setOnItemSelectedListener(endpointOnItemSelectedListener);
 }
 
 OnItemSelectedListener endpointOnItemSelectedListener = 
   new OnItemSelectedListener(){

  @Override
  public void onItemSelected(AdapterView<?> parent, 
    View view, int position, long id) {
   
   UsbEndpoint selectedEndpoint = listUsbEndpoint.get(position);
   
   String sEndpoint = "\n" + selectedEndpoint.toString() + "\n"
    + translateEndpointType(selectedEndpoint.getType());
   
   textEndPoint.setText(sEndpoint);
  }

  @Override
  public void onNothingSelected(AdapterView<?> parent) {}
  
 };
 
 private String translateEndpointType(int type){
  switch(type){
  case UsbConstants.USB_ENDPOINT_XFER_CONTROL:
   return "USB_ENDPOINT_XFER_CONTROL (endpoint zero)";
  case UsbConstants.USB_ENDPOINT_XFER_ISOC:
   return "USB_ENDPOINT_XFER_ISOC (isochronous endpoint)";
  case UsbConstants.USB_ENDPOINT_XFER_BULK :
   return "USB_ENDPOINT_XFER_BULK (bulk endpoint)";
  case UsbConstants.USB_ENDPOINT_XFER_INT:
   return "USB_ENDPOINT_XFER_INT (interrupt endpoint)";
  default: 
   return "unknown";
  }
 }
 
 private String translateDeviceClass(int deviceClass){
  switch(deviceClass){
  case UsbConstants.USB_CLASS_APP_SPEC: 
   return "Application specific USB class";
  case UsbConstants.USB_CLASS_AUDIO: 
   return "USB class for audio devices";
  case UsbConstants.USB_CLASS_CDC_DATA: 
   return "USB class for CDC devices (communications device class)";
  case UsbConstants.USB_CLASS_COMM: 
   return "USB class for communication devices";
  case UsbConstants.USB_CLASS_CONTENT_SEC: 
   return "USB class for content security devices";
  case UsbConstants.USB_CLASS_CSCID: 
   return "USB class for content smart card devices";
  case UsbConstants.USB_CLASS_HID: 
   return "USB class for human interface devices (for example, mice and keyboards)";
  case UsbConstants.USB_CLASS_HUB: 
   return "USB class for USB hubs";
  case UsbConstants.USB_CLASS_MASS_STORAGE: 
   return "USB class for mass storage devices";
  case UsbConstants.USB_CLASS_MISC: 
   return "USB class for wireless miscellaneous devices";
  case UsbConstants.USB_CLASS_PER_INTERFACE: 
   return "USB class indicating that the class is determined on a per-interface basis";
  case UsbConstants.USB_CLASS_PHYSICA: 
   return "USB class for physical devices";
  case UsbConstants.USB_CLASS_PRINTER: 
   return "USB class for printers";
  case UsbConstants.USB_CLASS_STILL_IMAGE: 
   return "USB class for still image devices (digital cameras)";
  case UsbConstants.USB_CLASS_VENDOR_SPEC: 
   return "Vendor specific USB class";
  case UsbConstants.USB_CLASS_VIDEO: 
   return "USB class for video devices";
  case UsbConstants.USB_CLASS_WIRELESS_CONTROLLER: 
   return "USB class for wireless controller devices";
  default: return "Unknown USB class!";
  
  }
 }

}

Layout, activity_main.xml
<LinearLayout xmlns:android="http://schemas.android.com/apk/res/android"
    xmlns:tools="http://schemas.android.com/tools"
    android:layout_width="match_parent"
    android:layout_height="match_parent"
    android:orientation="vertical"
    android:paddingBottom="@dimen/activity_vertical_margin"
    android:paddingLeft="@dimen/activity_horizontal_margin"
    android:paddingRight="@dimen/activity_horizontal_margin"
    android:paddingTop="@dimen/activity_vertical_margin"
    tools:context=".MainActivity" >

    <TextView
        android:layout_width="wrap_content"
        android:layout_height="wrap_content"
        android:layout_gravity="center_horizontal"
        android:autoLink="web"
        android:text="http://android-er.blogspot.com/"
        android:textStyle="bold" />

    <Button
        android:id="@+id/check"
        android:layout_width="match_parent"
        android:layout_height="wrap_content"
        android:text="Check USB devices" />

    <Spinner
        android:id="@+id/spinnerdevicename"
        android:layout_width="match_parent"
        android:layout_height="wrap_content" />

    <Spinner
        android:id="@+id/spinnerinterface"
        android:layout_width="match_parent"
        android:layout_height="wrap_content" />
    
    <Spinner
        android:id="@+id/spinnerendpoint"
        android:layout_width="match_parent"
        android:layout_height="wrap_content" />

    <ScrollView
        android:layout_width="match_parent"
        android:layout_height="match_parent" >

        <LinearLayout
            android:layout_width="match_parent"
            android:layout_height="wrap_content"
            android:orientation="vertical" >

            <TextView
                android:id="@+id/info"
                android:layout_width="match_parent"
                android:layout_height="wrap_content" />

            <TextView
                android:id="@+id/infointerface"
                android:layout_width="match_parent"
                android:layout_height="wrap_content"
                android:textStyle="italic" />
            
            <TextView
                android:id="@+id/infoendpoint"
                android:layout_width="match_parent"
                android:layout_height="wrap_content"
                android:textStyle="bold" />
            
        </LinearLayout>
    </ScrollView>

</LinearLayout>

In the demo video, the Android device is connected to PC in beginning; it show one UsbDevice only. Then connect with a Arduino Esplora board with USB OTG cable; it show two UsbDevice connected.


download filesDownload the files.

Next:
Read iManufacturer and iProduct of USB Device from raw Device Descriptors


Step-by-step: Android USB Host Mode programming

Thursday, January 30, 2014

A fast Android Emulator, Genymotion

Genymotion is the next generation of the AndroVM open source project, already trusted by 450,000 developers.

It’s even easier to use and has lots more functionalities. To know more: http://www.genymotion.com/

Wednesday, January 29, 2014

Lenovo to acquire Motorola Mobility

Just announced at Google Official Blog:

We’ve just signed an agreement to sell Motorola to Lenovo for $2.91 billion. As this is an important move for Android users everywhere, I wanted to explain why in detail. ~ read more: http://googleblog.blogspot.hk/2014/01/lenovo-to-acquire-motorola-mobility.html


Android Community Group@ARM Connected Commuity

Android Community Group
Android is a robust software stack that includes an operating system, middleware and select applications. If you are developing Android apps or devices for mobile phones, tablets, etc., here (http://community.arm.com/groups/android-community) is where you'll find the latest ARM technology including Android porting guides, reference platform information and Linux kernel information including partnership with Linaro. You'll also find useful information on Mali, graphics IP and some of ARM Android porting service partners.

Build native mobile applications using HTML, CSS and JavaScript

Google introduce early developer preview of a toolchain to build native mobile apps using HTML, CSS and JavaScript. The toolchain based on Apache Cordova, an open-source mobile development framework.


The toolchain wraps your Chrome App with a native application shell and enables you to distribute your app via Google Play and the Apple App Store. We provide a simple developer workflow for packaging a Chrome App natively for mobile platforms. You can run your Chrome App on a device or emulator using the command-line or an IDE. Alternatively, you can use the Chrome Apps Developer Tool to run your app on an Android device without the need to install an IDE or the mobile platform’s SDK.

Soure: Chromium Blog: Run Chrome Apps on mobile using Apache Cordova


Tuesday, January 28, 2014

Programming Google Glass

Google Glass is the new wearable computer everyone's talking about. It offers a head-mounted optical display and touch interface, and it's programmable. Kick-start your Glassware development by exploring how users can interface with Glass, developing a Glass application fast by using the Mirror API to manipulate Timeline cards and menus, tracking a Glass's geolocation, creating rich interactions by responding to user inputs, and capturing or serving user images and videos. This is the book to read for a shortcut to this brave new world.

Google Glass is the next big thing in portable technology---a wearable computer with an optical head-mounted display. Programming Google Glass is your all-inclusive guidebook for crafting your own Glassware using the Mirror API.

You'll start by setting up a production-ready service using Google App Engine, then provide Glass users an authorization to your Glassware. You'll learn how to handle the provided credentials, and from there you'll dive into the parts that make up the Glass interface, managing the timeline and creating cards and menu items. Next you'll create services where the user can interact with your server, such as geolocation tracking, change notifications, and custom menu options. You'll use this information to create a sophisticated application that suggests local restaurants. You'll see how to attach or detach assets, images, and video, and learn the basics of the emerging field of optical-display design. You'll see how to properly design new Glassware and update existing applications to become Glassware.

Now is the best time to be an early adopter of a technology that will only become more advanced, nuanced, and ubiquitous.

What You Need:

You will need a Google Glass device and Java 1.6 or greater. An Android device, like a smart phone or tablet, is also helpful, but not necessary.

Monday, January 27, 2014

Developing Android on Android: Automate Your Device with Scripts and Tasks

Developing Android on Android: Automate Your Device with Scripts and Tasks

Take advantage of the open, tinker-friendly Android platform and make your device work the way you want it to. Quickly create Android tasks, scripts, and programs entirely on your Android device--no PC required. Learn how to build your own innovative Android programs and workflows with tools you can run on Android itself, and tailor the Android default user interface to match your mobile lifestyle needs. Apply your favorite scripting language to rapidly develop programs that speak the time and battery level, alert you to important events or locations, read your new email to you, and much more.

Take charge of your Android phone or tablet by creating your own programs and scripts to make your device work for you. Developing Android on Android will teach you how to use the latest cutting-edge technologies to tailor your Android experience to your mobile lifestyle.

Write scripts that listen to your voice and post spoken tweets on Twitter. Track your phone's status and have it report its location every ten minutes via an instant message. Query and listen to weather forecasts with the click of a headset button. Have system notifications and new SMS messages automatically read to you. Design your own application launcher with a look and behavior that can be dynamically modified depending on the scripts and applications you execute.

With step-by-step instructions throughout, you'll master how to develop your own custom applications. And because you'll be using programming tools on your Android, you can change and improve your programs at any time. You'll build new Android programs and task-driven on-board workflows faster than any traditional Android development environment could hope to match!

What You Need

An Android smartphone or tablet running Android 4.0 or higher.

Saturday, January 25, 2014

Interactive resizable PopupWindow

This example show how to implement OnTouchListener for PopupWindow to make it resizable inactively.

Interactive resizable PopupWindow

package com.example.androidpopupwindow;

import android.os.Bundle;
import android.view.LayoutInflater;
import android.view.MotionEvent;
import android.view.View;
import android.view.View.OnTouchListener;
import android.view.ViewGroup.LayoutParams;
import android.widget.ArrayAdapter;
import android.widget.Button;
import android.widget.PopupWindow;
import android.widget.Spinner;
import android.app.Activity;

public class MainActivity extends Activity {
 
 String[] DayOfWeek = {"Sunday", "Monday", "Tuesday", 
   "Wednesday", "Thursday", "Friday", "Saturday"};

 @Override
 protected void onCreate(Bundle savedInstanceState) {
  super.onCreate(savedInstanceState);
  setContentView(R.layout.activity_main);

  final Button btnOpenPopup = (Button) findViewById(R.id.openpopup);
  btnOpenPopup.setOnClickListener(new Button.OnClickListener() {

   @Override
   public void onClick(View arg0) {
    LayoutInflater layoutInflater = 
      (LayoutInflater)getBaseContext()
      .getSystemService(LAYOUT_INFLATER_SERVICE);
    View popupView = layoutInflater.inflate(R.layout.popup, null);
    final PopupWindow popupWindow = new PopupWindow(
      popupView, LayoutParams.WRAP_CONTENT, LayoutParams.WRAP_CONTENT);
    
    Button btnDismiss = (Button)popupView.findViewById(R.id.dismiss);
    
    Spinner popupSpinner = (Spinner)popupView.findViewById(R.id.popupspinner);
    
    ArrayAdapter<String> adapter = 
      new ArrayAdapter<String>(MainActivity.this, 
        android.R.layout.simple_spinner_item, DayOfWeek);
    adapter.setDropDownViewResource(android.R.layout.simple_spinner_dropdown_item);
    popupSpinner.setAdapter(adapter);
    
    btnDismiss.setOnClickListener(new Button.OnClickListener(){

     @Override
     public void onClick(View v) {
      popupWindow.dismiss();
     }});
    
    popupWindow.showAsDropDown(btnOpenPopup, 50, -30);
    
    popupView.setOnTouchListener(new OnTouchListener() {
     int orgX, orgY;
     int offsetX, offsetY;
     
     int orgWidth, orgHeight;

     @Override
     public boolean onTouch(View v, MotionEvent event) {
      switch (event.getAction()) {
      case MotionEvent.ACTION_DOWN:
       orgX = (int) event.getRawX();
       orgY = (int) event.getRawY();

       orgWidth = v.getMeasuredWidth();
       orgHeight = v.getMeasuredHeight();
       
       break;
      case MotionEvent.ACTION_MOVE:
       offsetX = (int)event.getRawX() - orgX;
       offsetY = (int)event.getRawY() - orgY;

       //resize PopWindow
       popupWindow.update(
         orgWidth + offsetX, 
         orgHeight + offsetY);
       break;
      }
      return true;
     }});
   }

  });
 }

}

For other files, such as layout, customborder.xml...etc, refer to last exercise "PopupWindow with transparent background" and "Create background of Popup Window with custom shape".

download filesDownload the files.


Related: Implement drag-and-drop movable PopupWindow

Friday, January 24, 2014

Implement drag-and-drop movable PopupWindow

This example implement OnTouchListener() for PopupWindow to detect user action of drag-and-drop, to move PopupWindow.

movable PopupWindow
Movable PopupWindow

package com.example.androidpopupwindow;

import android.os.Bundle;
import android.view.LayoutInflater;
import android.view.MotionEvent;
import android.view.View;
import android.view.View.OnTouchListener;
import android.view.ViewGroup.LayoutParams;
import android.widget.ArrayAdapter;
import android.widget.Button;
import android.widget.PopupWindow;
import android.widget.Spinner;
import android.app.Activity;

public class MainActivity extends Activity {
 
 String[] DayOfWeek = {"Sunday", "Monday", "Tuesday", 
   "Wednesday", "Thursday", "Friday", "Saturday"};

 @Override
 protected void onCreate(Bundle savedInstanceState) {
  super.onCreate(savedInstanceState);
  setContentView(R.layout.activity_main);

  final Button btnOpenPopup = (Button) findViewById(R.id.openpopup);
  btnOpenPopup.setOnClickListener(new Button.OnClickListener() {

   @Override
   public void onClick(View arg0) {
    LayoutInflater layoutInflater = 
      (LayoutInflater)getBaseContext()
      .getSystemService(LAYOUT_INFLATER_SERVICE);
    View popupView = layoutInflater.inflate(R.layout.popup, null);
    final PopupWindow popupWindow = new PopupWindow(
      popupView, LayoutParams.WRAP_CONTENT, LayoutParams.WRAP_CONTENT);
    
    Button btnDismiss = (Button)popupView.findViewById(R.id.dismiss);
    
    Spinner popupSpinner = (Spinner)popupView.findViewById(R.id.popupspinner);
    
    ArrayAdapter<String> adapter = 
      new ArrayAdapter<String>(MainActivity.this, 
        android.R.layout.simple_spinner_item, DayOfWeek);
    adapter.setDropDownViewResource(android.R.layout.simple_spinner_dropdown_item);
    popupSpinner.setAdapter(adapter);
    
    btnDismiss.setOnClickListener(new Button.OnClickListener(){

     @Override
     public void onClick(View v) {
      popupWindow.dismiss();
     }});
    
    popupWindow.showAsDropDown(btnOpenPopup, 50, -30);
    
    popupView.setOnTouchListener(new OnTouchListener() {
     int orgX, orgY;
     int offsetX, offsetY;

     @Override
     public boolean onTouch(View v, MotionEvent event) {
      switch (event.getAction()) {
      case MotionEvent.ACTION_DOWN:
       orgX = (int) event.getX();
       orgY = (int) event.getY();
       break;
      case MotionEvent.ACTION_MOVE:
       offsetX = (int)event.getRawX() - orgX;
       offsetY = (int)event.getRawY() - orgY;
       popupWindow.update(offsetX, offsetY, -1, -1, true);
       break;
      }
      return true;
     }});
   }

  });
 }

}

For other files, such as layout, customborder.xml...etc, refer to last exercise "PopupWindow with transparent background" and "Create background of Popup Window with custom shape".

download filesDownload the files.


Related: Interactive resizable PopupWindow

Wednesday, January 22, 2014

Create background of Popup Window with custom shape

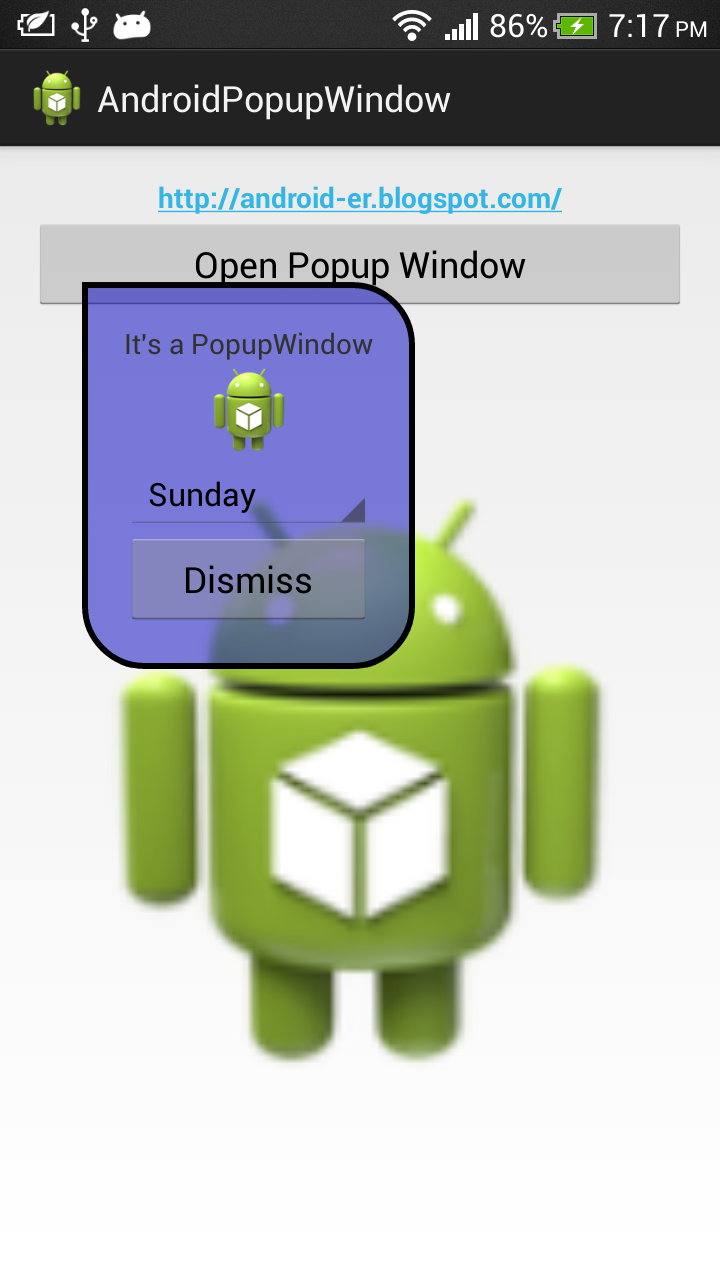
Last example display "PopupWindow with transparent background". I want to have transparent background with visible border. This example create background with custom shape, have rounded border, semi-transparent background.

Popup Window with background of custom shape
Create /res/drawable/customborder.xml to define custom shape.
<shape xmlns:android="http://schemas.android.com/apk/res/android"
       android:shape="rectangle">
  <corners
      android:topLeftRadius="0dp"
      android:topRightRadius="30dp"
      android:bottomRightRadius="30dp"
      android:bottomLeftRadius="30dp" />
  <stroke
      android:width="3dp"
      android:color="@android:color/background_dark" />
  <solid 
      android:color="#800000c0"/>
</shape>

Modify /res/layout/popup.xml to define android:background="@drawable/customborder".
<?xml version="1.0" encoding="utf-8"?>
<LinearLayout xmlns:android="http://schemas.android.com/apk/res/android"
    android:layout_width="fill_parent"
    android:layout_height="fill_parent"
    android:background="@drawable/customborder"
    android:orientation="vertical" >

    <LinearLayout
        android:layout_width="wrap_content"
        android:layout_height="wrap_content"
        android:layout_margin="1dp"
        android:orientation="vertical" >
        
        <LinearLayout
            android:layout_width="wrap_content"
            android:layout_height="wrap_content"
            android:layout_margin="20dp"
            android:orientation="vertical" >

            <TextView
                android:layout_width="fill_parent"
                android:layout_height="wrap_content"
                android:text="It's a PopupWindow" />

            <ImageView
                android:layout_width="fill_parent"
                android:layout_height="wrap_content"
                android:src="@drawable/ic_launcher" />

            <Spinner
                android:id="@+id/popupspinner"
                android:spinnerMode="dialog"
                android:layout_width="fill_parent"
                android:layout_height="wrap_content" />

            <Button
                android:id="@+id/dismiss"
                android:layout_width="fill_parent"
                android:layout_height="wrap_content"
                android:text="Dismiss" />
        </LinearLayout>
    </LinearLayout>

</LinearLayout>

download filesDownload the files.

Next: Implement drag-and-drop movable PopupWindow

PopupWindow with transparent background

PopupWindow with transparent background
A simple way to make background of PopupWindow transparent, you can define android:background="@android:color/transparent" in layout XML of the PopupWindow.

popup.xml
<?xml version="1.0" encoding="utf-8"?>
<LinearLayout xmlns:android="http://schemas.android.com/apk/res/android"
    android:layout_width="fill_parent"
    android:layout_height="fill_parent"
    android:background="@android:color/transparent"
    android:orientation="vertical" >

    <LinearLayout
        android:layout_width="wrap_content"
        android:layout_height="wrap_content"
        android:layout_margin="1dp"
        android:orientation="vertical" >
        
        <LinearLayout
            android:layout_width="wrap_content"
            android:layout_height="wrap_content"
            android:layout_margin="20dp"
            android:orientation="vertical" >

            <TextView
                android:layout_width="fill_parent"
                android:layout_height="wrap_content"
                android:text="It's a PopupWindow" />

            <ImageView
                android:layout_width="fill_parent"
                android:layout_height="wrap_content"
                android:src="@drawable/ic_launcher" />

            <Spinner
                android:id="@+id/popupspinner"
                android:spinnerMode="dialog"
                android:layout_width="fill_parent"
                android:layout_height="wrap_content" />

            <Button
                android:id="@+id/dismiss"
                android:layout_width="fill_parent"
                android:layout_height="wrap_content"
                android:text="Dismiss" />
        </LinearLayout>
    </LinearLayout>

</LinearLayout>

MainActivity.java
package com.example.androidpopupwindow;

import android.os.Bundle;
import android.view.LayoutInflater;
import android.view.View;
import android.view.ViewGroup.LayoutParams;
import android.widget.ArrayAdapter;
import android.widget.Button;
import android.widget.PopupWindow;
import android.widget.Spinner;
import android.app.Activity;

public class MainActivity extends Activity {
 
 String[] DayOfWeek = {"Sunday", "Monday", "Tuesday", 
   "Wednesday", "Thursday", "Friday", "Saturday"};

 @Override
 protected void onCreate(Bundle savedInstanceState) {
  super.onCreate(savedInstanceState);
  setContentView(R.layout.activity_main);

  final Button btnOpenPopup = (Button) findViewById(R.id.openpopup);
  btnOpenPopup.setOnClickListener(new Button.OnClickListener() {

   @Override
   public void onClick(View arg0) {
    LayoutInflater layoutInflater = 
      (LayoutInflater)getBaseContext()
      .getSystemService(LAYOUT_INFLATER_SERVICE);
    View popupView = layoutInflater.inflate(R.layout.popup, null);
    final PopupWindow popupWindow = new PopupWindow(
      popupView, LayoutParams.WRAP_CONTENT, LayoutParams.WRAP_CONTENT);
    
    Button btnDismiss = (Button)popupView.findViewById(R.id.dismiss);
    
    Spinner popupSpinner = (Spinner)popupView.findViewById(R.id.popupspinner);
    
    ArrayAdapter<String> adapter = 
      new ArrayAdapter<String>(MainActivity.this, 
        android.R.layout.simple_spinner_item, DayOfWeek);
    adapter.setDropDownViewResource(android.R.layout.simple_spinner_dropdown_item);
    popupSpinner.setAdapter(adapter);
    
    btnDismiss.setOnClickListener(new Button.OnClickListener(){

     @Override
     public void onClick(View v) {
      popupWindow.dismiss();
     }});
    
    popupWindow.showAsDropDown(btnOpenPopup, 50, -30);
   }

  });
 }

}

activity_main.xml
<LinearLayout xmlns:android="http://schemas.android.com/apk/res/android"
    xmlns:tools="http://schemas.android.com/tools"
    android:layout_width="match_parent"
    android:layout_height="match_parent"
    android:orientation="vertical"
    android:paddingBottom="@dimen/activity_vertical_margin"
    android:paddingLeft="@dimen/activity_horizontal_margin"
    android:paddingRight="@dimen/activity_horizontal_margin"
    android:paddingTop="@dimen/activity_vertical_margin"
    tools:context=".MainActivity" >

    <TextView
        android:layout_width="wrap_content"
        android:layout_height="wrap_content"
        android:text="http://android-er.blogspot.com/"
        android:textStyle="bold"
        android:layout_gravity="center_horizontal"
        android:autoLink="web" />

    <Button
        android:id="@+id/openpopup"
        android:layout_width="fill_parent"
        android:layout_height="wrap_content"
        android:text="Open Popup Window" />
    
    <ImageView 
        android:layout_width="fill_parent"
        android:layout_height="fill_parent"
        android:src="@drawable/ic_launcher" />

</LinearLayout>

download filesDownload the files.

Next: Creat background of Popup Window with custom shape

Monday, January 20, 2014

javafxports , a JavaFX on Android Porting Community

javafxports host a JavaFX Android community project. It contains instructions on how to run JavaFX applications on Android. The code is available at https://bitbucket.org/javafxports/android-graphics-rt.


Creating JavaFX Applications that also run on Android devices is not that hard. This project contains everything that is required to build a Java(FX) runtime for Android devices, along with instructions on how to create an Android project based on an existing Java Project. You can choose to either build the runtime yourself, or download one in the Downloads section of this project. The brave ones can build their own runtime. -- follow the instructions to build the runtime on Linux and MacOS.


Thursday, January 16, 2014

Android Application Security Essentials

Android Application Security Essentials
Write secure Android applications using the most up-to-date techniques and concepts
Overview
  • Understand Android security from kernel to the application layer
  • Protect components using permissions
  • Safeguard user and corporate data from prying eyes
  • Understand the security implications of mobile payments, NFC, and more
In Detail
In today’s techno-savvy world, more and more parts of our lives are going digital, and all this information is accessible anytime and anywhere using mobile devices. It is of the utmost importance that you understand and implement security in your apps that will reduce the likelihood of hazards that will wreck your users' experience.
"Android Application Security Essentials" takes a deep look into Android security from kernel to the application level, with practical hands-on examples, illustrations, and everyday use cases. This book will show you how to overcome the challenge of getting the security of your applications right.
"Android Application Security Essentials" will show you how to secure your Android applications and data. It will equip you with tricks and tips that will come in handy as you develop your applications.
We will start by learning the overall security architecture of the Android stack. Securing components with permissions, defining security in a manifest file, cryptographic algorithms and protocols on the Android stack, secure storage, security focused testing, and protecting enterprise data on your device is then also discussed in detail. You will also learn how to be security-aware when integrating newer technologies like NFC and mobile payments into your Android applications.
At the end of this book, you will understand Android security at the system level all the way to the nitty-gritty details of application security for securing your Android applications.
What you will learn from this book
  • Get familiar with Android security architecture
  • Secure Android components using permissions
  • Implement cryptography algorithms and protocols to secure your data
  • Protect user information both at rest and in transit
  • Test apps for security
  • Understand security considerations for upcoming use cases like NFC and mobile payments
  • Guard the corporate data of enterprises apps
Approach
"Android Application Security Essentials" is packed with examples, screenshots, illustrations, and real world use cases to secure your apps the right way.
Who this book is written for
If you are looking for guidance and detailed instructions on how to secure app data, then this book is for you. Developers, architects, managers, and technologists who wish to enhance their knowledge of Android security will find this book interesting. Some prior knowledge of development on the Android stack is desirable but not required.

Tuesday, January 14, 2014

HTC One X and One X+ will not get KitKat update...!!!

It's posted in HTC UK’s twitter account that "the One X+ will not receive further Android updates & will remain on the current version of Android". That means both HTC One X and One X+ will not get KitKat update...!!!

ByeByeHTC
#ByeByeHTC


Example of ListFragment inside DrawerLayout

This exercise implement android.app.ListFragment inside DrawerLayout. The ListFragment part refer to my another old post. If you are looking for ListView inside DrawLayout, read last post.

ListFragment inside DrawerLayout

In order to use android.app.ListFragment in your app, AndroidManifest.xml have to be modified to define android:minSdkVersion="11".

Create /res/layout/listfragment1.xml to define the layout of our ListFragment.
<?xml version="1.0" encoding="utf-8"?>
<LinearLayout xmlns:android="http://schemas.android.com/apk/res/android"
    android:layout_width="match_parent"
    android:layout_height="match_parent"
    android:orientation="vertical"
    android:paddingLeft="8dp"
    android:paddingRight="8dp" >

    <ListView
        android:id="@id/android:list"
        android:layout_width="match_parent"
        android:layout_height="match_parent"
        android:layout_weight="1"
        android:drawSelectorOnTop="false" />

    <TextView
        android:id="@id/android:empty"
        android:layout_width="match_parent"
        android:layout_height="match_parent"
        android:text="No data" />

</LinearLayout>

Create MyListFragment1.java extends ListFragment.
package com.example.androiddrawerlayout;

import android.app.ListFragment;
import android.os.Bundle;

import android.view.LayoutInflater;
import android.view.View;
import android.view.ViewGroup;
import android.widget.ArrayAdapter;
import android.widget.ListAdapter;
import android.widget.ListView;
import android.widget.Toast;

public class MyListFragment1 extends ListFragment {

 String[] month = { "January", "February", "March", "April", "May", "June",
   "July", "August", "September", "October", "November", "December" };

 @Override
 public void onCreate(Bundle savedInstanceState) {
  super.onCreate(savedInstanceState);
  ListAdapter myListAdapter = new ArrayAdapter<String>(getActivity(),
    android.R.layout.simple_list_item_1, month);
  setListAdapter(myListAdapter);
 }

 @Override
 public View onCreateView(LayoutInflater inflater, ViewGroup container,
   Bundle savedInstanceState) {
  return inflater.inflate(R.layout.listfragment1, container, false);
 }

 @Override
 public void onListItemClick(ListView l, View v, int position, long id) {
  // TODO Auto-generated method stub
  Toast.makeText(getActivity(),
    getListView().getItemAtPosition(position).toString(),
    Toast.LENGTH_LONG).show();
 }
}

Modify /res/layout/activity_main.xml to include <fragment> of "com.example.androiddrawerlayout.MyListFragment1" inside drawer.
<android.support.v4.widget.DrawerLayout xmlns:android="http://schemas.android.com/apk/res/android"
    xmlns:tools="http://schemas.android.com/tools"
    android:id="@+id/drawer_layout"
    android:layout_width="match_parent"
    android:layout_height="match_parent" >

    <LinearLayout
        android:layout_width="match_parent"
        android:layout_height="match_parent"
        android:background="@android:color/background_light"
        android:orientation="vertical"
        android:paddingBottom="@dimen/activity_vertical_margin"
        android:paddingLeft="@dimen/activity_horizontal_margin"
        android:paddingRight="@dimen/activity_horizontal_margin"
        android:paddingTop="@dimen/activity_vertical_margin"
        tools:context=".MainActivity" >

        <TextView
            android:layout_width="wrap_content"
            android:layout_height="wrap_content"
            android:text="Main layout" />

        <TextView
            android:layout_width="wrap_content"
            android:layout_height="wrap_content"
            android:layout_gravity="center_horizontal"
            android:autoLink="web"
            android:text="http://android-er.blogspot.com/"
            android:textStyle="bold" />

        <Button
            android:id="@+id/opendrawer"
            android:layout_width="match_parent"
            android:layout_height="wrap_content"
            android:text="Open Drawer" />

        <TextView
            android:id="@+id/prompt"
            android:layout_width="match_parent"
            android:layout_height="wrap_content"
            android:gravity="right" />

        <TextView
            android:id="@+id/prompt2"
            android:layout_width="match_parent"
            android:layout_height="wrap_content"
            android:gravity="right" />

        <TextView
            android:id="@+id/selection"
            android:layout_width="match_parent"
            android:layout_height="wrap_content"
            android:gravity="right" />
    </LinearLayout>

    <LinearLayout
        android:id="@+id/drawer"
        android:layout_width="240dp"
        android:layout_height="match_parent"
        android:layout_gravity="start"
        android:background="@android:color/background_light"
        android:orientation="vertical"
        android:padding="5dp" >

        <fragment
            android:id="@+id/fragment1"
            android:name="com.example.androiddrawerlayout.MyListFragment1"
            android:layout_width="match_parent"
            android:layout_height="match_parent"
            android:layout_weight="1" />
    </LinearLayout>

</android.support.v4.widget.DrawerLayout>

MainActivity.java
package com.example.androiddrawerlayout;

import android.os.Bundle;
import android.app.Activity;
import android.support.v4.widget.DrawerLayout;
import android.support.v4.widget.DrawerLayout.DrawerListener;
import android.view.View;
import android.view.View.OnClickListener;
import android.widget.Button;
import android.widget.TextView;

public class MainActivity extends Activity {
 
 DrawerLayout drawerLayout;
 View drawerView;
 TextView textPrompt, textPrompt2;
 TextView textSelection;

 @Override
 protected void onCreate(Bundle savedInstanceState) {
  super.onCreate(savedInstanceState);
  setContentView(R.layout.activity_main);
  
  textPrompt = (TextView)findViewById(R.id.prompt);
  textPrompt2 = (TextView)findViewById(R.id.prompt2);
  
  drawerLayout = (DrawerLayout)findViewById(R.id.drawer_layout);
  drawerView = (View)findViewById(R.id.drawer);
  
  Button buttonOpenDrawer = (Button)findViewById(R.id.opendrawer);
  buttonOpenDrawer.setOnClickListener(new OnClickListener(){

   @Override
   public void onClick(View arg0) {
    drawerLayout.openDrawer(drawerView);
   }});
  
  drawerLayout.setDrawerListener(myDrawerListener);
  
  /*
   * In my trial experiment:
   * Without dummy OnTouchListener for the drawView to 
   * consume the onTouch event, touching/clicking on 
   * un-handled view on drawView will pass to the view
   * under it!
   * - Touching on the Android icon will
   * trigger the TextView("http://android-er.blogspot.com/")
   * to open the web.
   */
  /*
  drawerView.setOnTouchListener(new OnTouchListener() {
   
   @Override
   public boolean onTouch(View v, MotionEvent event) {
    // TODO Auto-generated method stub
    return true;
   }
  });
  */
  
  textSelection = (TextView)findViewById(R.id.selection);
 }
 
 DrawerListener myDrawerListener = new DrawerListener(){

  @Override
  public void onDrawerClosed(View drawerView) {
   textPrompt.setText("onDrawerClosed");
  }

  @Override
  public void onDrawerOpened(View drawerView) {
   textPrompt.setText("onDrawerOpened");
  }

  @Override
  public void onDrawerSlide(View drawerView, float slideOffset) {
   textPrompt.setText("onDrawerSlide: " + String.format("%.2f", slideOffset));
  }

  @Override
  public void onDrawerStateChanged(int newState) {
   String state;
   switch(newState){
   case DrawerLayout.STATE_IDLE:
    state = "STATE_IDLE";
    break;
   case DrawerLayout.STATE_DRAGGING:
    state = "STATE_DRAGGING";
    break;
   case DrawerLayout.STATE_SETTLING:
    state = "STATE_SETTLING";
    break;
   default:
    state = "unknown!";
   }
    
   textPrompt2.setText(state);
  }};

}


download filesDownload the files.

Sunday, January 12, 2014

DrawerLayout with ListView

Follow the exercise "Android DrawerLayout and DrawerListener", we are going to add a ListView inside DrawerLayout, and implement OnItemClickListener.

DrawerLayout with ListView

Layout:
<android.support.v4.widget.DrawerLayout xmlns:android="http://schemas.android.com/apk/res/android"
    xmlns:tools="http://schemas.android.com/tools"
    android:id="@+id/drawer_layout"
    android:layout_width="match_parent"
    android:layout_height="match_parent" >

    <LinearLayout
        android:layout_width="match_parent"
        android:layout_height="match_parent"
        android:background="@android:color/background_light"
        android:orientation="vertical"
        android:paddingBottom="@dimen/activity_vertical_margin"
        android:paddingLeft="@dimen/activity_horizontal_margin"
        android:paddingRight="@dimen/activity_horizontal_margin"
        android:paddingTop="@dimen/activity_vertical_margin"
        tools:context=".MainActivity" >

        <TextView
            android:layout_width="wrap_content"
            android:layout_height="wrap_content"
            android:text="Main layout" />

        <TextView
            android:layout_width="wrap_content"
            android:layout_height="wrap_content"
            android:layout_gravity="center_horizontal"
            android:autoLink="web"
            android:text="http://android-er.blogspot.com/"
            android:textStyle="bold" />

        <Button
            android:id="@+id/opendrawer"
            android:layout_width="match_parent"
            android:layout_height="wrap_content"
            android:text="Open Drawer" />

        <TextView
            android:id="@+id/prompt"
            android:layout_width="match_parent"
            android:layout_height="wrap_content"
            android:gravity="right" />

        <TextView
            android:id="@+id/prompt2"
            android:layout_width="match_parent"
            android:layout_height="wrap_content"
            android:gravity="right" />
        
        <TextView
            android:id="@+id/selection"
            android:layout_width="match_parent"
            android:layout_height="wrap_content"
            android:gravity="right" />
    </LinearLayout>

    <LinearLayout
        android:id="@+id/drawer"
        android:layout_width="240dp"
        android:layout_height="match_parent"
        android:layout_gravity="start"
        android:background="@android:color/background_dark"
        android:orientation="vertical"
        android:padding="5dp" >

        <TextView
            android:layout_width="match_parent"
            android:layout_height="wrap_content"
            android:text="Drawer" />

        <ImageView
            android:layout_width="match_parent"
            android:layout_height="wrap_content"
            android:src="@drawable/ic_launcher" />

        <ListView
            android:id="@+id/drawerlist"
            android:layout_width="match_parent"
            android:layout_height="wrap_content"
            android:background="#e0e0e0" />

        <Button
            android:id="@+id/closedrawer"
            android:layout_width="match_parent"
            android:layout_height="wrap_content"
            android:text="Close Drawer" />
    </LinearLayout>

</android.support.v4.widget.DrawerLayout>

Main code:
package com.example.androiddrawerlayout;

import android.os.Bundle;
import android.app.Activity;
import android.support.v4.widget.DrawerLayout;
import android.support.v4.widget.DrawerLayout.DrawerListener;
import android.view.MotionEvent;
import android.view.View;
import android.view.View.OnClickListener;
import android.view.View.OnTouchListener;
import android.widget.AdapterView;
import android.widget.AdapterView.OnItemClickListener;
import android.widget.ArrayAdapter;
import android.widget.Button;
import android.widget.ListView;
import android.widget.TextView;

public class MainActivity extends Activity {
 
 DrawerLayout drawerLayout;
 View drawerView;
 TextView textPrompt, textPrompt2;
 ListView drawerList;
 TextView textSelection;
 
 private String[] dayOfWeek = {
   "Sunday", "Monday", "Tuesday", "Wednesday",
   "Thursday", "Friday", "Saturday"};
 ArrayAdapter<String> arrayAdapter;

 @Override
 protected void onCreate(Bundle savedInstanceState) {
  super.onCreate(savedInstanceState);
  setContentView(R.layout.activity_main);
  
  textPrompt = (TextView)findViewById(R.id.prompt);
  textPrompt2 = (TextView)findViewById(R.id.prompt2);
  
  drawerLayout = (DrawerLayout)findViewById(R.id.drawer_layout);
  drawerView = (View)findViewById(R.id.drawer);
  
  Button buttonOpenDrawer = (Button)findViewById(R.id.opendrawer);
  buttonOpenDrawer.setOnClickListener(new OnClickListener(){

   @Override
   public void onClick(View arg0) {
    drawerLayout.openDrawer(drawerView);
   }});
  
  Button buttonCloseDrawer = (Button)findViewById(R.id.closedrawer);
  buttonCloseDrawer.setOnClickListener(new OnClickListener(){

   @Override
   public void onClick(View arg0) {
    drawerLayout.closeDrawers();
   }});
  
  drawerLayout.setDrawerListener(myDrawerListener);
  
  /*
   * In my trial experiment:
   * Without dummy OnTouchListener for the drawView to 
   * consume the onTouch event, touching/clicking on 
   * un-handled view on drawView will pass to the view
   * under it!
   * - Touching on the Android icon will
   * trigger the TextView("http://android-er.blogspot.com/")
   * to open the web.
   */
  drawerView.setOnTouchListener(new OnTouchListener() {
   
   @Override
   public boolean onTouch(View v, MotionEvent event) {
    // TODO Auto-generated method stub
    return true;
   }
  });
  
  textSelection = (TextView)findViewById(R.id.selection);
  drawerList = (ListView)findViewById(R.id.drawerlist);
  arrayAdapter = new ArrayAdapter<String>(this, 
    android.R.layout.simple_list_item_1, 
    dayOfWeek);
  drawerList.setAdapter(arrayAdapter);
  
  drawerList.setOnItemClickListener(new OnItemClickListener(){

   @Override
   public void onItemClick(AdapterView<?> parent, 
     View view, int position, long id) {
    String sel = (String)parent.getItemAtPosition(position);
    textSelection.setText(sel);
   }});
 }
 
 DrawerListener myDrawerListener = new DrawerListener(){

  @Override
  public void onDrawerClosed(View drawerView) {
   textPrompt.setText("onDrawerClosed");
  }

  @Override
  public void onDrawerOpened(View drawerView) {
   textPrompt.setText("onDrawerOpened");
  }

  @Override
  public void onDrawerSlide(View drawerView, float slideOffset) {
   textPrompt.setText("onDrawerSlide: " + String.format("%.2f", slideOffset));
  }

  @Override
  public void onDrawerStateChanged(int newState) {
   String state;
   switch(newState){
   case DrawerLayout.STATE_IDLE:
    state = "STATE_IDLE";
    break;
   case DrawerLayout.STATE_DRAGGING:
    state = "STATE_DRAGGING";
    break;
   case DrawerLayout.STATE_SETTLING:
    state = "STATE_SETTLING";
    break;
   default:
    state = "unknown!";
   }
    
   textPrompt2.setText(state);
  }};

}


download filesDownload the files.

Related: DrawerLayout with ListFragment

Friday, January 10, 2014

Android Developer Tools Essentials

GDG Silicon Valley: Android Developer Tools Essentials - with Mike Wolfson

This presentation is an overview of the Android Developer Tools (ADT), including many useful techniques, tips and tricks for getting the most out of them.

As with any set of tools, they are only useful if you are able to identify the right tool for the right job, and know how to find it when you need it. This presentation is designed help every Android craftsman (from beginner to expert) learn how to use the basic toolkit to create the best products possible, with the least amount of effort.

I will walk through an Android project that contains a series of pre-configured examples that highlight the capabilities of theADT. The complete code will be available for download from GitHub so that attendees can follow along, or run the examples themselves at a later time.

In this talk, I will show you how to do all these things:
• Isolate memory problems
• Optimize your UI responsiveness
• Use the emulator effectively (and speed it up)
• Test against multiple form factors
• Generate code automatically

Use Eclipse shortcuts to save time
• Create and edit Layout files
• Access and manage your log files
• and more...

Helpful tips about getting discovered on Google Play search

PlayBytes: App Visibility and Search

Check out some helpful tips about getting discovered on Google Play search. This video review how to avoid common publishing and filtering oversights, recommendations for your Store Listing, and other helpful discoverability features.

Related Links:
Android Developer Help Center - http://support.google.com/googleplay/android-developer


Wednesday, January 8, 2014

Build your own phone with Project Ara


Google-owned Motorola launches a project for modular smartphones, Facebook tests new ways to track users, and Barnes & Noble introduces the new Nook GlowLight.

CES 2014: Keynote Address by Brian Krzanich, Intel CEO


Intel CEO Brian Krzanich discusses wearable technology, the journey towards conflict-free processors, in-car infotainment, and Intel Security at CES 2014 in Las Vegas.

Monday, January 6, 2014

Android DrawerLayout and DrawerListener

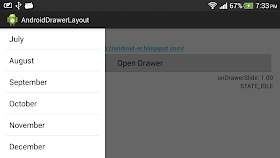
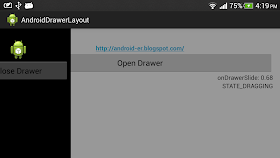
This exercise show how to use android.support.v4.widget.DrawerLayout and implement DrawerListener. DrawerLayout is a top-level container that allows for interactive "drawer" views to be pulled out from the edge of the window.

android.support.v4.widget.DrawerLayout and DrawerListener

Layout, to define <android.support.v4.widget.DrawerLayout> as top-level container.
<android.support.v4.widget.DrawerLayout 
    xmlns:android="http://schemas.android.com/apk/res/android"
    xmlns:tools="http://schemas.android.com/tools"
    android:id="@+id/drawer_layout"
    android:layout_width="match_parent"
    android:layout_height="match_parent" >

    <LinearLayout
        android:layout_width="match_parent"
        android:layout_height="match_parent"
        android:orientation="vertical"
        android:paddingBottom="@dimen/activity_vertical_margin"
        android:paddingLeft="@dimen/activity_horizontal_margin"
        android:paddingRight="@dimen/activity_horizontal_margin"
        android:paddingTop="@dimen/activity_vertical_margin"
        android:background="@android:color/background_light"
        tools:context=".MainActivity" >
        
        <TextView
            android:layout_width="wrap_content"
            android:layout_height="wrap_content"
            android:text="Main layout" />

        <TextView
            android:layout_width="wrap_content"
            android:layout_height="wrap_content"
            android:layout_gravity="center_horizontal"
            android:autoLink="web"
            android:text="http://android-er.blogspot.com/"
            android:textStyle="bold" />
        
        <Button
            android:id="@+id/opendrawer"
            android:layout_width="match_parent"
            android:layout_height="wrap_content"
            android:text="Open Drawer" />

        <TextView
            android:id="@+id/prompt"
            android:layout_width="match_parent"
            android:layout_height="wrap_content"
            android:gravity="right" />
        <TextView
            android:id="@+id/prompt2"
            android:layout_width="match_parent"
            android:layout_height="wrap_content"
            android:gravity="right" />
    </LinearLayout>

    <LinearLayout
        android:id="@+id/drawer"
        android:layout_width="240dp"
        android:layout_height="match_parent"
        android:layout_gravity="start"
        android:background="@android:color/background_dark"
        android:orientation="vertical"
        android:padding="5dp" >

        <TextView
            android:layout_width="match_parent"
            android:layout_height="wrap_content"
            android:text="Drawer" />

        <ImageView
            android:layout_width="match_parent"
            android:layout_height="wrap_content"
            android:src="@drawable/ic_launcher" />

        <Button
            android:id="@+id/closedrawer"
            android:layout_width="match_parent"
            android:layout_height="wrap_content"
            android:text="Close Drawer" />
    </LinearLayout>

</android.support.v4.widget.DrawerLayout>

MainActivity.java
package com.example.androiddrawerlayout;

import android.os.Bundle;
import android.app.Activity;
import android.support.v4.widget.DrawerLayout;
import android.support.v4.widget.DrawerLayout.DrawerListener;
import android.view.MotionEvent;
import android.view.View;
import android.view.View.OnClickListener;
import android.view.View.OnTouchListener;
import android.widget.Button;
import android.widget.TextView;

public class MainActivity extends Activity {
 
 DrawerLayout drawerLayout;
 View drawerView;
 TextView textPrompt, textPrompt2;

 @Override
 protected void onCreate(Bundle savedInstanceState) {
  super.onCreate(savedInstanceState);
  setContentView(R.layout.activity_main);
  
  textPrompt = (TextView)findViewById(R.id.prompt);
  textPrompt2 = (TextView)findViewById(R.id.prompt2);
  
  drawerLayout = (DrawerLayout)findViewById(R.id.drawer_layout);
  drawerView = (View)findViewById(R.id.drawer);
  
  Button buttonOpenDrawer = (Button)findViewById(R.id.opendrawer);
  buttonOpenDrawer.setOnClickListener(new OnClickListener(){

   @Override
   public void onClick(View arg0) {
    drawerLayout.openDrawer(drawerView);
   }});
  
  Button buttonCloseDrawer = (Button)findViewById(R.id.closedrawer);
  buttonCloseDrawer.setOnClickListener(new OnClickListener(){

   @Override
   public void onClick(View arg0) {
    drawerLayout.closeDrawers();
   }});
  
  drawerLayout.setDrawerListener(myDrawerListener);
  
  /*
   * In my trial experiment:
   * Without dummy OnTouchListener for the drawView to 
   * consume the onTouch event, touching/clicking on 
   * un-handled view on drawView will pass to the view
   * under it!
   * - Touching on the Android icon will
   * trigger the TextView("http://android-er.blogspot.com/")
   * to open the web.
   */
  drawerView.setOnTouchListener(new OnTouchListener() {
   
   @Override
   public boolean onTouch(View v, MotionEvent event) {
    // TODO Auto-generated method stub
    return true;
   }
  });
 }
 
 DrawerListener myDrawerListener = new DrawerListener(){

  @Override
  public void onDrawerClosed(View drawerView) {
   textPrompt.setText("onDrawerClosed");
  }

  @Override
  public void onDrawerOpened(View drawerView) {
   textPrompt.setText("onDrawerOpened");
  }

  @Override
  public void onDrawerSlide(View drawerView, float slideOffset) {
   textPrompt.setText("onDrawerSlide: " + String.format("%.2f", slideOffset));
  }

  @Override
  public void onDrawerStateChanged(int newState) {
   String state;
   switch(newState){
   case DrawerLayout.STATE_IDLE:
    state = "STATE_IDLE";
    break;
   case DrawerLayout.STATE_DRAGGING:
    state = "STATE_DRAGGING";
    break;
   case DrawerLayout.STATE_SETTLING:
    state = "STATE_SETTLING";
    break;
   default:
    state = "unknown!";
   }
    
   textPrompt2.setText(state);
  }};

}


download filesDownload the files.

Next:
DrawerLayout with ListView

Sunday, January 5, 2014

Get child view at run-time, using getChildCount() and getChildAt().

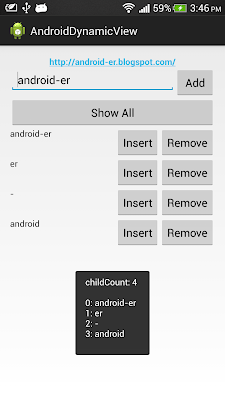
This exercise show how to retrieve child view at run time, using getChildCount() and getChildAt().

Last exercise show how to "Get text from dynamically added view" using button with OnClickListener to include text directly while creating and adding the view. In this exercise, we add a button, named "Show All", to retrieve all dynamic added view indirectly from their parent LinearLayout, container.

Get child view at run-time, using getChildCount() and getChildAt().

package com.example.androiddynamicview;

import android.os.Bundle;
import android.view.LayoutInflater;
import android.view.View;
import android.view.View.OnClickListener;
import android.widget.Button;
import android.widget.EditText;
import android.widget.LinearLayout;
import android.widget.TextView;
import android.widget.Toast;
import android.animation.LayoutTransition;
import android.app.Activity;
import android.content.Context;

public class MainActivity extends Activity {
 
 EditText textIn;
 Button buttonAdd;
 LinearLayout container;
 Button buttonShowAll;

 @Override
 protected void onCreate(Bundle savedInstanceState) {
  super.onCreate(savedInstanceState);
  setContentView(R.layout.activity_main);
  textIn = (EditText)findViewById(R.id.textin);
  buttonAdd = (Button)findViewById(R.id.add);
  container = (LinearLayout)findViewById(R.id.container);
  
  buttonAdd.setOnClickListener(new OnClickListener(){

   @Override
   public void onClick(View arg0) {
    LayoutInflater layoutInflater = 
      (LayoutInflater) getBaseContext().getSystemService(Context.LAYOUT_INFLATER_SERVICE);
    final View addView = layoutInflater.inflate(R.layout.row, null);
    final TextView textOut = (TextView)addView.findViewById(R.id.textout);
    textOut.setText(textIn.getText().toString());
    Button buttonRemove = (Button)addView.findViewById(R.id.remove);
    buttonRemove.setOnClickListener(new OnClickListener(){

     @Override
     public void onClick(View v) {
      ((LinearLayout)addView.getParent()).removeView(addView);
     }});
    
    Button buttonInsert = (Button)addView.findViewById(R.id.insert);
    buttonInsert.setOnClickListener(new OnClickListener(){

     @Override
     public void onClick(View v) {
      String text = textOut.getText().toString();
      String newText = textIn.getText().toString() + text;
      textIn.setText(newText);
     }});
    
    container.addView(addView, 0);
   }});
  
  LayoutTransition transition = new LayoutTransition();
  container.setLayoutTransition(transition);
  
  buttonShowAll = (Button)findViewById(R.id.showall);
  buttonShowAll.setOnClickListener(new OnClickListener(){

   @Override
   public void onClick(View arg0) {
    
    String showallPrompt = "";

    int childCount = container.getChildCount();
    showallPrompt += "childCount: " + childCount + "\n\n";

    for(int c=0; c<childCount; c++){
     View childView = container.getChildAt(c);
     TextView childTextView = (TextView)(childView.findViewById(R.id.textout));
     String childTextViewText = (String)(childTextView.getText());
     
     showallPrompt += c + ": " + childTextViewText + "\n";
    }
    
    Toast.makeText(MainActivity.this, 
      showallPrompt, 
      Toast.LENGTH_LONG).show();
   }});
 }
}

<LinearLayout xmlns:android="http://schemas.android.com/apk/res/android"
    xmlns:tools="http://schemas.android.com/tools"
    android:layout_width="match_parent"
    android:layout_height="match_parent"
    android:paddingBottom="@dimen/activity_vertical_margin"
    android:paddingLeft="@dimen/activity_horizontal_margin"
    android:paddingRight="@dimen/activity_horizontal_margin"
    android:paddingTop="@dimen/activity_vertical_margin"
    android:orientation="vertical"
    tools:context=".MainActivity" >

    <TextView
        android:layout_width="wrap_content"
        android:layout_height="wrap_content"
        android:layout_gravity="center_horizontal"
        android:autoLink="web"
        android:text="http://android-er.blogspot.com/"
        android:textStyle="bold" />
    
    <RelativeLayout
        android:layout_width="match_parent"
        android:layout_height="wrap_content">
        <Button
            android:id="@+id/add"
            android:layout_width="wrap_content"
            android:layout_height="wrap_content"
            android:layout_alignParentRight="true"
            android:text="Add"/>
        <EditText
            android:id="@+id/textin"
            android:layout_width="match_parent"
            android:layout_height="wrap_content"
            android:layout_alignParentLeft="true"
            android:layout_toLeftOf="@id/add"/>
    </RelativeLayout>
    <Button
        android:id="@+id/showall"
        android:layout_width="match_parent"
        android:layout_height="wrap_content"
        android:text="Show All" />
    <LinearLayout 
        android:id="@+id/container"
        android:layout_width="match_parent"
        android:layout_height="wrap_content"
        android:orientation="vertical">
    </LinearLayout>

</LinearLayout>

The layout of the dynamic view, /res/layout/row.xml, refer last exercise.


download filesDownload the files.

Thursday, January 2, 2014

Get text from dynamically added view

In the post "Add and Remove view dynamically", views are added dynamically ar run-time, with add and remove function. It's modified to have a "insert" button on each row, the associated text will be inserted in EditView if the button clicked.

Get text from dynamically added view


MainActivity.java
package com.example.androiddynamicview;

import android.os.Bundle;
import android.view.LayoutInflater;
import android.view.View;
import android.view.View.OnClickListener;
import android.widget.Button;
import android.widget.EditText;
import android.widget.LinearLayout;
import android.widget.TextView;
import android.animation.LayoutTransition;
import android.app.Activity;
import android.content.Context;

public class MainActivity extends Activity {
 
 EditText textIn;
 Button buttonAdd;
 LinearLayout container;

 @Override
 protected void onCreate(Bundle savedInstanceState) {
  super.onCreate(savedInstanceState);
  setContentView(R.layout.activity_main);
  textIn = (EditText)findViewById(R.id.textin);
  buttonAdd = (Button)findViewById(R.id.add);
  container = (LinearLayout)findViewById(R.id.container);
  
  buttonAdd.setOnClickListener(new OnClickListener(){

   @Override
   public void onClick(View arg0) {
    LayoutInflater layoutInflater = 
      (LayoutInflater) getBaseContext().getSystemService(Context.LAYOUT_INFLATER_SERVICE);
    final View addView = layoutInflater.inflate(R.layout.row, null);
    final TextView textOut = (TextView)addView.findViewById(R.id.textout);
    textOut.setText(textIn.getText().toString());
    Button buttonRemove = (Button)addView.findViewById(R.id.remove);
    buttonRemove.setOnClickListener(new OnClickListener(){

     @Override
     public void onClick(View v) {
      ((LinearLayout)addView.getParent()).removeView(addView);
     }});
    
    Button buttonInsert = (Button)addView.findViewById(R.id.insert);
    buttonInsert.setOnClickListener(new OnClickListener(){

     @Override
     public void onClick(View v) {
      String text = textOut.getText().toString();
      String newText = textIn.getText().toString() + text;
      textIn.setText(newText);
     }});
    
    container.addView(addView, 0);
   }});
  
  LayoutTransition transition = new LayoutTransition();
  container.setLayoutTransition(transition);
 }
}

/res/layout/activity_main.xml
<LinearLayout xmlns:android="http://schemas.android.com/apk/res/android"
    xmlns:tools="http://schemas.android.com/tools"
    android:layout_width="match_parent"
    android:layout_height="match_parent"
    android:paddingBottom="@dimen/activity_vertical_margin"
    android:paddingLeft="@dimen/activity_horizontal_margin"
    android:paddingRight="@dimen/activity_horizontal_margin"
    android:paddingTop="@dimen/activity_vertical_margin"
    android:orientation="vertical"
    tools:context=".MainActivity" >

    <TextView
        android:layout_width="wrap_content"
        android:layout_height="wrap_content"
        android:layout_gravity="center_horizontal"
        android:autoLink="web"
        android:text="http://android-er.blogspot.com/"
        android:textStyle="bold" />
    
    <RelativeLayout
        android:layout_width="match_parent"
        android:layout_height="wrap_content">
        <Button
            android:id="@+id/add"
            android:layout_width="wrap_content"
            android:layout_height="wrap_content"
            android:layout_alignParentRight="true"
            android:text="Add"/>
        <EditText
            android:id="@+id/textin"
            android:layout_width="match_parent"
            android:layout_height="wrap_content"
            android:layout_alignParentLeft="true"
            android:layout_toLeftOf="@id/add"/>
    </RelativeLayout>
    <LinearLayout 
        android:id="@+id/container"
        android:layout_width="match_parent"
        android:layout_height="wrap_content"
        android:orientation="vertical">
    </LinearLayout>

</LinearLayout>

/res/layout/row.xml
<RelativeLayout xmlns:android="http://schemas.android.com/apk/res/android"
    xmlns:tools="http://schemas.android.com/tools"
    android:layout_width="match_parent"
    android:layout_height="wrap_content">
    <Button
        android:id="@+id/remove"
        android:layout_width="wrap_content"
        android:layout_height="wrap_content"
        android:layout_alignParentRight="true"
        android:text="Remove"/>
    <Button
        android:id="@+id/insert"
        android:layout_width="wrap_content"
        android:layout_height="wrap_content"
        android:layout_toLeftOf="@id/remove"
        android:text="Insert"/>
    <TextView
        android:id="@+id/textout"
        android:layout_width="match_parent"
        android:layout_height="wrap_content"
        android:layout_alignParentLeft="true"
        android:layout_toLeftOf="@id/remove"/>
</RelativeLayout>


download filesDownload the files.

Next: Get child view at run-time, using getChildCount() and getChildAt().

Wednesday, January 1, 2014

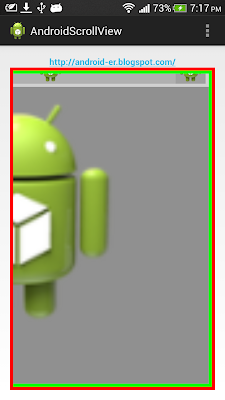
Horizontal-Vertical scrollable view

By using and , we can make a layout scrollable horizontally and vertically.

Horizontal-Vertical scrollable view
Example XML:
<LinearLayout xmlns:android="http://schemas.android.com/apk/res/android"
    xmlns:tools="http://schemas.android.com/tools"
    android:layout_width="match_parent"
    android:layout_height="match_parent"
    android:orientation="vertical"
    android:paddingBottom="@dimen/activity_vertical_margin"
    android:paddingLeft="@dimen/activity_horizontal_margin"
    android:paddingRight="@dimen/activity_horizontal_margin"
    android:paddingTop="@dimen/activity_vertical_margin"
    tools:context=".MainActivity" >

    <TextView
        android:layout_width="wrap_content"
        android:layout_height="wrap_content"
        android:layout_gravity="center_horizontal"
        android:autoLink="web"
        android:text="http://android-er.blogspot.com/"
        android:textStyle="bold" />

    <HorizontalScrollView
        android:layout_width="match_parent"
        android:layout_height="match_parent"
        android:background="#ff0000"
        android:padding="5dp" >

        <ScrollView
            android:layout_width="wrap_content"
            android:layout_height="wrap_content"
            android:background="#00ff00"
            android:padding="5dp" >

            <LinearLayout
                android:layout_width="wrap_content"
                android:layout_height="wrap_content"
                android:orientation="vertical"
                android:background="#909090" >

                <TextView
                    android:layout_width="match_parent"
                    android:layout_height="wrap_content"
                    android:text="Horizontal-Vertical scroll view" />

                <LinearLayout
                    android:layout_width="wrap_content"
                    android:layout_height="wrap_content"
                    android:background="#d0d0d0"
                    android:orientation="horizontal"
                    android:padding="5dp" >

                    <ImageView
                        android:layout_width="wrap_content"
                        android:layout_height="wrap_content"
                        android:background="#c0c0c0"
                        android:src="@drawable/ic_launcher" />

                    <ImageView
                        android:layout_width="400dp"
                        android:layout_height="wrap_content"
                        android:background="#b0b0b0"
                        android:src="@drawable/ic_launcher" />

                    <ImageView
                        android:layout_width="wrap_content"
                        android:layout_height="wrap_content"
                        android:background="#a0a0a0"
                        android:src="@drawable/ic_launcher" />
                </LinearLayout>

                <ImageView
                    android:layout_width="400dp"
                    android:layout_height="400dp"
                    android:src="@drawable/ic_launcher" />

                <ImageView
                    android:layout_width="wrap_content"
                    android:layout_height="wrap_content"
                    android:src="@drawable/ic_launcher" />
                
                <ImageView
                    android:layout_width="wrap_content"
                    android:layout_height="wrap_content"
                    android:src="@drawable/ic_launcher" />
                
            </LinearLayout>
        </ScrollView>
    </HorizontalScrollView>

</LinearLayout>