Tuesday, August 30, 2016

Asynchronous Android Programming, 2nd Edition

Asynchronous Android Programming

About This Book
  • Construct scalable and performant applications to take advantage of multi-thread asynchronous techniques
  • Explore the high-level Android asynchronous constructs available on the Android SDK
  • Choose the most appropriate asynchronous technique to implement your next outstanding feature
Who This Book Is For
This book is for Android developers who want to learn how to build multithreaded and reliable Android applications using high-level and advanced asynchronous techniques and concepts.

What You Will Learn
  • Get familiar with the Android process model and low-level concurrent and multithread constructs available on the Android SDK
  • Use AsyncTask to load data in the background, delivering progress results in the meantime
  • Enhance UI performance and responsiveness by sending work to a service running in the background
  • Defer, schedule, and batch work on the Android system without compromising the battery life and user experience
  • Use the JNI interface to execute concurrent work on native layer
  • Pull and push data from your network servers using the Google GCM platform
  • Create and compose tasks with RxJava to execute complex asynchronous work in a predictable way
  • Get accustomed to the use of the Android Loader construct to deliver up-to-date results
In Detail
Asynchronous programming has acquired immense importance in Android programming, especially when we want to make use of the number of independent processing units (cores) available on the most recent Android devices. To start with, we will discuss the details of the Android process model and the Java low-level concurrent framework, delivered by the Android SDK. Next, we will discuss the creation of IntentServices, bound services, and external services, which can run in the background even when the user is not interacting with them. In a more advanced phase, you will create background tasks that are able to execute CPU-intensive tasks in native code–making use of the Android NDK.

You will be then guided through the process of interacting with remote services asynchronously using the HTTP protocol or Google GCM Platform. Finally, we will introduce RxJava, a popular asynchronous Java framework used to compose work in a concise and reactive way.

Monday, August 29, 2016

Auto scrolling (horizontal running) TextView


It's follow-up post about my old post of "Implement auto-running TextView", to make a TextView horizontal scrolling automatically.

This video show how it tested on Android emulator running Android 7.0 Nougat API 24, in Multi-Window Mode also.


<?xml version="1.0" encoding="utf-8"?>
<LinearLayout xmlns:android="http://schemas.android.com/apk/res/android"
    xmlns:tools="http://schemas.android.com/tools"
    android:layout_width="match_parent"
    android:layout_height="match_parent"
    android:padding="16dp"
    android:orientation="vertical"
    tools:context="com.blogspot.android_er.androidautotextview.MainActivity">

    <TextView
        android:layout_width="match_parent"
        android:layout_height="wrap_content"
        android:layout_margin="20dp"
        android:layout_gravity="center_horizontal"
        android:autoLink="web"
        android:text="http://android-er.blogspot.com/"
        android:textStyle="bold"/>

    <TextView
        android:id="@+id/scrollingtext"
        android:layout_width="match_parent"
        android:layout_height="wrap_content"
        android:textSize="40dp"
        android:background="#D0D0D0"
        android:text="http://android-er.blogspot.com/"

        android:focusable="true"
        android:focusableInTouchMode="true"
        android:singleLine="true"
        android:scrollHorizontally="true"
        android:ellipsize="marquee"
        android:marqueeRepeatLimit ="marquee_forever"/>

</LinearLayout>


And set it selected in Java code.
package com.blogspot.android_er.androidautotextview;

import android.os.Bundle;
import android.support.v7.app.AppCompatActivity;
import android.widget.TextView;

public class MainActivity extends AppCompatActivity {

    TextView scrollingText;

    @Override
    protected void onCreate(Bundle savedInstanceState) {
        super.onCreate(savedInstanceState);
        setContentView(R.layout.activity_main);
        scrollingText = (TextView)findViewById(R.id.scrollingtext);
        scrollingText.setSelected(true);

    }
}


Saturday, August 27, 2016

TextView, auto scroll down to display bottom of text


This example show how to make a TextView auto scroll down to display bottom of text. In the demonstration, the upper TextView is normal, user cannot see the bottom of text if it is full. The lower one, the TextView will auto scroll down, such that user can see the new added text.


<?xml version="1.0" encoding="utf-8"?>
<LinearLayout xmlns:android="http://schemas.android.com/apk/res/android"
    xmlns:tools="http://schemas.android.com/tools"
    android:layout_width="match_parent"
    android:layout_height="match_parent"
    android:padding="16dp"
    android:orientation="vertical"
    tools:context="com.blogspot.android_er.androidautotextview.MainActivity">

    <TextView
        android:layout_width="wrap_content"
        android:layout_height="wrap_content"
        android:layout_margin="20dp"
        android:layout_gravity="center_horizontal"
        android:autoLink="web"
        android:text="http://android-er.blogspot.com/"
        android:textStyle="bold"/>

    <EditText
        android:id="@+id/textin"
        android:layout_width="match_parent"
        android:layout_height="wrap_content"
        android:textSize="28dp"/>

    <Button
        android:id="@+id/btnappend"
        android:layout_width="match_parent"
        android:layout_height="wrap_content"
        android:text="Append Text"/>

    <LinearLayout
        android:layout_width="match_parent"
        android:layout_height="match_parent"
        android:orientation="vertical">
        <TextView
            android:id="@+id/textout1"
            android:layout_width="match_parent"
            android:layout_height="0dp"
            android:layout_weight="1"
            android:textSize="20dp"
            android:background="#D0D0D0"/>
        <TextView
            android:id="@+id/textout2"
            android:layout_width="match_parent"
            android:layout_height="0dp"
            android:layout_weight="1"
            android:textSize="20dp"
            android:gravity="bottom"
            android:background="#E0E0E0"/>
    </LinearLayout>

</LinearLayout>


package com.blogspot.android_er.androidautotextview;

import android.os.Bundle;
import android.support.v7.app.AppCompatActivity;
import android.text.method.ScrollingMovementMethod;
import android.view.View;
import android.widget.Button;
import android.widget.EditText;
import android.widget.TextView;

public class MainActivity extends AppCompatActivity {

    EditText editTextIn;
    TextView textViewOut1, textViewOut2;
    Button btnAppend;

    @Override
    protected void onCreate(Bundle savedInstanceState) {
        super.onCreate(savedInstanceState);
        setContentView(R.layout.activity_main);

        editTextIn = (EditText)findViewById(R.id.textin);
        btnAppend = (Button)findViewById(R.id.btnappend);

        textViewOut1 = (TextView)findViewById(R.id.textout1);
        textViewOut1.setText("It's normal TextView.\n");

        textViewOut2 = (TextView)findViewById(R.id.textout2);
        textViewOut2.setMovementMethod(new ScrollingMovementMethod());
        textViewOut2.setText("This TextView always auto scroll down to display bottom of text.\n");


        btnAppend.setOnClickListener(new View.OnClickListener() {
            @Override
            public void onClick(View view) {
                String textToAppend = editTextIn.getText().toString() + "\n";
                textViewOut1.append(textToAppend);
                textViewOut2.append(textToAppend);
                editTextIn.setText("");
            }
        });
    }
}


Wednesday, August 24, 2016

The Android Game Developer's Handbook

The Android Game Developer's Handbook

Key Features
  • Practical tips and tricks to develop powerful Android games
  • Learn to successfully implement microtransactions and monitor the performance of your game once it's out live.
  • Integrate Google's DIY VR tool and Google Cardboard into your games to join in on the VR revolution
Book Description
Gaming in android is an already established market and growing each day. Previously games were made for specific platforms, but this is the time of cross platform gaming with social connectivity. It requires vision of polishing, design and must follow user behavior. This book would help developers to predict and create scopes of improvement according to user behavior.

You will begin with the guidelines and rules of game development on the Android platform followed by a brief description about the current variants of Android devices available. Next you will walk through the various tools available to develop any Android games and learn how to choose the most appropriate tools for a specific purpose.

You will then learn JAVA game coding standard and style upon the Android SDK. Later, you would focus on creation, maintenance of Game Loop using Android SDK, common mistakes in game development and the solutions to avoid them to improve performance. We will deep dive into Shaders and learn how to optimize memory and performance for an Android Game before moving on to another important topic, testing and debugging Android Games followed by an overview about Virtual Reality and how to integrate them into Android games.

Want to program a different way? Inside you'll also learn Android game Development using C++ and OpenGL. Finally you would walk through the required tools to polish and finalize the game and possible integration of any third party tools or SDKs in order to monetize your game when it's one the market!

What you will learn
  • Learn the prospects of Android in Game Development
  • Understand the Android architecture and explore platform limitation and variations
  • Explore the various approaches for Game Development using Android
  • Learn about the common mistakes and possible solutions on Android Game Development
  • Discover the top Cross Platform Game Engines and port games on different android platform
  • Optimize memory and performance of your game.
  • Familiarize yourself with different ways to earn money from Android Games
About the Author
Avisekhar Roy is a B.Tech engineer in computer science. He has had a passion for coding since his school days. However, he had no plans to become a game programmer. His fate landed him in the gaming industry in 2010. Since then, he fell in love with game development.

Avisekhar has worked in many formats of game development environment, ranging from small companies and individual studios to corporate companies and full-scale game development studios. He recently started his own gaming start-up in 2016 and is currently working on games for the mobile platform.

Avisekhar has also worked with some big companies, such as Reliance Games in India, as well as a small-scale studio called Nautilus Mobile. He is now trying to acquire a position in the gaming industry for his own venture, Funboat Games.

Table of Contents
  1. Android Game Development
  2. Introduction to Different Android Platforms
  3. Different Android Development Tools
  4. Android Development Style and Standards in the Industry
  5. Understanding the Game Loop and Frame Rate
  6. Improving Performance of 2D/3D Games
  7. Working with Shaders
  8. Performance and Memory Optimization
  9. Testing Code and Debugging
  10. Scope for Android in VR Games
  11. Android Game Development Using C++ and OpenGL
  12. Polishing Android Games
  13. Third-Party Integration, Monetization, and Services

Tuesday, August 16, 2016

Find the Best moveset of Pokémons

It's a web site Pokémon GO Info, you can check the best moveset, weaknesses, max CP and also ranking of any Pokémon.

This video show the best moveset of Drogonite, Vaporeon and Gyarados.


Visit: https://pokemon.gameinfo.io/


Select the Pokémon you want to check. It will show the best moveset of Quick move and Main move with highest dps (damage per second). Also show the weaknesses.


Compare with the moveset of your Pokémon.


Monday, August 15, 2016

Sunday, August 14, 2016

Niantic will ban 'Pokemon GO' Cheaters

Niantic announced in their Pokémon GO > FAQ > Submit a ban appeal:

Your account will be permanently terminated for violations of the Pokémon GO Terms of Service. This includes, but is not limited to: falsifying your location, using emulators, modified or unofficial software and/or accessing Pokémon GO clients or backends in an unauthorized manner including through the use of third party software.

For the first three reasons, I think all you and me agree. But for the fourth reason (accessing Pokémon GO clients or backends), it seem including check iv using third party software/web service; so I already removed my intro videos about.


Friday, August 12, 2016

Pikachu Evolution: to Raichu


Google Play is launching on Chromebooks

At Google I/O 2016, Google announced that Google Play would be launching on Chromebooks. As an Android developer, your apps will soon be compatible with Chromebooks. Here’s how you can improve the Chromebook experience for your Android apps:
No action is required, but we recommend the steps above to best position your app for the millions of potential customers using Chromebooks.


Wednesday, August 10, 2016

Custom view to draw bitmap along path, calculate in background thread

Last post show a example of "Custom view to draw bitmap along path", with calculation run inside onDraw(). It's modified version to pre-calculate in back thread.


(remark: in last post, canvas.drawPath() is called inside onDraw(). It seem run very slow, removed in this example.)

Modify AnimationView.java
package com.blogspot.android_er.androidmovingbitmapalongpath;

import android.content.Context;
import android.graphics.Canvas;
import android.util.AttributeSet;
import android.view.View;

import java.util.ArrayList;
import java.util.List;

public class AnimationView extends View {

    List<AnimationThing> animationThingsList;
    public AnimationView(Context context) {
        super(context);
        initAnimationView();
    }

    public AnimationView(Context context, AttributeSet attrs) {
        super(context, attrs);
        initAnimationView();
    }

    public AnimationView(Context context, AttributeSet attrs, int defStyleAttr) {
        super(context, attrs, defStyleAttr);
        initAnimationView();
    }

    private void initAnimationView(){
        animationThingsList = new ArrayList<>();
    }

    public void insertThing(AnimationThing thing){
        animationThingsList.add(thing);
    }

    //prepare calculation in background thread
    public void preDraw(){
        for (AnimationThing thing : animationThingsList){
            if(thing.distance < thing.pathLength){
                thing.pathMeasure.getPosTan(thing.distance, thing.pos, thing.tan);

                thing.matrix.reset();
                float degrees = (float)(Math.atan2(thing.tan[1], 
                        thing.tan[0])*180.0/Math.PI);
                thing.matrix.postRotate(degrees, thing.bm_offsetX, thing.bm_offsetY);
                thing.matrix.postTranslate(thing.pos[0]-thing.bm_offsetX, 
                        thing.pos[1]-thing.bm_offsetY);

                thing.distance += thing.step;
            }else{
                thing.distance = 0;
            }
        }
    }

    @Override
    protected void onDraw(Canvas canvas) {
        for (AnimationThing thing : animationThingsList){
            canvas.drawBitmap(thing.bm, thing.matrix, null);
        }

        invalidate();
    }

    /*
    @Override
    protected void onDraw(Canvas canvas) {
        for (AnimationThing thing : animationThingsList){

            //This code run slow!!!
            //canvas.drawPath(thing.animPath, thing.paint);

            if(thing.distance < thing.pathLength){
                thing.pathMeasure.getPosTan(thing.distance, thing.pos, thing.tan);

                thing.matrix.reset();
                float degrees = (float)(Math.atan2(thing.tan[1], 
                    thing.tan[0])*180.0/Math.PI);
                thing.matrix.postRotate(degrees, thing.bm_offsetX, thing.bm_offsetY);
                thing.matrix.postTranslate(thing.pos[0]-thing.bm_offsetX, 
                    thing.pos[1]-thing.bm_offsetY);

                canvas.drawBitmap(thing.bm, thing.matrix, null);

                thing.distance += thing.step;
            }else{
                thing.distance = 0;
            }
        }

        invalidate();
    }
    */


}


MainActivity.java
package com.blogspot.android_er.androidmovingbitmapalongpath;

import android.graphics.Bitmap;
import android.graphics.BitmapFactory;
import android.graphics.Path;
import android.os.Bundle;
import android.support.v7.app.AppCompatActivity;

public class MainActivity extends AppCompatActivity {

    AnimationView myAnimationView;
    AniThread myAniThread;

    @Override
    protected void onCreate(Bundle savedInstanceState) {
        super.onCreate(savedInstanceState);
        setContentView(R.layout.activity_main);
        myAnimationView = (AnimationView)findViewById(R.id.MyAnimationView);

        prepareThings();
        myAniThread = new AniThread(myAnimationView);
        myAniThread.start();
    }

    private void prepareThings() {
        Path animPath;
        float step;
        Bitmap bm;

        bm = BitmapFactory.decodeResource(getResources(), R.mipmap.ic_launcher);

        animPath = new Path();
        animPath.moveTo(100, 100);
        animPath.lineTo(200, 100);
        animPath.lineTo(300, 50);
        animPath.lineTo(400, 150);
        animPath.lineTo(100, 300);
        animPath.lineTo(600, 300);
        animPath.lineTo(100, 100);
        animPath.close();

        step = 1;

        AnimationThing thing = new AnimationThing(animPath, bm, step);
        myAnimationView.insertThing(thing);

        //The second thing
        bm = BitmapFactory.decodeResource(getResources(), android.R.drawable.ic_menu_add);

        animPath.reset();
        animPath.addCircle(400, 400, 300, Path.Direction.CW);
        step = 3;
        thing = new AnimationThing(animPath, bm, step);
        myAnimationView.insertThing(thing);
    }

    class AniThread extends Thread{

        AnimationView targetView;

        public AniThread(AnimationView target) {
            super();
            targetView = target;
        }

        @Override
        public void run() {
            while (true){
                targetView.preDraw();
                try {
                    Thread.sleep(10);
                } catch (InterruptedException e) {
                    e.printStackTrace();
                }
            }

        }
    }

}


The other files, AnimationThing.java and activity_main.xml, refer last post.


download filesDownload the files .

Tuesday, August 9, 2016

Custom view to draw bitmap along path


Refer to my old exercise "Animation of moving bitmap along path", the bitmap and path are hard-coded inside custom view. It's a modified version; the thing to be drawn (bitmap/path) are held separated and referenced by custom view in a list, such that it is easy to insert more things.


Please notice:
- I don't thing it's a good approach to do this, I just show a interesting exercise.
- You should not do the calculation (such as move the bitmap) inside onDraw(), it's suggested to do it in another thread.

Create a new class AnimationThing.java. It hold the bitmap and path of individual thing.
package com.blogspot.android_er.androidmovingbitmapalongpath;

import android.graphics.Bitmap;
import android.graphics.Matrix;
import android.graphics.Paint;
import android.graphics.Path;
import android.graphics.PathMeasure;

public class AnimationThing {

    Paint paint;
    Path animPath;
    PathMeasure pathMeasure;
    float pathLength;
    Bitmap bm;
    int bm_offsetX, bm_offsetY;
    float step;
    float distance;
    float[] pos;
    float[] tan;
    Matrix matrix;

    public AnimationThing(Paint paint,
                          Path animPath,
                          Bitmap bm,
                          float step) {
        this.paint = paint;

        this.animPath = animPath;
        pathMeasure = new PathMeasure(this.animPath, false);
        pathLength = pathMeasure.getLength();

        this.bm = bm;
        bm_offsetX = bm.getWidth()/2;
        bm_offsetY = bm.getHeight()/2;

        this.step = step;
        distance = 0;
        pos = new float[2];
        tan = new float[2];

        matrix = new Matrix();
    }
}


Create our custom view, AnimationView .java.
package com.blogspot.android_er.androidmovingbitmapalongpath;

import android.content.Context;
import android.graphics.Canvas;
import android.util.AttributeSet;
import android.view.View;

import java.util.ArrayList;
import java.util.List;

public class AnimationView extends View {

    List<AnimationThing> animationThingsList;
    public AnimationView(Context context) {
        super(context);
        initAnimationView();
    }

    public AnimationView(Context context, AttributeSet attrs) {
        super(context, attrs);
        initAnimationView();
    }

    public AnimationView(Context context, AttributeSet attrs, int defStyleAttr) {
        super(context, attrs, defStyleAttr);
        initAnimationView();
    }

    private void initAnimationView(){
        animationThingsList = new ArrayList<>();
    }

    public void insertThing(AnimationThing thing){
        animationThingsList.add(thing);
    }

    @Override
    protected void onDraw(Canvas canvas) {
        for (AnimationThing thing : animationThingsList){

            //!!! Only the path of the last thing will be drawn on screen
            canvas.drawPath(thing.animPath, thing.paint);

            if(thing.distance < thing.pathLength){
                thing.pathMeasure.getPosTan(thing.distance, thing.pos, thing.tan);

                thing.matrix.reset();
                float degrees = (float)(Math.atan2(thing.tan[1], thing.tan[0])*180.0/Math.PI);
                thing.matrix.postRotate(degrees, thing.bm_offsetX, thing.bm_offsetY);
                thing.matrix.postTranslate(thing.pos[0]-thing.bm_offsetX, thing.pos[1]-thing.bm_offsetY);

                canvas.drawBitmap(thing.bm, thing.matrix, null);

                thing.distance += thing.step;
            }else{
                thing.distance = 0;
            }
        }

        invalidate();
    }
}


Layout, activity_main.xml.
<?xml version="1.0" encoding="utf-8"?>
<LinearLayout xmlns:android="http://schemas.android.com/apk/res/android"
    xmlns:tools="http://schemas.android.com/tools"
    android:layout_width="match_parent"
    android:layout_height="match_parent"
    android:padding="16dp"
    android:orientation="vertical"
    tools:context="com.blogspot.android_er.androidmovingbitmapalongpath.MainActivity">

    <TextView
        android:layout_width="wrap_content"
        android:layout_height="wrap_content"
        android:layout_gravity="center_horizontal"
        android:autoLink="web"
        android:text="http://android-er.blogspot.com/"
        android:textStyle="bold" />

    <com.blogspot.android_er.androidmovingbitmapalongpath.AnimationView
        android:id="@+id/MyAnimationView"
        android:layout_width="match_parent"
        android:layout_height="match_parent"
        android:background="#F0F0F0"/>
</LinearLayout>


MainActivity.java
package com.blogspot.android_er.androidmovingbitmapalongpath;

import android.graphics.Bitmap;
import android.graphics.BitmapFactory;
import android.graphics.Color;
import android.graphics.Paint;
import android.graphics.Path;
import android.os.Bundle;
import android.support.v7.app.AppCompatActivity;

public class MainActivity extends AppCompatActivity {

    AnimationView myAnimationView;

    @Override
    protected void onCreate(Bundle savedInstanceState) {
        super.onCreate(savedInstanceState);
        setContentView(R.layout.activity_main);
        myAnimationView = (AnimationView)findViewById(R.id.MyAnimationView);

        prepareThings();
    }

    private void prepareThings(){
        Paint paint;
        Path animPath;
        float step;
        Bitmap bm;

        paint = new Paint();
        paint.setColor(Color.BLUE);
        paint.setStrokeWidth(1);
        paint.setStyle(Paint.Style.STROKE);

        bm = BitmapFactory.decodeResource(getResources(), R.mipmap.ic_launcher);

        animPath = new Path();
        animPath.moveTo(100, 100);
        animPath.lineTo(200, 100);
        animPath.lineTo(300, 50);
        animPath.lineTo(400, 150);
        animPath.lineTo(100, 300);
        animPath.lineTo(600, 300);
        animPath.lineTo(100, 100);
        animPath.close();

        step = 1;

        AnimationThing thing = new AnimationThing(paint, animPath, bm, step);
        myAnimationView.insertThing(thing);

        //The second thing
        bm = BitmapFactory.decodeResource(getResources(), android.R.drawable.ic_menu_add);

        animPath.reset();
        animPath.addCircle(400, 400, 300, Path.Direction.CW);
        step = 3;
        thing = new AnimationThing(paint, animPath, bm, step);
        myAnimationView.insertThing(thing);
    }
}


download filesDownload the files .

Next:
Custom view to draw bitmap along path, calculate in background thread

Monday, August 8, 2016

Pokémon GO has been updated to version 0.33.0 for Android and 1.3.0 for iOS

Pokémon GO has been updated to version 0.33.0 for Android and 1.3.0 for iOS devices. Below are some release notes and comments from our development team.
  • Added a dialog to remind Trainers that they should not play while traveling above a certain speed. Trainers must confirm they are not driving in order to continue playing.
  • Made improvements to the accuracy of a curveball throw
  • Fixed a bug that prevented ”Nice,” ”Great,” and “Excellent” Poké Ball throws from awarding the appropriate XP bonuses.
  • Fixed achievements showing incorrect Medal icons.
  • Enabled the ability for Trainers to change their nickname one time. Please choose your new nickname wisely.
  • Resolved issues with the battery saver mode on iOS and re-enabled the feature.
  • Added visuals of Team Leaders Candela, Blanche, and Spark.
  • Currently testing a variation of the “Nearby Pokémon” feature with a subset of users. During this period you may see some variation in the nearby Pokémon UI.
  • Minor text fixes

source: http://pokemongo.nianticlabs.com/en/post/update-080816/


Customize theme's colors


Last example show how to Apply Material Theme (with default color) to Activity. The video show how to further custom the theme colors.


Edit values/styles.xml to modify style of "AppTheme2", adding various color defination.
<resources>

    <!-- Base application theme. -->
    <style name="AppTheme" parent="Theme.AppCompat.Light.DarkActionBar">
        <!-- Customize your theme here. -->
        <item name="colorPrimary">@color/colorPrimary</item>
        <item name="colorPrimaryDark">@color/colorPrimaryDark</item>
        <item name="colorAccent">@color/colorAccent</item>
    </style>

    <style name="AppTheme2" parent="android:Theme.Material">
        <item name="android:colorPrimary">@android:color/holo_orange_light</item>
        <item name="android:colorPrimaryDark">@android:color/holo_orange_dark</item>
        <item name="android:textColorPrimary">@android:color/holo_blue_bright</item>
        <item name="android:windowBackground">@android:color/darker_gray</item>
        <item name="android:navigationBarColor">@android:color/holo_green_dark</item>
    </style>

</resources>


Make sure "@style/AppTheme2" is used in AndroidManifest.xml.
<?xml version="1.0" encoding="utf-8"?>
<manifest xmlns:android="http://schemas.android.com/apk/res/android"
    package="com.blogspot.android_er.androidmultiwindow">

    <application
        android:allowBackup="true"
        android:icon="@mipmap/ic_launcher"
        android:label="@string/app_name"
        android:supportsRtl="true"
        android:theme="@style/AppTheme2">
        <activity android:name=".MainActivity">
            <intent-filter>
                <action android:name="android.intent.action.MAIN" />

                <category android:name="android.intent.category.LAUNCHER" />
            </intent-filter>
        </activity>
    </application>

</manifest>


Reference:
Using the Material Theme

PokéAdvisor blocked

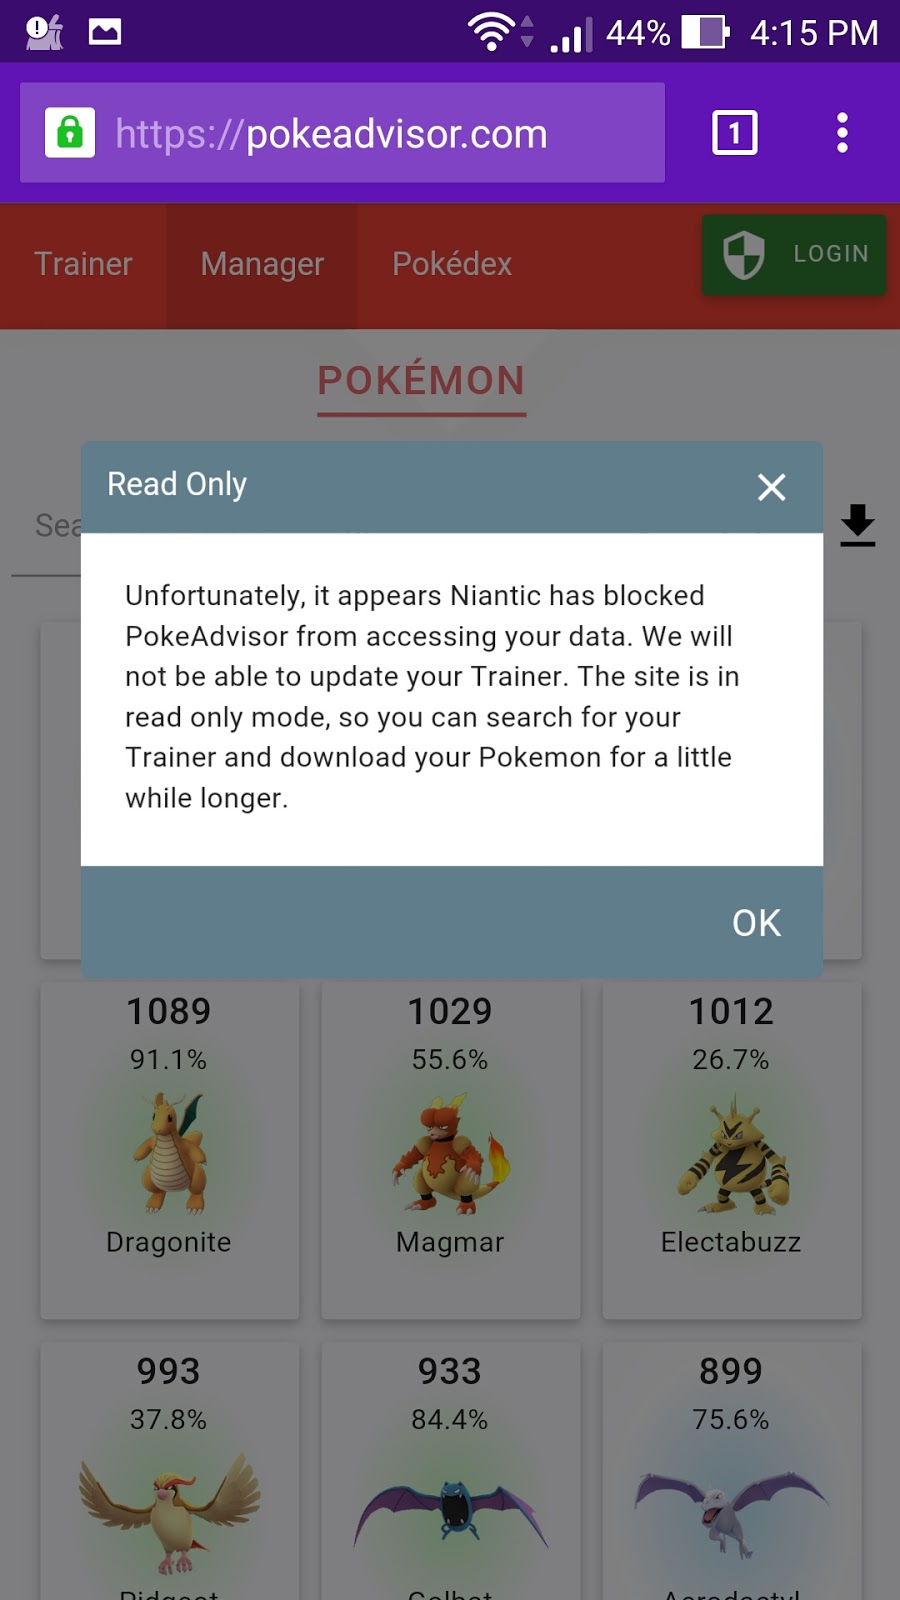
It appears Niantic has blocked PokeAdvisor from accessing your data. PokéAdvisor will not be able to update user Trainer. The site is in read only mode, so you can search for your Trainer and download your Pokemon for a little while longer.


Related:
- Niantic will ban 'Pokemon GO' Cheaters

Farfetch'd - Asia limited Pokémon


Farfetch'd is always seen with a stalk from a plant of some sort. Apparently, there are good stalks and bad stalks. This Pokémon has been known to fight with others over stalks.
~ know more.


Wednesday, August 3, 2016

Windows 10 Anniversary Update

Windows 10 Anniversary Update will begin rolling out around the world. The Windows 10 Anniversary Update is full of new features and innovations that bring Windows Ink and Cortana to life; a faster, more accessible and more power-efficient Microsoft Edge browser; advanced security features; new gaming experiences and more. The Windows 10 Anniversary Update will start rolling out to Windows 10 Mobile phones in the coming weeks.

The Windows 10 Anniversary Update is being rolled out to Windows 10 PCs across the world in phases starting with the newer machines first. You don’t have to do anything to get the Windows 10 Anniversary Update, it will roll out automatically to you through Windows Update if you’ve chosen to have updates installed automatically on your device. However, if you don’t want to wait for the update to roll out to you, you can manually get the update yourself on your personal PC. If you’re using a Windows 10 PC at work, you will need to check with your IT administrator for details on your organization’s specific plans to update.

Read more at https://blogs.windows.com/windowsexperience/2016/08/02/how-to-get-the-windows-10-anniversary-update/#ZMI61X8Smr8eLb88.99