Wednesday, June 29, 2011

Google Developer Day 2011

Google Developer Day (GDD) will be coming to eight cities in 2011.
  • September 16: Sao Paulo, Brazil
  • September 19-20: Buenos Aires, Argentina
  • October 10: Moscow, Russia
  • October 18: Prague, Czech Republic
  • November 1: Tokyo, Japan
  • November 8: Sydney, Australia
  • November 13: Tel-Aviv, Israel
  • November 19: Berlin, Germany

Link:
- http://www.google.com/events/developerday/2011/


Friday, June 24, 2011

Example of FrameLayout

It's a example of using FrameLayout, to make two view (a SeekBar and a SurfaceView here) overlap.

Example of FrameLayout

It use the old post "Implement a SeekBar to control the volume of Video Player" as a example. The Java code keep no change, modify the layout file, main.xml, to move the Volumn Control (SeekBar) over the top of the video(SurfaceView).

<?xml version="1.0" encoding="utf-8"?>
<LinearLayout xmlns:android="http://schemas.android.com/apk/res/android"
android:orientation="vertical"
android:layout_width="fill_parent"
android:layout_height="fill_parent">
<TextView
android:layout_width="fill_parent"
android:layout_height="wrap_content"
android:text="@string/hello"/>
<LinearLayout
android:orientation="horizontal"
android:layout_height="wrap_content"
android:layout_width="fill_parent">
<Button
android:id="@+id/playvideoplayer"
android:layout_width="0dip"
android:layout_height="wrap_content"
android:layout_weight="1"
android:text="- PLAY Video -"
/>
<Button
android:id="@+id/pausevideoplayer"
android:layout_width="0dip"
android:layout_height="wrap_content"
android:layout_weight="1"
android:text="- PAUSE Video -"/>
</LinearLayout>
<FrameLayout
android:layout_width="fill_parent"
android:layout_height="fill_parent"
>
<SurfaceView
android:id="@+id/surfaceview"
android:layout_width="fill_parent"
android:layout_height="wrap_content"/>
<SeekBar
android:id="@+id/volbar"
android:layout_width="fill_parent"
android:layout_height="wrap_content"
android:layout_margin="10px"/>
</FrameLayout>
</LinearLayout>


Bringing C and C++ Games to Android

Google I/O 2011: Bringing C and C++ Games to Android

Want to make great Android games, but you're not a Java programmer? This talk is for you. Android supports a toolchain for building applications in C/C++. In December 2010 it got a makeover specifically aimed at making life better for game developers. This presentation gives an introduction to Android programming in C/C++, covers what's new and improved since last year, and shows best practices for building and debugging games with the NDK.

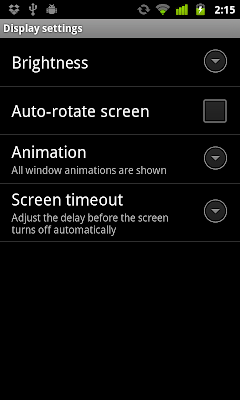
Start Display Setting, start activity with Settings.ACTION_DISPLAY_SETTINGS

Start Display Setting, start activity with Settings.ACTION_DISPLAY_SETTINGS

package com.exercise.AndroidIntentDisplaySetting;

import android.app.Activity;
import android.content.Intent;
import android.content.pm.ResolveInfo;
import android.os.Bundle;
import android.provider.Settings;
import android.view.View;
import android.widget.Button;
import android.widget.Toast;

public class AndroidIntentDisplaySettingActivity extends Activity {

Button btnDisplaySetting;
Intent intentDisplaySetting;

/** Called when the activity is first created. */
@Override
public void onCreate(Bundle savedInstanceState) {
super.onCreate(savedInstanceState);
setContentView(R.layout.main);
btnDisplaySetting = (Button)findViewById(R.id.displaySetting);

intentDisplaySetting = new Intent(Settings.ACTION_DISPLAY_SETTINGS);
ResolveInfo resolveInfo = getPackageManager().resolveActivity(intentDisplaySetting,0);

if(resolveInfo == null){
Toast.makeText(AndroidIntentDisplaySettingActivity.this,
"Not Support!",
Toast.LENGTH_LONG).show();
btnDisplaySetting.setEnabled(false);
}else{
btnDisplaySetting.setEnabled(true);
}

btnDisplaySetting.setOnClickListener(new Button.OnClickListener(){

public void onClick(View v) {
// TODO Auto-generated method stub
startActivity(intentDisplaySetting);
}});
}
}


Thursday, June 23, 2011

Check battery usage, with Intent.ACTION_POWER_USAGE_SUMMARY

To show power usage information to the user, you can start activity using Intent.ACTION_POWER_USAGE_SUMMARY.

Check battery usage, with Intent.ACTION_POWER_USAGE_SUMMARY

package com.exercise.IntentBatteryUsage;

import android.app.Activity;
import android.content.Intent;
import android.content.pm.ResolveInfo;
import android.os.Bundle;
import android.view.View;
import android.widget.Button;
import android.widget.Toast;

public class AndroidIntentBatteryUsageActivity extends Activity {

Button btnCheckBattery;
Intent intentBatteryUsage;

/** Called when the activity is first created. */
@Override
public void onCreate(Bundle savedInstanceState) {
super.onCreate(savedInstanceState);
setContentView(R.layout.main);

btnCheckBattery = (Button)findViewById(R.id.checkBattery);

intentBatteryUsage = new Intent(Intent.ACTION_POWER_USAGE_SUMMARY);
ResolveInfo resolveInfo = getPackageManager().resolveActivity(intentBatteryUsage,0);

if(resolveInfo == null){
Toast.makeText(AndroidIntentBatteryUsageActivity.this,
"Not Support!",
Toast.LENGTH_LONG).show();
btnCheckBattery.setEnabled(false);
}else{
btnCheckBattery.setEnabled(true);
}

btnCheckBattery.setOnClickListener(new Button.OnClickListener(){

public void onClick(View v) {
// TODO Auto-generated method stub
startActivity(intentBatteryUsage);
}});

}
}


Related articles:
- Detect Battery Info.

Wednesday, June 22, 2011

A example of RelativeLayout, layout_alignParentTop, layout_alignParentBottom and layout_above

It's a example of using RelativeLayout; place a button (or any other view) on top of screen, a button on bottom of screen, and another button place related to another view.

A example of RelativeLayout

<?xml version="1.0" encoding="utf-8"?>
<LinearLayout xmlns:android="http://schemas.android.com/apk/res/android"
android:orientation="vertical"
android:layout_width="fill_parent"
android:layout_height="fill_parent"
>
<TextView
android:layout_width="fill_parent"
android:layout_height="wrap_content"
android:text="@string/hello"
/>
<RelativeLayout
android:layout_width="fill_parent"
android:layout_height="fill_parent" >
<Button
android:layout_width="fill_parent"
android:layout_height="wrap_content"
android:layout_alignParentTop="true"
android:text="Button on Top"
/>
<Button
android:id="@+id/buttonOnBottom"
android:layout_width="fill_parent"
android:layout_height="wrap_content"
android:layout_alignParentBottom="true"
android:text="Button on Bottom"
/>
<Button
android:layout_width="fill_parent"
android:layout_height="wrap_content"
android:layout_above="@id/buttonOnBottom"
android:text="Button Above Button on Bottom"
/>
</RelativeLayout>
</LinearLayout>


Tuesday, June 21, 2011

Set shadow of TextView in Java code, setShadowLayer()

Example:
        TextView textHello = (TextView)findViewById(R.id.hello);
textHello.setShadowLayer(
5f, //float radius
10f, //float dx
10f, //float dy
0xFFffffff //int color
);


Related article:
- Place shadow behind text using XML

Sunday, June 19, 2011

Place shadow behind text using XML

We can define XML Attributes to place a shadow of the specified color behind the text.
  • android:shadowColor - Place a shadow of the specified color behind the text.
  • android:shadowDx - Horizontal offset of the shadow.
  • android:shadowDy - Vertical offset of the shadow.
  • android:shadowRadius - Radius of the shadow.


Place shadow behind text

<?xml version="1.0" encoding="utf-8"?>
<LinearLayout xmlns:android="http://schemas.android.com/apk/res/android"
android:orientation="vertical"
android:layout_width="fill_parent"
android:layout_height="fill_parent"
>
<TextView
android:layout_width="fill_parent"
android:layout_height="wrap_content"
android:text="@string/hello"
android:textSize="20dp"
android:shadowColor="#FFFFFF"
android:shadowRadius="5"
android:shadowDx="10"
android:shadowDy="10"
/>
<Button
android:layout_width="wrap_content"
android:layout_height="wrap_content"
android:text="@string/hello"
android:shadowColor="#000000"
android:shadowRadius="5"
android:shadowDx="10"
android:shadowDy="10"
/>
</LinearLayout>


Related article:
- Set shadow of TextView in Java code, setShadowLayer()

Add view using Java code

It's a example to add view in run-time using Java code, instead of XML.

Add view using Java code

A empty LinearLayout with id mainlayout is defined. in the layout, main.xml. Additional view can be added using addView(view) method of LinearLayout.

<?xml version="1.0" encoding="utf-8"?>
<LinearLayout xmlns:android="http://schemas.android.com/apk/res/android"
    android:orientation="vertical"
    android:layout_width="fill_parent"
    android:layout_height="fill_parent"
    >
<LinearLayout
    android:orientation="vertical"
    android:layout_width="fill_parent"
    android:layout_height="wrap_content"
    android:id="@+id/mainlayout"
    />
<TextView  
    android:layout_width="fill_parent" 
    android:layout_height="wrap_content" 
    android:text="@string/hello"
    />
</LinearLayout>


package com.exercise.AndroidAddView;

import android.app.Activity;
import android.os.Bundle;
import android.view.ViewGroup.LayoutParams;
import android.widget.ImageView;
import android.widget.LinearLayout;

public class AndroidAddViewActivity extends Activity {
    /** Called when the activity is first created. */
    @Override
    public void onCreate(Bundle savedInstanceState) {
        super.onCreate(savedInstanceState);
        setContentView(R.layout.main);
        
        LinearLayout mainLayout = (LinearLayout)findViewById(R.id.mainlayout);
        
        //Add view using Java Code
        ImageView imageView = new ImageView(AndroidAddViewActivity.this);
  imageView.setImageResource(R.drawable.icon);
  LayoutParams imageViewLayoutParams 
   = new LayoutParams(LayoutParams.WRAP_CONTENT, LayoutParams.WRAP_CONTENT);
  imageView.setLayoutParams(imageViewLayoutParams);
  
  mainLayout.addView(imageView);
        
    }
}


Related:
- Programmatically create layout and view, with ID assigned by setId().


Friday, June 17, 2011

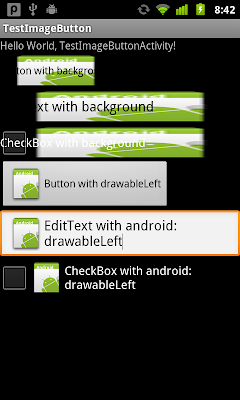
android:background vs android:drawableLeft/drawableTop/drawableRight/drawableBottom

android:background specify drawable to use as the background.

android:drawableLeft/drawableTop/drawableRight/drawableBottom specify the drawable to be drawn to the left/top/right/bottom.

Here is some examples using android:background and android:drawableLeft/drawableTop/drawableRight/drawableBottom.

android:background vs android:drawableLeft/drawableTop/drawableRight/drawableBottom

<?xml version="1.0" encoding="utf-8"?>
<LinearLayout xmlns:android="http://schemas.android.com/apk/res/android"
android:orientation="vertical"
android:layout_width="fill_parent"
android:layout_height="fill_parent"
>
<TextView
android:layout_width="fill_parent"
android:layout_height="wrap_content"
android:text="@string/hello"
/>
<Button
android:layout_width="wrap_content"
android:layout_height="wrap_content"
android:background="@drawable/icon"
android:text="Button with background"
/>
<EditText
android:layout_width="fill_parent"
android:layout_height="wrap_content"
android:background="@drawable/icon"
android:text="EditText with background"
/>
<CheckBox
android:layout_width="fill_parent"
android:layout_height="wrap_content"
android:background="@drawable/icon"
android:text="CheckBox with background"
/>
<Button
android:layout_width="wrap_content"
android:layout_height="wrap_content"
android:drawableLeft="@drawable/icon"
android:text="Button with drawableLeft"
/>
<EditText
android:layout_width="fill_parent"
android:layout_height="wrap_content"
android:drawableLeft="@drawable/icon"
android:text="EditText with android:drawableLeft"
/>
<CheckBox
android:layout_width="fill_parent"
android:layout_height="wrap_content"
android:drawableLeft="@drawable/icon"
android:text="CheckBox with android:drawableLeft"
/>
</LinearLayout>


Monday, June 13, 2011

query SQLite database with sorting

Work on last exercise, "Edit row in SQLite database using SQLiteDatabase.update()". Modify to have option to quary order by default, adn to quary order by KEY_CONTENT1.

query SQLite database with sorting

Modify main.xml to add two key, sortbyDefault and sortby1.
<?xml version="1.0" encoding="utf-8"?>
<LinearLayout xmlns:android="http://schemas.android.com/apk/res/android"
    android:orientation="vertical"
    android:layout_width="fill_parent"
    android:layout_height="fill_parent"
    >
<TextView  
    android:layout_width="fill_parent" 
    android:layout_height="wrap_content" 
    android:text="@string/hello"
    />
<TextView  
    android:layout_width="fill_parent" 
    android:layout_height="wrap_content" 
    android:text="Enter content of column 1"
    />
<EditText
    android:id="@+id/content1"
    android:layout_width="fill_parent" 
    android:layout_height="wrap_content" 
    />
<TextView  
    android:layout_width="fill_parent" 
    android:layout_height="wrap_content" 
    android:text="Enter content of column 2"
    />
<EditText
    android:id="@+id/content2"
    android:layout_width="fill_parent" 
    android:layout_height="wrap_content" 
    />
<Button
    android:id="@+id/add"
    android:layout_width="fill_parent" 
    android:layout_height="wrap_content" 
    android:text="Add"
    />
<Button
    android:id="@+id/deleteall"
    android:layout_width="fill_parent" 
    android:layout_height="wrap_content" 
    android:text="Delete All"
    />
<LinearLayout
    android:orientation="horizontal"
    android:layout_width="fill_parent"
    android:layout_height="wrap_content">
<Button
    android:id="@+id/sortbyDefault"
    android:layout_width="wrap_content" 
    android:layout_height="wrap_content" 
    android:layout_weight="1"
    android:text="Sort By default"
    />
<Button
    android:id="@+id/sortby1"
    android:layout_width="wrap_content" 
    android:layout_height="wrap_content" 
    android:layout_weight="1"
    android:text="Sort By Content 1"
    />
</LinearLayout>
<ListView
 android:id="@+id/contentlist"
 android:layout_width="fill_parent"
 android:layout_height="fill_parent"/>
</LinearLayout>


Modify SQLiteAdapter.java to add method queueAll_SortBy_CONTENT1(), simple call sqLiteDatabase.query(MYDATABASE_TABLE, columns, null, null, null, null, KEY_CONTENT1) indirectly.
package com.exercise.AndroidSQLite;

import android.content.ContentValues;
import android.content.Context;
import android.database.Cursor;
import android.database.sqlite.SQLiteDatabase;
import android.database.sqlite.SQLiteOpenHelper;
import android.database.sqlite.SQLiteDatabase.CursorFactory;

public class SQLiteAdapter {

 public static final String MYDATABASE_NAME = "MY_DATABASE";
 public static final String MYDATABASE_TABLE = "MY_TABLE";
 public static final int MYDATABASE_VERSION = 1;
 public static final String KEY_ID = "_id";
 public static final String KEY_CONTENT1 = "Content1";
 public static final String KEY_CONTENT2 = "Content2";

 //create table MY_DATABASE (ID integer primary key, Content text not null);
 private static final String SCRIPT_CREATE_DATABASE =
  "create table " + MYDATABASE_TABLE + " ("
  + KEY_ID + " integer primary key autoincrement, "
  + KEY_CONTENT1 + " text not null, "
  + KEY_CONTENT2 + " text not null);";
 
 private SQLiteHelper sqLiteHelper;
 private SQLiteDatabase sqLiteDatabase;

 private Context context;
 
 public SQLiteAdapter(Context c){
  context = c;
 }
 
 public SQLiteAdapter openToRead() throws android.database.SQLException {
  sqLiteHelper = new SQLiteHelper(context, MYDATABASE_NAME, null, MYDATABASE_VERSION);
  sqLiteDatabase = sqLiteHelper.getReadableDatabase();
  return this; 
 }
 
 public SQLiteAdapter openToWrite() throws android.database.SQLException {
  sqLiteHelper = new SQLiteHelper(context, MYDATABASE_NAME, null, MYDATABASE_VERSION);
  sqLiteDatabase = sqLiteHelper.getWritableDatabase();
  return this; 
 }
 
 public void close(){
  sqLiteHelper.close();
 }
 
 public long insert(String content1, String content2){
  
  ContentValues contentValues = new ContentValues();
  contentValues.put(KEY_CONTENT1, content1);
  contentValues.put(KEY_CONTENT2, content2);
  return sqLiteDatabase.insert(MYDATABASE_TABLE, null, contentValues);
 }
 
 public int deleteAll(){
  return sqLiteDatabase.delete(MYDATABASE_TABLE, null, null);
 }
 
 public void delete_byID(int id){
  sqLiteDatabase.delete(MYDATABASE_TABLE, KEY_ID+"="+id, null);
 }
 
 public void update_byID(int id, String v1, String v2){
  ContentValues values = new ContentValues();
  values.put(KEY_CONTENT1, v1);
  values.put(KEY_CONTENT2, v2);
  sqLiteDatabase.update(MYDATABASE_TABLE, values, KEY_ID+"="+id, null);
 }
 
 public Cursor queueAll(){
  String[] columns = new String[]{KEY_ID, KEY_CONTENT1, KEY_CONTENT2};
  Cursor cursor = sqLiteDatabase.query(MYDATABASE_TABLE, columns, 
    null, null, null, null, null);
  
  return cursor;
 }
 
 public Cursor queueAll_SortBy_CONTENT1(){
  String[] columns = new String[]{KEY_ID, KEY_CONTENT1, KEY_CONTENT2};
  Cursor cursor = sqLiteDatabase.query(MYDATABASE_TABLE, columns, 
    null, null, null, null, KEY_CONTENT1);
  
  return cursor;
 }
 
 public Cursor queueAll_SortBy_CONTENT2(){
  String[] columns = new String[]{KEY_ID, KEY_CONTENT1, KEY_CONTENT2};
  Cursor cursor = sqLiteDatabase.query(MYDATABASE_TABLE, columns, 
    null, null, null, null, KEY_CONTENT2);
  
  return cursor;
 }
 
 public class SQLiteHelper extends SQLiteOpenHelper {

  public SQLiteHelper(Context context, String name,
    CursorFactory factory, int version) {
   super(context, name, factory, version);
  }

  @Override
  public void onCreate(SQLiteDatabase db) {
   // TODO Auto-generated method stub
   db.execSQL(SCRIPT_CREATE_DATABASE);
  }

  @Override
  public void onUpgrade(SQLiteDatabase db, int oldVersion, int newVersion) {
   // TODO Auto-generated method stub

  }

 }
 
}


Modify AndroidSQLite.java to add Button and Button.OnClickListener() of buttonSortDefault and buttonSort1.
package com.exercise.AndroidSQLite;

import android.app.Activity;
import android.app.AlertDialog;
import android.content.DialogInterface;
import android.database.Cursor;
import android.os.Bundle;
import android.view.View;
import android.view.ViewGroup.LayoutParams;
import android.widget.AdapterView;
import android.widget.Button;
import android.widget.EditText;
import android.widget.LinearLayout;
import android.widget.ListView;
import android.widget.SimpleCursorAdapter;
import android.widget.TextView;

public class AndroidSQLite extends Activity {
 
 EditText inputContent1, inputContent2;
 Button buttonAdd, buttonDeleteAll;
 Button buttonSortDefault, buttonSort1;
 
 private SQLiteAdapter mySQLiteAdapter;
 ListView listContent;
 
 SimpleCursorAdapter cursorAdapter;
 Cursor cursor;
 
    /** Called when the activity is first created. */
    @Override
    public void onCreate(Bundle savedInstanceState) {
        super.onCreate(savedInstanceState);
        setContentView(R.layout.main);
        
        inputContent1 = (EditText)findViewById(R.id.content1);
        inputContent2 = (EditText)findViewById(R.id.content2);
        buttonAdd = (Button)findViewById(R.id.add);
        buttonDeleteAll = (Button)findViewById(R.id.deleteall);
        
        listContent = (ListView)findViewById(R.id.contentlist);

        mySQLiteAdapter = new SQLiteAdapter(this);
        mySQLiteAdapter.openToWrite();

        cursor = mySQLiteAdapter.queueAll();
        String[] from = new String[]{SQLiteAdapter.KEY_ID, SQLiteAdapter.KEY_CONTENT1, SQLiteAdapter.KEY_CONTENT2};
        int[] to = new int[]{R.id.id, R.id.text1, R.id.text2};
        cursorAdapter =
         new SimpleCursorAdapter(this, R.layout.row, cursor, from, to);
        listContent.setAdapter(cursorAdapter);
        listContent.setOnItemClickListener(listContentOnItemClickListener);
        
        buttonAdd.setOnClickListener(buttonAddOnClickListener);
        buttonDeleteAll.setOnClickListener(buttonDeleteAllOnClickListener);
        
        buttonSortDefault = (Button)findViewById(R.id.sortbyDefault);
        buttonSort1 =  (Button)findViewById(R.id.sortby1);
        
        buttonSortDefault.setOnClickListener(new Button.OnClickListener(){

   @Override
   public void onClick(View arg0) {
    // TODO Auto-generated method stub
    cursor = mySQLiteAdapter.queueAll();
    String[] from = new String[]{SQLiteAdapter.KEY_ID, SQLiteAdapter.KEY_CONTENT1, SQLiteAdapter.KEY_CONTENT2};
          int[] to = new int[]{R.id.id, R.id.text1, R.id.text2};
          cursorAdapter =
           new SimpleCursorAdapter(AndroidSQLite.this, R.layout.row, cursor, from, to);
          listContent.setAdapter(cursorAdapter);
    updateList();
   }});
        
        buttonSort1.setOnClickListener(new Button.OnClickListener(){

   @Override
   public void onClick(View arg0) {
    // TODO Auto-generated method stub
    cursor = mySQLiteAdapter.queueAll_SortBy_CONTENT1();
    String[] from = new String[]{SQLiteAdapter.KEY_ID, SQLiteAdapter.KEY_CONTENT1, SQLiteAdapter.KEY_CONTENT2};
          int[] to = new int[]{R.id.id, R.id.text1, R.id.text2};
          cursorAdapter =
           new SimpleCursorAdapter(AndroidSQLite.this, R.layout.row, cursor, from, to);
          listContent.setAdapter(cursorAdapter);
    updateList();
   }});
        
        
    }
    
    Button.OnClickListener buttonAddOnClickListener
    = new Button.OnClickListener(){

  @Override
  public void onClick(View arg0) {
   // TODO Auto-generated method stub
   String data1 = inputContent1.getText().toString();
   String data2 = inputContent2.getText().toString();
   mySQLiteAdapter.insert(data1, data2);
   updateList();
  }
     
    };
    
    Button.OnClickListener buttonDeleteAllOnClickListener
    = new Button.OnClickListener(){

  @Override
  public void onClick(View arg0) {
   // TODO Auto-generated method stub
   mySQLiteAdapter.deleteAll();
   updateList();
  }
     
    };
    
    private ListView.OnItemClickListener listContentOnItemClickListener
    = new ListView.OnItemClickListener(){

  @Override
  public void onItemClick(AdapterView<?> parent, View view, int position,
    long id) {
   // TODO Auto-generated method stub
   
   Cursor cursor = (Cursor) parent.getItemAtPosition(position);
   final int item_id = cursor.getInt(cursor.getColumnIndex(SQLiteAdapter.KEY_ID));
            String item_content1 = cursor.getString(cursor.getColumnIndex(SQLiteAdapter.KEY_CONTENT1));
            String item_content2 = cursor.getString(cursor.getColumnIndex(SQLiteAdapter.KEY_CONTENT2));
            
            AlertDialog.Builder myDialog 
            = new AlertDialog.Builder(AndroidSQLite.this);
            
            myDialog.setTitle("Delete/Edit?");
            
            TextView dialogTxt_id = new TextView(AndroidSQLite.this);
            LayoutParams dialogTxt_idLayoutParams 
             = new LayoutParams(LayoutParams.WRAP_CONTENT, LayoutParams.WRAP_CONTENT);
            dialogTxt_id.setLayoutParams(dialogTxt_idLayoutParams);
            dialogTxt_id.setText("#" + String.valueOf(item_id));
            
            final EditText dialogC1_id = new EditText(AndroidSQLite.this);
            LayoutParams dialogC1_idLayoutParams 
             = new LayoutParams(LayoutParams.FILL_PARENT, LayoutParams.WRAP_CONTENT);
            dialogC1_id.setLayoutParams(dialogC1_idLayoutParams);
            dialogC1_id.setText(item_content1);
            
            final EditText dialogC2_id = new EditText(AndroidSQLite.this);
            LayoutParams dialogC2_idLayoutParams 
             = new LayoutParams(LayoutParams.FILL_PARENT, LayoutParams.WRAP_CONTENT);
            dialogC2_id.setLayoutParams(dialogC2_idLayoutParams);
            dialogC2_id.setText(item_content2);
            
            LinearLayout layout = new LinearLayout(AndroidSQLite.this);
            layout.setOrientation(LinearLayout.VERTICAL);
            layout.addView(dialogTxt_id);
            layout.addView(dialogC1_id);
            layout.addView(dialogC2_id);
            myDialog.setView(layout);
            
            myDialog.setPositiveButton("Delete", new DialogInterface.OnClickListener() {
                // do something when the button is clicked
                public void onClick(DialogInterface arg0, int arg1) {
                 mySQLiteAdapter.delete_byID(item_id);
           updateList();
                 }
                });
            
            myDialog.setNeutralButton("Update", new DialogInterface.OnClickListener() {
                // do something when the button is clicked
                public void onClick(DialogInterface arg0, int arg1) {
                 String value1 = dialogC1_id.getText().toString();
                 String value2 = dialogC2_id.getText().toString();
                 mySQLiteAdapter.update_byID(item_id, value1, value2);
           updateList();
                 }
                });
            
            myDialog.setNegativeButton("Cancel", new DialogInterface.OnClickListener() {
                // do something when the button is clicked
                public void onClick(DialogInterface arg0, int arg1) {
         
                 }
                });
            
            myDialog.show();
            
            
  }};

 @Override
 protected void onDestroy() {
  // TODO Auto-generated method stub
  super.onDestroy();
  mySQLiteAdapter.close();
 }


 private void updateList(){
  cursor.requery();
    }

}


download filesDownload the files.

Friday, June 10, 2011

Windows Phone 7 Guide for Android Application Developers

If you have been developing Android applications and are interested in building your applications for Windows Phone 7, this guide is for you.
The guide will cover what you need to know to add Windows Phone 7 development to your skill set, while leveraging what you have already learned building Android applications.

link:
- WindowsPhone7 - Windows Phone 7 Guide for Android Application Developers

Thursday, June 9, 2011

Edit row in SQLite database using SQLiteDatabase.update().

update() of SQLiteDatabase class provide convenience method for updating rows in the database.

Edit row in SQLite database using SQLiteDatabase.update()

Further work on last exercise "Delete row in SQLite database".

Modify SQLiteAdapter.java to implement update_byID() method.
package com.exercise.AndroidSQLite;

import android.content.ContentValues;
import android.content.Context;
import android.database.Cursor;
import android.database.sqlite.SQLiteDatabase;
import android.database.sqlite.SQLiteOpenHelper;
import android.database.sqlite.SQLiteDatabase.CursorFactory;

public class SQLiteAdapter {

 public static final String MYDATABASE_NAME = "MY_DATABASE";
 public static final String MYDATABASE_TABLE = "MY_TABLE";
 public static final int MYDATABASE_VERSION = 1;
 public static final String KEY_ID = "_id";
 public static final String KEY_CONTENT1 = "Content1";
 public static final String KEY_CONTENT2 = "Content2";

 //create table MY_DATABASE (ID integer primary key, Content text not null);
 private static final String SCRIPT_CREATE_DATABASE =
  "create table " + MYDATABASE_TABLE + " ("
  + KEY_ID + " integer primary key autoincrement, "
  + KEY_CONTENT1 + " text not null, "
  + KEY_CONTENT2 + " text not null);";
 
 private SQLiteHelper sqLiteHelper;
 private SQLiteDatabase sqLiteDatabase;

 private Context context;
 
 public SQLiteAdapter(Context c){
  context = c;
 }
 
 public SQLiteAdapter openToRead() throws android.database.SQLException {
  sqLiteHelper = new SQLiteHelper(context, MYDATABASE_NAME, null, MYDATABASE_VERSION);
  sqLiteDatabase = sqLiteHelper.getReadableDatabase();
  return this; 
 }
 
 public SQLiteAdapter openToWrite() throws android.database.SQLException {
  sqLiteHelper = new SQLiteHelper(context, MYDATABASE_NAME, null, MYDATABASE_VERSION);
  sqLiteDatabase = sqLiteHelper.getWritableDatabase();
  return this; 
 }
 
 public void close(){
  sqLiteHelper.close();
 }
 
 public long insert(String content1, String content2){
  
  ContentValues contentValues = new ContentValues();
  contentValues.put(KEY_CONTENT1, content1);
  contentValues.put(KEY_CONTENT2, content2);
  return sqLiteDatabase.insert(MYDATABASE_TABLE, null, contentValues);
 }
 
 public int deleteAll(){
  return sqLiteDatabase.delete(MYDATABASE_TABLE, null, null);
 }
 
 public void delete_byID(int id){
  sqLiteDatabase.delete(MYDATABASE_TABLE, KEY_ID+"="+id, null);
 }
 
 public void update_byID(int id, String v1, String v2){
  ContentValues values = new ContentValues();
  values.put(KEY_CONTENT1, v1);
  values.put(KEY_CONTENT2, v2);
  sqLiteDatabase.update(MYDATABASE_TABLE, values, KEY_ID+"="+id, null);
 }
 
 public Cursor queueAll(){
  String[] columns = new String[]{KEY_ID, KEY_CONTENT1, KEY_CONTENT2};
  Cursor cursor = sqLiteDatabase.query(MYDATABASE_TABLE, columns,
    null, null, null, null, null);
  
  return cursor;
 }
 
 public class SQLiteHelper extends SQLiteOpenHelper {

  public SQLiteHelper(Context context, String name,
    CursorFactory factory, int version) {
   super(context, name, factory, version);
  }

  @Override
  public void onCreate(SQLiteDatabase db) {
   // TODO Auto-generated method stub
   db.execSQL(SCRIPT_CREATE_DATABASE);
  }

  @Override
  public void onUpgrade(SQLiteDatabase db, int oldVersion, int newVersion) {
   // TODO Auto-generated method stub

  }

 }
 
}


Update AndroidSQLite.java, modify listContentOnItemClickListener to change the dialogC1_id and dialogC1_id to final EditText, and also add button to update SQLite database with mySQLiteAdapter.update_byID().
package com.exercise.AndroidSQLite;

import android.app.Activity;
import android.app.AlertDialog;
import android.content.DialogInterface;
import android.database.Cursor;
import android.os.Bundle;
import android.view.View;
import android.view.ViewGroup.LayoutParams;
import android.widget.AdapterView;
import android.widget.Button;
import android.widget.EditText;
import android.widget.LinearLayout;
import android.widget.ListView;
import android.widget.SimpleCursorAdapter;
import android.widget.TextView;

public class AndroidSQLite extends Activity {
 
 EditText inputContent1, inputContent2;
 Button buttonAdd, buttonDeleteAll;
 
 private SQLiteAdapter mySQLiteAdapter;
 ListView listContent;
 
 SimpleCursorAdapter cursorAdapter;
 Cursor cursor;
 
   /** Called when the activity is first created. */
   @Override
   public void onCreate(Bundle savedInstanceState) {
       super.onCreate(savedInstanceState);
       setContentView(R.layout.main);
      
       inputContent1 = (EditText)findViewById(R.id.content1);
       inputContent2 = (EditText)findViewById(R.id.content2);
       buttonAdd = (Button)findViewById(R.id.add);
       buttonDeleteAll = (Button)findViewById(R.id.deleteall);
      
       listContent = (ListView)findViewById(R.id.contentlist);

       mySQLiteAdapter = new SQLiteAdapter(this);
       mySQLiteAdapter.openToWrite();

       cursor = mySQLiteAdapter.queueAll();
       String[] from = new String[]{SQLiteAdapter.KEY_ID, SQLiteAdapter.KEY_CONTENT1, SQLiteAdapter.KEY_CONTENT2};
       int[] to = new int[]{R.id.id, R.id.text1, R.id.text2};
       cursorAdapter =
        new SimpleCursorAdapter(this, R.layout.row, cursor, from, to);
       listContent.setAdapter(cursorAdapter);
       listContent.setOnItemClickListener(listContentOnItemClickListener);
      
       buttonAdd.setOnClickListener(buttonAddOnClickListener);
       buttonDeleteAll.setOnClickListener(buttonDeleteAllOnClickListener);
      
   }
  
   Button.OnClickListener buttonAddOnClickListener
   = new Button.OnClickListener(){

  @Override
  public void onClick(View arg0) {
   // TODO Auto-generated method stub
   String data1 = inputContent1.getText().toString();
   String data2 = inputContent2.getText().toString();
   mySQLiteAdapter.insert(data1, data2);
   updateList();
  }
    
   };
  
   Button.OnClickListener buttonDeleteAllOnClickListener
   = new Button.OnClickListener(){

  @Override
  public void onClick(View arg0) {
   // TODO Auto-generated method stub
   mySQLiteAdapter.deleteAll();
   updateList();
  }
    
   };
  
   private ListView.OnItemClickListener listContentOnItemClickListener
   = new ListView.OnItemClickListener(){

  @Override
  public void onItemClick(AdapterView<?> parent, View view, int position,
    long id) {
   // TODO Auto-generated method stub
   
   Cursor cursor = (Cursor) parent.getItemAtPosition(position);
   final int item_id = cursor.getInt(cursor.getColumnIndex(SQLiteAdapter.KEY_ID));
           String item_content1 = cursor.getString(cursor.getColumnIndex(SQLiteAdapter.KEY_CONTENT1));
           String item_content2 = cursor.getString(cursor.getColumnIndex(SQLiteAdapter.KEY_CONTENT2));
          
           AlertDialog.Builder myDialog
           = new AlertDialog.Builder(AndroidSQLite.this);
          
           myDialog.setTitle("Delete/Edit?");
          
           TextView dialogTxt_id = new TextView(AndroidSQLite.this);
           LayoutParams dialogTxt_idLayoutParams
            = new LayoutParams(LayoutParams.WRAP_CONTENT, LayoutParams.WRAP_CONTENT);
           dialogTxt_id.setLayoutParams(dialogTxt_idLayoutParams);
           dialogTxt_id.setText("#" + String.valueOf(item_id));
          
           final EditText dialogC1_id = new EditText(AndroidSQLite.this);
           LayoutParams dialogC1_idLayoutParams
            = new LayoutParams(LayoutParams.FILL_PARENT, LayoutParams.WRAP_CONTENT);
           dialogC1_id.setLayoutParams(dialogC1_idLayoutParams);
           dialogC1_id.setText(item_content1);
          
           final EditText dialogC2_id = new EditText(AndroidSQLite.this);
           LayoutParams dialogC2_idLayoutParams
            = new LayoutParams(LayoutParams.FILL_PARENT, LayoutParams.WRAP_CONTENT);
           dialogC2_id.setLayoutParams(dialogC2_idLayoutParams);
           dialogC2_id.setText(item_content2);
          
           LinearLayout layout = new LinearLayout(AndroidSQLite.this);
           layout.setOrientation(LinearLayout.VERTICAL);
           layout.addView(dialogTxt_id);
           layout.addView(dialogC1_id);
           layout.addView(dialogC2_id);
           myDialog.setView(layout);
          
           myDialog.setPositiveButton("Delete", new DialogInterface.OnClickListener() {
               // do something when the button is clicked
               public void onClick(DialogInterface arg0, int arg1) {
                mySQLiteAdapter.delete_byID(item_id);
          updateList();
                }
               });
          
           myDialog.setNeutralButton("Update", new DialogInterface.OnClickListener() {
               // do something when the button is clicked
               public void onClick(DialogInterface arg0, int arg1) {
                String value1 = dialogC1_id.getText().toString();
                String value2 = dialogC2_id.getText().toString();
                mySQLiteAdapter.update_byID(item_id, value1, value2);
          updateList();
                }
               });
          
           myDialog.setNegativeButton("Cancel", new DialogInterface.OnClickListener() {
               // do something when the button is clicked
               public void onClick(DialogInterface arg0, int arg1) {
       
                }
               });
          
           myDialog.show();
          
          
  }};

 @Override
 protected void onDestroy() {
  // TODO Auto-generated method stub
  super.onDestroy();
  mySQLiteAdapter.close();
 }

 private void updateList(){
  cursor.requery();
   }

}


download filesDownload the files.

next:
- query SQLite database with sorting

Gesture Search API available

Gesture Search API available
Gesture Search from Google Labs now has an API. You can use the API to easily integrate Gesture Search into your Android apps, so your users can gesture to write text and search for application-specific data.

The Official Google Code Blog have a post, Add Gesture Search to your Android apps, demonstrate how we can embed Gesture Search (1.4.0 or later) into an Android app that enables a user to find information about a specific country.

link:
- The Official Google Code Blog: Add Gesture Search to your Android apps

Wednesday, June 8, 2011

Delete row in SQLite database

android.database.sqlite.SQLiteDatabase class provide a convenience method for deleting rows in the database.

Delete row in SQLite database

Modify SQLiteAdapter.java, implement a method delete_byID(int id) to delete individual row using id.
package com.exercise.AndroidSQLite;

import android.content.ContentValues;
import android.content.Context;
import android.database.Cursor;
import android.database.sqlite.SQLiteDatabase;
import android.database.sqlite.SQLiteOpenHelper;
import android.database.sqlite.SQLiteDatabase.CursorFactory;

public class SQLiteAdapter {

public static final String MYDATABASE_NAME = "MY_DATABASE";
public static final String MYDATABASE_TABLE = "MY_TABLE";
public static final int MYDATABASE_VERSION = 1;
public static final String KEY_ID = "_id";
public static final String KEY_CONTENT1 = "Content1";
public static final String KEY_CONTENT2 = "Content2";

//create table MY_DATABASE (ID integer primary key, Content text not null);
private static final String SCRIPT_CREATE_DATABASE =
 "create table " + MYDATABASE_TABLE + " ("
 + KEY_ID + " integer primary key autoincrement, "
 + KEY_CONTENT1 + " text not null, "
 + KEY_CONTENT2 + " text not null);";

private SQLiteHelper sqLiteHelper;
private SQLiteDatabase sqLiteDatabase;

private Context context;

public SQLiteAdapter(Context c){
 context = c;
}

public SQLiteAdapter openToRead() throws android.database.SQLException {
 sqLiteHelper = new SQLiteHelper(context, MYDATABASE_NAME, null, MYDATABASE_VERSION);
 sqLiteDatabase = sqLiteHelper.getReadableDatabase();
 return this;
}

public SQLiteAdapter openToWrite() throws android.database.SQLException {
 sqLiteHelper = new SQLiteHelper(context, MYDATABASE_NAME, null, MYDATABASE_VERSION);
 sqLiteDatabase = sqLiteHelper.getWritableDatabase();
 return this;
}

public void close(){
 sqLiteHelper.close();
}

public long insert(String content1, String content2){

 ContentValues contentValues = new ContentValues();
 contentValues.put(KEY_CONTENT1, content1);
 contentValues.put(KEY_CONTENT2, content2);
 return sqLiteDatabase.insert(MYDATABASE_TABLE, null, contentValues);
}

public int deleteAll(){
 return sqLiteDatabase.delete(MYDATABASE_TABLE, null, null);
}

public void delete_byID(int id){
 sqLiteDatabase.delete(MYDATABASE_TABLE, KEY_ID+"="+id, null);
}

public Cursor queueAll(){
 String[] columns = new String[]{KEY_ID, KEY_CONTENT1, KEY_CONTENT2};
 Cursor cursor = sqLiteDatabase.query(MYDATABASE_TABLE, columns,
   null, null, null, null, null);

 return cursor;
}

public class SQLiteHelper extends SQLiteOpenHelper {

 public SQLiteHelper(Context context, String name,
   CursorFactory factory, int version) {
  super(context, name, factory, version);
 }

 @Override
 public void onCreate(SQLiteDatabase db) {
  // TODO Auto-generated method stub
  db.execSQL(SCRIPT_CREATE_DATABASE);
 }

 @Override
 public void onUpgrade(SQLiteDatabase db, int oldVersion, int newVersion) {
  // TODO Auto-generated method stub

 }

}

}


Modify AndroidSQLite.java to implement a custom AlertDialog to handle the ui, call delete_byID(int id) to delete row.
package com.exercise.AndroidSQLite;

import android.app.Activity;
import android.app.AlertDialog;
import android.content.DialogInterface;
import android.database.Cursor;
import android.os.Bundle;
import android.view.View;
import android.view.ViewGroup.LayoutParams;
import android.widget.AdapterView;
import android.widget.Button;
import android.widget.EditText;
import android.widget.LinearLayout;
import android.widget.ListView;
import android.widget.SimpleCursorAdapter;
import android.widget.TextView;

public class AndroidSQLite extends Activity {

EditText inputContent1, inputContent2;
Button buttonAdd, buttonDeleteAll;

private SQLiteAdapter mySQLiteAdapter;
ListView listContent;

SimpleCursorAdapter cursorAdapter;
Cursor cursor;

  /** Called when the activity is first created. */
  @Override
  public void onCreate(Bundle savedInstanceState) {
      super.onCreate(savedInstanceState);
      setContentView(R.layout.main);
    
      inputContent1 = (EditText)findViewById(R.id.content1);
      inputContent2 = (EditText)findViewById(R.id.content2);
      buttonAdd = (Button)findViewById(R.id.add);
      buttonDeleteAll = (Button)findViewById(R.id.deleteall);
    
      listContent = (ListView)findViewById(R.id.contentlist);

      mySQLiteAdapter = new SQLiteAdapter(this);
      mySQLiteAdapter.openToWrite();

      cursor = mySQLiteAdapter.queueAll();
      String[] from = new String[]{SQLiteAdapter.KEY_ID, SQLiteAdapter.KEY_CONTENT1, SQLiteAdapter.KEY_CONTENT2};
      int[] to = new int[]{R.id.id, R.id.text1, R.id.text2};
      cursorAdapter =
       new SimpleCursorAdapter(this, R.layout.row, cursor, from, to);
      listContent.setAdapter(cursorAdapter);
      listContent.setOnItemClickListener(listContentOnItemClickListener);
    
      buttonAdd.setOnClickListener(buttonAddOnClickListener);
      buttonDeleteAll.setOnClickListener(buttonDeleteAllOnClickListener);
    
  }

  Button.OnClickListener buttonAddOnClickListener
  = new Button.OnClickListener(){

 @Override
 public void onClick(View arg0) {
  // TODO Auto-generated method stub
  String data1 = inputContent1.getText().toString();
  String data2 = inputContent2.getText().toString();
  mySQLiteAdapter.insert(data1, data2);
  updateList();
 }
  
  };

  Button.OnClickListener buttonDeleteAllOnClickListener
  = new Button.OnClickListener(){

 @Override
 public void onClick(View arg0) {
  // TODO Auto-generated method stub
  mySQLiteAdapter.deleteAll();
  updateList();
 }
  
  };

  private ListView.OnItemClickListener listContentOnItemClickListener
  = new ListView.OnItemClickListener(){

 @Override
 public void onItemClick(AdapterView<?> parent, View view, int position,
   long id) {
  // TODO Auto-generated method stub
 
  Cursor cursor = (Cursor) parent.getItemAtPosition(position);
  final int item_id = cursor.getInt(cursor.getColumnIndex(SQLiteAdapter.KEY_ID));
          String item_content1 = cursor.getString(cursor.getColumnIndex(SQLiteAdapter.KEY_CONTENT1));
          String item_content2 = cursor.getString(cursor.getColumnIndex(SQLiteAdapter.KEY_CONTENT2));
        
          AlertDialog.Builder myDialog
          = new AlertDialog.Builder(AndroidSQLite.this);
        
          myDialog.setTitle("Delete?");
        
          TextView dialogTxt_id = new TextView(AndroidSQLite.this);
          LayoutParams dialogTxt_idLayoutParams
           = new LayoutParams(LayoutParams.WRAP_CONTENT, LayoutParams.WRAP_CONTENT);
          dialogTxt_id.setLayoutParams(dialogTxt_idLayoutParams);
          dialogTxt_id.setText("#" + String.valueOf(item_id));
        
          TextView dialogC1_id = new TextView(AndroidSQLite.this);
          LayoutParams dialogC1_idLayoutParams
           = new LayoutParams(LayoutParams.WRAP_CONTENT, LayoutParams.WRAP_CONTENT);
          dialogC1_id.setLayoutParams(dialogC1_idLayoutParams);
          dialogC1_id.setText(item_content1);
        
          TextView dialogC2_id = new TextView(AndroidSQLite.this);
          LayoutParams dialogC2_idLayoutParams
           = new LayoutParams(LayoutParams.WRAP_CONTENT, LayoutParams.WRAP_CONTENT);
          dialogC2_id.setLayoutParams(dialogC2_idLayoutParams);
          dialogC2_id.setText(item_content2);
        
          LinearLayout layout = new LinearLayout(AndroidSQLite.this);
          layout.setOrientation(LinearLayout.VERTICAL);
          layout.addView(dialogTxt_id);
          layout.addView(dialogC1_id);
          layout.addView(dialogC2_id);
          myDialog.setView(layout);
        
          myDialog.setPositiveButton("OK", new DialogInterface.OnClickListener() {
              // do something when the button is clicked
              public void onClick(DialogInterface arg0, int arg1) {
               mySQLiteAdapter.delete_byID(item_id);
         updateList();
               }
              });
        
          myDialog.setNegativeButton("Cancel", new DialogInterface.OnClickListener() {
              // do something when the button is clicked
              public void onClick(DialogInterface arg0, int arg1) {
     
               }
              });
        
          myDialog.show();
        
        
 }};

@Override
protected void onDestroy() {
 // TODO Auto-generated method stub
 super.onDestroy();
 mySQLiteAdapter.close();
}


private void updateList(){
 cursor.requery();
  }

}


All other files, main.xml and row.xml, follow the last exercise "Retrieve individual items in cursor".

download filesDownload the files.

Next:
- Edit row in SQLite database using SQLiteDatabase.update()

Tuesday, June 7, 2011

Custom AlertDialog

It's a example of custom AlertDialog built using AlertDialog.Builder().

Custom AlertDialog

package com.exercise.AndroidCustomAlertDialog;

import android.app.Activity;
import android.app.AlertDialog;
import android.content.DialogInterface;
import android.os.Bundle;
import android.view.ViewGroup.LayoutParams;
import android.widget.EditText;
import android.widget.ImageView;
import android.widget.LinearLayout;
import android.widget.TextView;

public class AndroidCustomAlertDialog extends Activity {
/** Called when the activity is first created. */
@Override
public void onCreate(Bundle savedInstanceState) {
super.onCreate(savedInstanceState);
setContentView(R.layout.main);

AlertDialog.Builder myDialog
= new AlertDialog.Builder(AndroidCustomAlertDialog.this);
myDialog.setTitle("My Dialog");

ImageView imageView = new ImageView(AndroidCustomAlertDialog.this);
imageView.setImageResource(R.drawable.icon);
LayoutParams imageViewLayoutParams
= new LayoutParams(LayoutParams.WRAP_CONTENT, LayoutParams.WRAP_CONTENT);
imageView.setLayoutParams(imageViewLayoutParams);

TextView textView = new TextView(AndroidCustomAlertDialog.this);
textView.setText("It's my custom AlertDialog");
LayoutParams textViewLayoutParams
= new LayoutParams(LayoutParams.WRAP_CONTENT, LayoutParams.WRAP_CONTENT);
textView.setLayoutParams(textViewLayoutParams);

EditText editText = new EditText(AndroidCustomAlertDialog.this);
LayoutParams editTextLayoutParams
= new LayoutParams(LayoutParams.FILL_PARENT, LayoutParams.WRAP_CONTENT);
editText.setLayoutParams(editTextLayoutParams);

LinearLayout layout = new LinearLayout(AndroidCustomAlertDialog.this);
layout.setOrientation(LinearLayout.VERTICAL);
layout.addView(imageView);
layout.addView(textView);
layout.addView(editText);

myDialog.setView(layout);

myDialog.setPositiveButton("OK", new DialogInterface.OnClickListener() {
// do something when the button is clicked
public void onClick(DialogInterface arg0, int arg1) {

}
});

myDialog.setNegativeButton("Cancel", new DialogInterface.OnClickListener() {
// do something when the button is clicked
public void onClick(DialogInterface arg0, int arg1) {

}
});

myDialog.show();
}
}


Download the files.

ADT 11 is available for download, focuses on editor improvements

ADT 11 focuses on editor improvements. First, it offers several new visual refactoring operations, such as “Extract Include” and “Extract Style,” which help automatically extract duplicated layout fragments and style attributes into reusable layouts, styles, and themes.

Second, the visual layout editor now supports fragments, palette configurations, and improved support for custom views.

Last, XML editing has been improved with new quick fixes, code completion in more file types and many “go to declaration” enhancements.

ADT 11 packs a long list of new features and enhancements. Visit our ADT page for more details.

Source: Android Developers Blog - New Editing Features in Eclipse plug-in for Android

If you have already installed Android SDK, ADT for Eclipse, you can update ADT in Eclipse:
Eclipse Menu > Help > Check for Updates >

After ADT updated, may be you have to re-assign your SdK folder:
Eclipse Menu > Window > Preferences > Select Android on the left, and Browse to select your SDK Location.


Retrieve individual items in cursor

In the last exercise "Add data to SQLite database, with SimpleCursorAdapter updated dynamically", to retrieve individual items associated with the cursor when any list item clicked. We can use the code:

Cursor cursor = (Cursor) parent.getItemAtPosition(position);
int item_id = cursor.getInt(cursor.getColumnIndex(SQLiteAdapter.KEY_ID));
String item_content1 = cursor.getString(cursor.getColumnIndex(SQLiteAdapter.KEY_CONTENT1));
String item_content2 = cursor.getString(cursor.getColumnIndex(SQLiteAdapter.KEY_CONTENT2));

Retrieve individual items in cursor

Modify AndroidSQLite.java listContentOnItemClickListener() to handle the OnItemClick event of the ListView.
package com.exercise.AndroidSQLite;

import android.app.Activity;
import android.database.Cursor;
import android.os.Bundle;
import android.view.View;
import android.widget.AdapterView;
import android.widget.Button;
import android.widget.EditText;
import android.widget.ListView;
import android.widget.SimpleCursorAdapter;
import android.widget.Toast;

public class AndroidSQLite extends Activity {

EditText inputContent1, inputContent2;
Button buttonAdd, buttonDeleteAll;

private SQLiteAdapter mySQLiteAdapter;
ListView listContent;

SimpleCursorAdapter cursorAdapter;
Cursor cursor;

   /** Called when the activity is first created. */
   @Override
   public void onCreate(Bundle savedInstanceState) {
       super.onCreate(savedInstanceState);
       setContentView(R.layout.main);
      
       inputContent1 = (EditText)findViewById(R.id.content1);
       inputContent2 = (EditText)findViewById(R.id.content2);
       buttonAdd = (Button)findViewById(R.id.add);
       buttonDeleteAll = (Button)findViewById(R.id.deleteall);
      
       listContent = (ListView)findViewById(R.id.contentlist);

       mySQLiteAdapter = new SQLiteAdapter(this);
       mySQLiteAdapter.openToWrite();

       cursor = mySQLiteAdapter.queueAll();
       String[] from = new String[]{SQLiteAdapter.KEY_ID, SQLiteAdapter.KEY_CONTENT1, SQLiteAdapter.KEY_CONTENT2};
       int[] to = new int[]{R.id.id, R.id.text1, R.id.text2};
       cursorAdapter =
        new SimpleCursorAdapter(this, R.layout.row, cursor, from, to);
       listContent.setAdapter(cursorAdapter);
       listContent.setOnItemClickListener(listContentOnItemClickListener);
      
       buttonAdd.setOnClickListener(buttonAddOnClickListener);
       buttonDeleteAll.setOnClickListener(buttonDeleteAllOnClickListener);
      
   }
  
   Button.OnClickListener buttonAddOnClickListener
   = new Button.OnClickListener(){

 @Override
 public void onClick(View arg0) {
  // TODO Auto-generated method stub
  String data1 = inputContent1.getText().toString();
  String data2 = inputContent2.getText().toString();
  mySQLiteAdapter.insert(data1, data2);
  updateList();
 }
   
   };
  
   Button.OnClickListener buttonDeleteAllOnClickListener
   = new Button.OnClickListener(){

 @Override
 public void onClick(View arg0) {
  // TODO Auto-generated method stub
  mySQLiteAdapter.deleteAll();
  updateList();
 }
   
   };
  
   private ListView.OnItemClickListener listContentOnItemClickListener
   = new ListView.OnItemClickListener(){

 @Override
 public void onItemClick(AdapterView<?> parent, View view, int position,
   long id) {
  // TODO Auto-generated method stub
 
  Cursor cursor = (Cursor) parent.getItemAtPosition(position);
  int item_id = cursor.getInt(cursor.getColumnIndex(SQLiteAdapter.KEY_ID));
           String item_content1 = cursor.getString(cursor.getColumnIndex(SQLiteAdapter.KEY_CONTENT1));
           String item_content2 = cursor.getString(cursor.getColumnIndex(SQLiteAdapter.KEY_CONTENT2));
          
           String item = String.valueOf(item_id) + " : " + item_content1 +"\n"
                +item_content2;
  Toast.makeText(AndroidSQLite.this, item, Toast.LENGTH_LONG).show();
 }};

@Override
protected void onDestroy() {
 // TODO Auto-generated method stub
 super.onDestroy();
 mySQLiteAdapter.close();
}


private void updateList(){
 cursor.requery();
   }

}


Other files follow the last post "Add data to SQLite database, with SimpleCursorAdapter updated dynamically".

next:
- Delete row in SQLite database

Monday, June 6, 2011

Add data to SQLite database, with SimpleCursorAdapter updated dynamically

Work on the article "A simple example using Android's SQLite database, exposes data from Cursor to a ListView", it was modified to add ui for user to add data to SQLite database. Once SQLite database updated, simple call cursor.requery() to update ListView dynamically.

Add data to SQLite database, with SimpleCursorAdapter updated dynamically

Modify main.xml and row.xml to update our ui
<?xml version="1.0" encoding="utf-8"?>

<LinearLayout xmlns:android="http://schemas.android.com/apk/res/android"

   android:orientation="vertical"

   android:layout_width="fill_parent"

   android:layout_height="fill_parent"

   >

<TextView 

   android:layout_width="fill_parent"

   android:layout_height="wrap_content"

   android:text="@string/hello"

   />

<TextView 

   android:layout_width="fill_parent"

   android:layout_height="wrap_content"

   android:text="Enter content of column 1"

   />

<EditText

   android:id="@+id/content1"

   android:layout_width="fill_parent"

   android:layout_height="wrap_content"

   />

<TextView 

   android:layout_width="fill_parent"

   android:layout_height="wrap_content"

   android:text="Enter content of column 2"

   />

<EditText

   android:id="@+id/content2"

   android:layout_width="fill_parent"

   android:layout_height="wrap_content"

   />

<Button

   android:id="@+id/add"

   android:layout_width="fill_parent"

   android:layout_height="wrap_content"

   android:text="Add"

   />

<Button

   android:id="@+id/deleteall"

   android:layout_width="fill_parent"

   android:layout_height="wrap_content"

   android:text="Delete All"

   />

<ListView

 android:id="@+id/contentlist"

 android:layout_width="fill_parent"

 android:layout_height="fill_parent"/>

</LinearLayout>


<?xml version="1.0" encoding="utf-8"?>

<LinearLayout xmlns:android="http://schemas.android.com/apk/res/android"

   android:orientation="vertical"

 android:layout_width="fill_parent"

 android:layout_height="wrap_content">

<LinearLayout

   android:orientation="horizontal"

 android:layout_width="fill_parent"

 android:layout_height="wrap_content">

<TextView

 android:layout_width="wrap_content"

 android:layout_height="fill_parent"

 android:padding="2dip"

 android:text="#"/>

<TextView

 android:id="@+id/id"

 android:layout_width="wrap_content"

 android:layout_height="fill_parent"

 android:padding="2dip"

 android:paddingRight="10dip"/>

<TextView

 android:layout_width="wrap_content"

 android:layout_height="fill_parent"

 android:padding="2dip"

 android:paddingRight="10dip"

 android:text="-" />

<TextView

 android:id="@+id/text1"

 android:layout_width="fill_parent"

 android:layout_height="fill_parent"

 android:padding="2dip"/>

</LinearLayout>

<TextView

 android:id="@+id/text2"

 android:layout_width="fill_parent"

 android:layout_height="wrap_content"

 android:padding="2dip"/>

</LinearLayout>


SQLiteAdapter.java
package com.exercise.AndroidSQLite;


import android.content.ContentValues;

import android.content.Context;

import android.database.Cursor;

import android.database.sqlite.SQLiteDatabase;

import android.database.sqlite.SQLiteOpenHelper;

import android.database.sqlite.SQLiteDatabase.CursorFactory;


public class SQLiteAdapter {


 public static final String MYDATABASE_NAME = "MY_DATABASE";

 public static final String MYDATABASE_TABLE = "MY_TABLE";

 public static final int MYDATABASE_VERSION = 1;

 public static final String KEY_ID = "_id";

 public static final String KEY_CONTENT1 = "Content1";

 public static final String KEY_CONTENT2 = "Content2";


 //create table MY_DATABASE (ID integer primary key, Content text not null);

 private static final String SCRIPT_CREATE_DATABASE =

  "create table " + MYDATABASE_TABLE + " ("

  + KEY_ID + " integer primary key autoincrement, "

  + KEY_CONTENT1 + " text not null, "

  + KEY_CONTENT2 + " text not null);";


 private SQLiteHelper sqLiteHelper;

 private SQLiteDatabase sqLiteDatabase;


 private Context context;


 public SQLiteAdapter(Context c){

  context = c;

 }


 public SQLiteAdapter openToRead() throws android.database.SQLException {

  sqLiteHelper = new SQLiteHelper(context, MYDATABASE_NAME, null, MYDATABASE_VERSION);

  sqLiteDatabase = sqLiteHelper.getReadableDatabase();

  return this; 

 }


 public SQLiteAdapter openToWrite() throws android.database.SQLException {

  sqLiteHelper = new SQLiteHelper(context, MYDATABASE_NAME, null, MYDATABASE_VERSION);

  sqLiteDatabase = sqLiteHelper.getWritableDatabase();

  return this; 

 }


 public void close(){

  sqLiteHelper.close();

 }


 public long insert(String content1, String content2){


  ContentValues contentValues = new ContentValues();

  contentValues.put(KEY_CONTENT1, content1);

  contentValues.put(KEY_CONTENT2, content2);

  return sqLiteDatabase.insert(MYDATABASE_TABLE, null, contentValues);

 }


 public int deleteAll(){

  return sqLiteDatabase.delete(MYDATABASE_TABLE, null, null);

 }


 public Cursor queueAll(){

  String[] columns = new String[]{KEY_ID, KEY_CONTENT1, KEY_CONTENT2};

  Cursor cursor = sqLiteDatabase.query(MYDATABASE_TABLE, columns,

    null, null, null, null, null);


  return cursor;

 }


 public class SQLiteHelper extends SQLiteOpenHelper {


  public SQLiteHelper(Context context, String name,

    CursorFactory factory, int version) {

   super(context, name, factory, version);

  }


  @Override

  public void onCreate(SQLiteDatabase db) {

   // TODO Auto-generated method stub

   db.execSQL(SCRIPT_CREATE_DATABASE);

  }


  @Override

  public void onUpgrade(SQLiteDatabase db, int oldVersion, int newVersion) {

   // TODO Auto-generated method stub

  }

 } 

}


AndroidSQLite.java
package com.exercise.AndroidSQLite;


import android.app.Activity;

import android.database.Cursor;

import android.os.Bundle;

import android.view.View;

import android.widget.Button;

import android.widget.EditText;

import android.widget.ListView;

import android.widget.SimpleCursorAdapter;


public class AndroidSQLite extends Activity {


 EditText inputContent1, inputContent2;

 Button buttonAdd, buttonDeleteAll;


 private SQLiteAdapter mySQLiteAdapter;

 ListView listContent;


 SimpleCursorAdapter cursorAdapter;

 Cursor cursor;


   /** Called when the activity is first created. */

   @Override

   public void onCreate(Bundle savedInstanceState) {

       super.onCreate(savedInstanceState);

       setContentView(R.layout.main);


       inputContent1 = (EditText)findViewById(R.id.content1);

       inputContent2 = (EditText)findViewById(R.id.content2);

       buttonAdd = (Button)findViewById(R.id.add);

       buttonDeleteAll = (Button)findViewById(R.id.deleteall);


       listContent = (ListView)findViewById(R.id.contentlist);


       mySQLiteAdapter = new SQLiteAdapter(this);

       mySQLiteAdapter.openToWrite();


       cursor = mySQLiteAdapter.queueAll();

       String[] from = new String[]{SQLiteAdapter.KEY_ID, SQLiteAdapter.KEY_CONTENT1, SQLiteAdapter.KEY_CONTENT2};

       int[] to = new int[]{R.id.id, R.id.text1, R.id.text2};

       cursorAdapter =

        new SimpleCursorAdapter(this, R.layout.row, cursor, from, to);

       listContent.setAdapter(cursorAdapter);


       buttonAdd.setOnClickListener(buttonAddOnClickListener);

       buttonDeleteAll.setOnClickListener(buttonDeleteAllOnClickListener);


   }


   Button.OnClickListener buttonAddOnClickListener

   = new Button.OnClickListener(){


  @Override

  public void onClick(View arg0) {

   // TODO Auto-generated method stub

   String data1 = inputContent1.getText().toString();

   String data2 = inputContent2.getText().toString();

   mySQLiteAdapter.insert(data1, data2);

   updateList();

  }


   };


   Button.OnClickListener buttonDeleteAllOnClickListener

   = new Button.OnClickListener(){


  @Override

  public void onClick(View arg0) {

   // TODO Auto-generated method stub

   mySQLiteAdapter.deleteAll();

   updateList();

  }


   };


 @Override

 protected void onDestroy() {

  // TODO Auto-generated method stub

  super.onDestroy();

  mySQLiteAdapter.close();

 }


 private void updateList(){

  cursor.requery();

   }


}


download filesDownload the files.

Related article:
- Retrieve individual items in cursor

Sunday, June 5, 2011

Get IP addresses associated with the given host

java.net.InetAddress is a class of an Internet Protocol (IP) address. This can be either an IPv4 address or an IPv6 address, and in practice you'll have an instance of either Inet4Address or Inet6Address (this class cannot be instantiated directly). Most code does not need to distinguish between the two families, and should use InetAddress.

An InetAddress may have a hostname (accessible via getHostName), but may not, depending on how the InetAddress was created.

In this exercise, we are going to get all IP addresses associated with a host, by calling the function getAllByName().

Get IP addresses associated with the given host

package com.exercise.AndroidIP;

import java.net.InetAddress;
import java.net.UnknownHostException;

import android.app.Activity;
import android.os.Bundle;
import android.view.View;
import android.widget.Button;
import android.widget.EditText;
import android.widget.TextView;
import android.widget.Toast;

public class AndroidIP extends Activity {
 
 EditText inputHostName;
 Button btnCheck;
 TextView textInetAddress;
 
 final static String DEFAULT_HOST_NAME = "www.google.com";
 
   /** Called when the activity is first created. */
   @Override
   public void onCreate(Bundle savedInstanceState) {
       super.onCreate(savedInstanceState);
       setContentView(R.layout.main);
    inputHostName = (EditText)findViewById(R.id.hostname);
    btnCheck = (Button)findViewById(R.id.check);
    textInetAddress = (TextView)findViewById(R.id.InetAddress);
    
    inputHostName.setText(DEFAULT_HOST_NAME);
    btnCheck.setOnClickListener(btnCheckOnClickListener);
   }
  
   Button.OnClickListener btnCheckOnClickListener
   = new Button.OnClickListener(){

  @Override
  public void onClick(View arg0) {
   // TODO Auto-generated method stub
   String hostName = inputHostName.getText().toString();
   try {

    InetAddress[] hostInetAddress
     = InetAddress.getAllByName(hostName);
    String all = "";
    for(int i = 0; i < hostInetAddress.length; i++){
     all = all + String.valueOf(i) + " : "
      + hostInetAddress[i].toString() + "\n";
    }
    textInetAddress.setText(all);
    
   } catch (UnknownHostException e) {
    // TODO Auto-generated catch block
    e.printStackTrace();
    Toast.makeText(AndroidIP.this, e.toString(),
      Toast.LENGTH_LONG).show();
   }
  }
    
   };
}


<?xml version="1.0" encoding="utf-8"?>
<LinearLayout xmlns:android="http://schemas.android.com/apk/res/android"
   android:orientation="vertical"
   android:layout_width="fill_parent"
   android:layout_height="fill_parent"
   >
<TextView 
   android:layout_width="fill_parent"
   android:layout_height="wrap_content"
   android:text="@string/hello"
   />
<TextView 
   android:layout_width="fill_parent"
   android:layout_height="wrap_content"
   android:text="Enter Host Name"
   />
<EditText
   android:id="@+id/hostname"
   android:layout_width="fill_parent"
   android:layout_height="wrap_content"
   />
<Button
   android:id="@+id/check"
   android:layout_width="fill_parent"
   android:layout_height="wrap_content"
   android:text=" Check "
   />
<TextView 
   android:id="@+id/InetAddress"
   android:layout_width="fill_parent"
   android:layout_height="wrap_content"
   />
</LinearLayout>


Grant permission of "android.permission.INTERNET"
<?xml version="1.0" encoding="utf-8"?>
<manifest xmlns:android="http://schemas.android.com/apk/res/android"
     package="com.exercise.AndroidIP"
     android:versionCode="1"
     android:versionName="1.0">
   <uses-sdk android:minSdkVersion="4" />
   <uses-permission android:name="android.permission.INTERNET"></uses-permission>

   <application android:icon="@drawable/icon" android:label="@string/app_name">
       <activity android:name=".AndroidIP"
                 android:label="@string/app_name">
           <intent-filter>
               <action android:name="android.intent.action.MAIN" />
               <category android:name="android.intent.category.LAUNCHER" />
           </intent-filter>
       </activity>

   </application>
</manifest>


Download the files.

IPV6 DAY - 8 June, 2011

<!– BEGIN WORLD IPv6 DAY TEST FLIGHT BADGE: BLUE: 128px –>
WORLD IPV6 DAY is 8 June 2011 – The Future is Forever
<!– END WORLD IPv6 DAY TEST FLIGHT BADGE: BLUE: 128px –>
On 8 June, 2011, Google, Facebook, Yahoo!, Akamai and Limelight Networks will be amongst some of the major organisations that will offer their content over IPv6 for a 24-hour “test flight”. The goal of the Test Flight Day is to motivate organizations across the industry – Internet service providers, hardware makers, operating system vendors and web companies – to prepare their services for IPv6 to ensure a successful transition as IPv4 addresses run out.


TEST YOUR IPV6 CONNECTIVITY

Want to find out your IPv6 readiness? Use this test.


http://www.worldipv6day.org/

Saturday, June 4, 2011

PhoneGap: Open Source Mobile Framework support multi-platform

PhoneGap is an HTML5 app platform that allows developers to author native apps with web technologies and get access to APIs and app stores. It leverages web technologies; such as HTML and Javascript.

link:
- PhoneGap web

PhoneGap and Android quick start video using ecliplse

This is a video that will show you how to quickly get your android environment setup using eclipse for phonegap development.

Thursday, June 2, 2011

HTC announce HTCdev, with HTC OpenSense SDK.

HTCdev will be a comprehensive resource for developers that will provide the core tools you need to develop your ideas specifically on HTC devices, including access to HTC OpenSense SDK, support, education, and enhanced services that will enable you to build, publish and promote your ideas. HTCdev will be a constantly evolving platform and we intend to use your feedback to add new features and tools in the future. This is the start of a conversation and of a collaboration. Where it goes from here is only limited by your imagination.

The HTC OpenSense SDK will allow developers to harness software and hardware innovations on HTC phones to develop more deeply integrated mobile apps and experiences. Altogether, you'll have access to documentation, sample code, APIs and more importantly, the support and inspiration of the HTCdev community.

Link:
- HTCdev.com

column '_id' does not exist

In the exercise "A simple example using Android's SQLite database, exposes data from Cursor to a ListView", we have to add column "_id" in our database, and also include it in the queue. Why?

Because we use SimpleCursorAdapter to exposes data from a Cursor to a ListView widget. It's a subclass of android.widget.CursorAdapter. The Cursor must include a column named "_id" or this class will not work - refer to Android doc CursorAdapter.

So, we must:
- include column "_id" in database.
- include it in the queue.

Otherwise "java.lang.IllegalArgumentException: column '_id' does not exist" will be thrown!

A simple example using Android's SQLite database, exposes data from Cursor to a ListView.

In previous exercise "A simple example using Android's SQLite database", the result of queue was presented as string. It's going to be modified to exposes data from Cursor to a ListView widget.

A simple example using Android's SQLite database, exposes data from Cursor to a ListView.

Modify SQLiteAdapter.java to include a column of "_id" in our database, also include it in the queue. Modify the return of queueAll() to Cursor. Refer to the article "column '_id' does not exist".
package com.exercise.AndroidSQLite;

import android.content.ContentValues;
import android.content.Context;
import android.database.Cursor;
import android.database.sqlite.SQLiteDatabase;
import android.database.sqlite.SQLiteOpenHelper;
import android.database.sqlite.SQLiteDatabase.CursorFactory;

public class SQLiteAdapter {

public static final String MYDATABASE_NAME = "MY_DATABASE";
public static final String MYDATABASE_TABLE = "MY_TABLE";
public static final int MYDATABASE_VERSION = 1;
public static final String KEY_ID = "_id";
public static final String KEY_CONTENT = "Content";

//create table MY_DATABASE (ID integer primary key, Content text not null);
private static final String SCRIPT_CREATE_DATABASE =
"create table " + MYDATABASE_TABLE + " ("
+ KEY_ID + " integer primary key autoincrement, "
+ KEY_CONTENT + " text not null);";

private SQLiteHelper sqLiteHelper;
private SQLiteDatabase sqLiteDatabase;

private Context context;

public SQLiteAdapter(Context c){
context = c;
}

public SQLiteAdapter openToRead() throws android.database.SQLException {
sqLiteHelper = new SQLiteHelper(context, MYDATABASE_NAME, null, MYDATABASE_VERSION);
sqLiteDatabase = sqLiteHelper.getReadableDatabase();
return this;
}

public SQLiteAdapter openToWrite() throws android.database.SQLException {
sqLiteHelper = new SQLiteHelper(context, MYDATABASE_NAME, null, MYDATABASE_VERSION);
sqLiteDatabase = sqLiteHelper.getWritableDatabase();
return this;
}

public void close(){
sqLiteHelper.close();
}

public long insert(String content){

ContentValues contentValues = new ContentValues();
contentValues.put(KEY_CONTENT, content);
return sqLiteDatabase.insert(MYDATABASE_TABLE, null, contentValues);
}

public int deleteAll(){
return sqLiteDatabase.delete(MYDATABASE_TABLE, null, null);
}

public Cursor queueAll(){
String[] columns = new String[]{KEY_ID, KEY_CONTENT};
Cursor cursor = sqLiteDatabase.query(MYDATABASE_TABLE, columns,
  null, null, null, null, null);

return cursor;
}

public class SQLiteHelper extends SQLiteOpenHelper {

public SQLiteHelper(Context context, String name,
  CursorFactory factory, int version) {
 super(context, name, factory, version);
}

@Override
public void onCreate(SQLiteDatabase db) {
 // TODO Auto-generated method stub
 db.execSQL(SCRIPT_CREATE_DATABASE);
}

@Override
public void onUpgrade(SQLiteDatabase db, int oldVersion, int newVersion) {
 // TODO Auto-generated method stub

}

}

}


Create /res/layout/row.xml for our ListView
<?xml version="1.0" encoding="utf-8"?>
<TextView xmlns:android="http://schemas.android.com/apk/res/android"
android:id="@+id/text"
android:layout_width="fill_parent"
android:layout_height="fill_parent"
android:padding="10dip"/>


Modify main.xml to change the result(contentlist) from TextView to ListView.
<?xml version="1.0" encoding="utf-8"?>
<LinearLayout xmlns:android="http://schemas.android.com/apk/res/android"
  android:orientation="vertical"
  android:layout_width="fill_parent"
  android:layout_height="fill_parent"
  >
<TextView
  android:layout_width="fill_parent"
  android:layout_height="wrap_content"
  android:text="@string/hello"
  />
<ListView
android:id="@+id/contentlist"
android:layout_width="fill_parent"
android:layout_height="fill_parent"/>
</LinearLayout>


Finally, modify AndroidSQLite.java
package com.exercise.AndroidSQLite;

import android.app.Activity;
import android.database.Cursor;
import android.os.Bundle;
import android.widget.ListView;
import android.widget.SimpleCursorAdapter;

public class AndroidSQLite extends Activity {

private SQLiteAdapter mySQLiteAdapter;

  /** Called when the activity is first created. */
  @Override
  public void onCreate(Bundle savedInstanceState) {
      super.onCreate(savedInstanceState);
      setContentView(R.layout.main);
      ListView listContent = (ListView)findViewById(R.id.contentlist);
    
      /*
       *  Create/Open a SQLite database
       *  and fill with dummy content
       *  and close it
       */
      mySQLiteAdapter = new SQLiteAdapter(this);
      mySQLiteAdapter.openToWrite();
      mySQLiteAdapter.deleteAll();

      mySQLiteAdapter.insert("A for Apply");
      mySQLiteAdapter.insert("B for Boy");
      mySQLiteAdapter.insert("C for Cat");
      mySQLiteAdapter.insert("D for Dog");
      mySQLiteAdapter.insert("E for Egg");
      mySQLiteAdapter.insert("F for Fish");
      mySQLiteAdapter.insert("G for Girl");
      mySQLiteAdapter.insert("H for Hand");
      mySQLiteAdapter.insert("I for Ice-scream");
      mySQLiteAdapter.insert("J for Jet");
      mySQLiteAdapter.insert("K for Kite");
      mySQLiteAdapter.insert("L for Lamp");
      mySQLiteAdapter.insert("M for Man");
      mySQLiteAdapter.insert("N for Nose");
      mySQLiteAdapter.insert("O for Orange");
      mySQLiteAdapter.insert("P for Pen");
      mySQLiteAdapter.insert("Q for Queen");
      mySQLiteAdapter.insert("R for Rain");
      mySQLiteAdapter.insert("S for Sugar");
      mySQLiteAdapter.insert("T for Tree");
      mySQLiteAdapter.insert("U for Umbrella");
      mySQLiteAdapter.insert("V for Van");
      mySQLiteAdapter.insert("W for Water");
      mySQLiteAdapter.insert("X for X'mas");
      mySQLiteAdapter.insert("Y for Yellow");
      mySQLiteAdapter.insert("Z for Zoo");
    
      mySQLiteAdapter.close();

      /*
       *  Open the same SQLite database
       *  and read all it's content.
       */
      mySQLiteAdapter = new SQLiteAdapter(this);
      mySQLiteAdapter.openToRead();

      Cursor cursor = mySQLiteAdapter.queueAll();
      startManagingCursor(cursor);

      String[] from = new String[]{SQLiteAdapter.KEY_CONTENT};
      int[] to = new int[]{R.id.text};

      SimpleCursorAdapter cursorAdapter =
       new SimpleCursorAdapter(this, R.layout.row, cursor, from, to);

      listContent.setAdapter(cursorAdapter);
    
      mySQLiteAdapter.close();

    
  }
}


download filesDownload the files.

next:
- Add data to SQLite database, with SimpleCursorAdapter updated dynamically