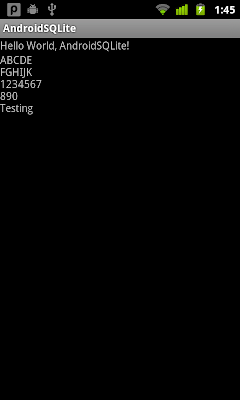
The SQLite database have only one field, "Content". When the app start, it will open the database and delete all first, then insert some dummy data, then close it. And Re-open, read all content.

AndroidSQLite.java
package com.exercise.AndroidSQLite;

import android.app.Activity;
import android.os.Bundle;
import android.widget.TextView;

public class AndroidSQLite extends Activity {

 private SQLiteAdapter mySQLiteAdapter;

    /** Called when the activity is first created. */
    @Override
    public void onCreate(Bundle savedInstanceState) {
        super.onCreate(savedInstanceState);
        setContentView(R.layout.main);
        TextView listContent = (TextView)findViewById(R.id.contentlist);

        /*
         *  Create/Open a SQLite database
         *  and fill with dummy content
         *  and close it
         */
        mySQLiteAdapter = new SQLiteAdapter(this);
        mySQLiteAdapter.openToWrite();
        mySQLiteAdapter.deleteAll();
        mySQLiteAdapter.insert("ABCDE");
        mySQLiteAdapter.insert("FGHIJK");
        mySQLiteAdapter.insert("1234567");
        mySQLiteAdapter.insert("890");
        mySQLiteAdapter.insert("Testing");
        mySQLiteAdapter.close();

        /*
         *  Open the same SQLite database
         *  and read all it's content.
         */
        mySQLiteAdapter = new SQLiteAdapter(this);
        mySQLiteAdapter.openToRead();
        String contentRead = mySQLiteAdapter.queueAll();
        mySQLiteAdapter.close();

        listContent.setText(contentRead);

    }
}
SQLiteAdapter.java
package com.exercise.AndroidSQLite;

import android.content.ContentValues;
import android.content.Context;
import android.database.Cursor;
import android.database.sqlite.SQLiteDatabase;
import android.database.sqlite.SQLiteOpenHelper;
import android.database.sqlite.SQLiteDatabase.CursorFactory;

public class SQLiteAdapter {

 public static final String MYDATABASE_NAME = "MY_DATABASE";
 public static final String MYDATABASE_TABLE = "MY_TABLE";
 public static final int MYDATABASE_VERSION = 1;
 public static final String KEY_CONTENT = "Content";

 //create table MY_DATABASE (ID integer primary key, Content text not null);
 private static final String SCRIPT_CREATE_DATABASE =
  "create table " + MYDATABASE_TABLE + " ("
  + KEY_CONTENT + " text not null);";

 private SQLiteHelper sqLiteHelper;
 private SQLiteDatabase sqLiteDatabase;

 private Context context;

 public SQLiteAdapter(Context c){
  context = c;
 }

 public SQLiteAdapter openToRead() throws android.database.SQLException {
  sqLiteHelper = new SQLiteHelper(context, MYDATABASE_NAME, null, MYDATABASE_VERSION);
  sqLiteDatabase = sqLiteHelper.getReadableDatabase();
  return this;
 }

 public SQLiteAdapter openToWrite() throws android.database.SQLException {
  sqLiteHelper = new SQLiteHelper(context, MYDATABASE_NAME, null, MYDATABASE_VERSION);
  sqLiteDatabase = sqLiteHelper.getWritableDatabase();
  return this;
 }

 public void close(){
  sqLiteHelper.close();
 }

 public long insert(String content){

  ContentValues contentValues = new ContentValues();
  contentValues.put(KEY_CONTENT, content);
  return sqLiteDatabase.insert(MYDATABASE_TABLE, null, contentValues);
 }

 public int deleteAll(){
  return sqLiteDatabase.delete(MYDATABASE_TABLE, null, null);
 }

 public String queueAll(){
  String[] columns = new String[]{KEY_CONTENT};
  Cursor cursor = sqLiteDatabase.query(MYDATABASE_TABLE, columns,
    null, null, null, null, null);
  String result = "";

  int index_CONTENT = cursor.getColumnIndex(KEY_CONTENT);
  for(cursor.moveToFirst(); !(cursor.isAfterLast()); cursor.moveToNext()){
   result = result + cursor.getString(index_CONTENT) + "\n";
  }

  return result;
 }

 public class SQLiteHelper extends SQLiteOpenHelper {

  public SQLiteHelper(Context context, String name,
    CursorFactory factory, int version) {
   super(context, name, factory, version);
  }

  @Override
  public void onCreate(SQLiteDatabase db) {
   // TODO Auto-generated method stub
   db.execSQL(SCRIPT_CREATE_DATABASE);
  }

  @Override
  public void onUpgrade(SQLiteDatabase db, int oldVersion, int newVersion) {
   // TODO Auto-generated method stub

  }

 }

}
main.xml
<?xml version="1.0" encoding="utf-8"?>
<LinearLayout xmlns:android="http://schemas.android.com/apk/res/android"
    android:orientation="vertical"
    android:layout_width="fill_parent"
    android:layout_height="fill_parent"
    >
<TextView
    android:layout_width="fill_parent"
    android:layout_height="wrap_content"
    android:text="@string/hello"
    />
<TextView
 android:id="@+id/contentlist"
 android:layout_width="fill_parent"
 android:layout_height="wrap_content"/>
</LinearLayout>Related Post:
- A simple example using Android's SQLite database, exposes data from Cursor to a ListView.
- A simple example using Android's SQLite database, exposes data from Cursor to a ListView.
- column '_id' does not exist
- Add data to SQLite database, with SimpleCursorAdapter updated dynamically.
- Retrieve individual items in cursor
- Delete row in SQLite database
- Edit row in SQLite database using SQLiteDatabase.update().
- query SQLite database with sorting.
13 comments:
this is awesome post, another helpful post you may check the following link...
http://mindstick.com/Articles/af5c031a-e435-4642-8464-9f7d375087c2/?SQLite%20in%20Android
Thanks!!
The best solution found after trying all the blogs, websites, forums.
I was able to accomplish my task after so many days of effort. This is the right place to be.
thanks
THANKYOU ! Dead simple for a newb like me. Helped debug config problems with, and tested on, Android 2.2 platform, Win64/Eclipse64/JDK64. success.
I can;t get this code to work- looks like something broke in the new android classes
Hihi ^^ Is there any recommended tutorial on how to create multiple tables in android? Including adding some value into each table. As I found all tutorial only create 1 table.
I am new in Android and Java so I have no idea on how to do it.
finally a working example....
Thanks
Dude you are a genius. Excellent example!
Thank you so Much ! You saved me !
Not getting the contentlist appear, only the 'Hello' text. Any ideas? No errors are appearing.
Only getting the hello text appear and not the content list. All seems to be fine in the build. Any ideas?
thankssssssssssssssssssss
hey everybody, great tut by the way, i don't know if i am at the right but anyways, i was building an android app and was wondering how i could design the layout for the blog posts and comments.
Thanks
Post a Comment