Thursday, December 17, 2020

Android Kotlin exercise: detect touch on individual view

 This example show how to detect touch on individual view.


Example code

package com.blogspot.android_er.exmyview

import android.os.Build
import androidx.appcompat.app.AppCompatActivity
import android.os.Bundle
import android.view.MotionEvent
import android.widget.ImageView
import android.widget.TextView

/*
ref: 
https://developer.android.com/training/gestures/detector#capture-touch-events-for-a-single-view
Android Developers Guides > Detect common gestures > Capture touch events for a single view
 */

class MainActivity : AppCompatActivity() {
    private lateinit var ivIcon: ImageView
    private lateinit var tvSysInfo: TextView
    private lateinit var tvSdkInfo: TextView
    private lateinit var tvConsole: TextView

    override fun onCreate(savedInstanceState: Bundle?) {
        super.onCreate(savedInstanceState)
        setContentView(R.layout.activity_main)

        ivIcon = findViewById(R.id.icon)
        tvSysInfo = findViewById(R.id.sysinfo)
        tvSdkInfo = findViewById(R.id.sdkinfo)
        tvConsole = findViewById(R.id.console)

        val manufacturer = Build.MANUFACTURER
        val model = Build.MODEL
        val release = Build.VERSION.RELEASE

        val pkgInfo = packageManager.getPackageInfo(packageName, 0)
        val appInfo = pkgInfo.applicationInfo
        val targetSdkVersion = appInfo.targetSdkVersion
        val minSdkVersion = appInfo.minSdkVersion

        tvSysInfo.text = manufacturer + "\n" +
                model + "\n" + "Android: " + release
        tvSdkInfo.text = "targetSdkVersion: " + targetSdkVersion + "\n" +
                "minSdkVersion: " + minSdkVersion

        tvConsole.text = "Android Example:" +
                "\nCapture touch events for a single view"

        ivIcon.setOnTouchListener { v, event -> // ... Respond to touch events
            /*
            return true if the listener has consumed the event, false otherwise.
             */
            val action = event.action
            when (action) {
                MotionEvent.ACTION_DOWN -> {
                    /*
                    Beware of creating a listener that returns false
                    for the ACTION_DOWN event.
                    If you do this, the listener will not be called
                    for the subsequent ACTION_MOVE and ACTION_UP string of events.
                    This is because ACTION_DOWN is the starting point for all touch events.
                     */

                    tvConsole.text = "ACTION_DOWN@ivIcon"

                    true}
                MotionEvent.ACTION_MOVE -> {
                    tvConsole.append("\nACTION_MOVE@ivIcon")
                    true}
                MotionEvent.ACTION_UP -> {
                    tvConsole.text = "ACTION_UP@ivIcon"
                    true}
                MotionEvent.ACTION_CANCEL -> {
                    tvConsole.text = "ACTION_CANCEL@ivIcon"
                    true}
                MotionEvent.ACTION_OUTSIDE -> {
                    tvConsole.text = "ACTION_OUTSIDE@ivIcon"
                    true}
                else -> super.onTouchEvent(event)
            }

        }

        tvSysInfo.setOnTouchListener { v, event -> // ... Respond to touch events

            when (event.action) {
                MotionEvent.ACTION_DOWN -> {
                    tvConsole.text = "ACTION_DOWN@tvSysInfo"
                    true}
                MotionEvent.ACTION_MOVE -> {
                    tvConsole.append("\nACTION_MOVE@tvSysInfo")
                    true}
                MotionEvent.ACTION_UP -> {
                    tvConsole.text = "ACTION_UP@tvSysInfo"
                    true}
                MotionEvent.ACTION_CANCEL -> {
                    tvConsole.text = "ACTION_CANCEL@tvSysInfo"
                    true}
                MotionEvent.ACTION_OUTSIDE -> {
                    tvConsole.text = "ACTION_OUTSIDE@tvSysInfo"
                    true}
                else -> super.onTouchEvent(event)
            }
        }

        tvSdkInfo.setOnTouchListener { v, event -> // ... Respond to touch events

            when (event.action) {
                MotionEvent.ACTION_DOWN -> {
                    tvConsole.text = "ACTION_DOWN@tvSdkInfo"
                    true}
                MotionEvent.ACTION_MOVE -> {
                    tvConsole.append("\nACTION_MOVE@tvSdkInfo")
                    true}
                MotionEvent.ACTION_UP -> {
                    tvConsole.text = "ACTION_UP@tvSdkInfo"
                    true}
                MotionEvent.ACTION_CANCEL -> {
                    tvConsole.text = "ACTION_CANCEL@tvSdkInfo"
                    true}
                MotionEvent.ACTION_OUTSIDE -> {
                    tvConsole.text = "ACTION_OUTSIDE@tvSdkInfo"
                    true}
                else -> super.onTouchEvent(event)
            }
        }
    }
}

layout
<?xml version="1.0" encoding="utf-8"?>
<LinearLayout
    xmlns:android="http://schemas.android.com/apk/res/android"
    xmlns:app="http://schemas.android.com/apk/res-auto"
    xmlns:tools="http://schemas.android.com/tools"
    android:layout_width="match_parent"
    android:layout_height="match_parent"
    android:orientation="horizontal"
    tools:context=".MainActivity">

    <LinearLayout
        android:id="@+id/leftpanel"
        android:layout_width="0dp"
        android:layout_height="match_parent"
        android:layout_weight="1"
        android:orientation="vertical"
        android:background="#E0E0E0"
        android:layout_margin="5dp">

        <ImageView
            android:id="@+id/icon"
            android:layout_width="wrap_content"
            android:layout_height="wrap_content"
            android:layout_margin="5dp"
            android:padding="5dp"
            android:background="#0000F0"
            android:src="@mipmap/ic_launcher_round"/>
        <TextView
            android:id="@+id/sysinfo"
            android:layout_width="match_parent"
            android:layout_height="wrap_content"
            android:layout_margin="5dp"
            android:padding="5dp"
            android:background="#0000D0"
            android:textSize="20dp"
            android:textStyle="bold"
            android:textColor="@color/white"/>
        <TextView
            android:id="@+id/sdkinfo"
            android:layout_width="match_parent"
            android:layout_height="wrap_content"
            android:layout_margin="5dp"
            android:padding="5dp"
            android:background="#0000B0"
            android:textSize="20dp"
            android:textStyle="bold"
            android:textColor="@color/white"/>

    </LinearLayout>

    <LinearLayout
        android:id="@+id/rightpanel"
        android:layout_width="0dp"
        android:layout_height="match_parent"
        android:layout_weight="1"
        android:orientation="vertical"
        android:background="#C0C0C0">
        <TextView
            android:layout_width="match_parent"
            android:layout_height="wrap_content"
            android:layout_margin="5dp"
            android:padding="5dp"
            android:textSize="20dp"
            android:textStyle="bold"
            android:textColor="@color/white"
            android:text="android-er.blogspot.com"/>
        <TextView
            android:id="@+id/console"
            android:layout_width="wrap_content"
            android:layout_height="wrap_content"
            android:layout_margin="5dp"
            android:padding="5dp"
            android:textSize="30dp"
            android:textStyle="bold"
            android:gravity="bottom"/>
    </LinearLayout>
</LinearLayout>

Friday, December 11, 2020

Linux Mint: Add Program Launcher to Menu

As a example, this video show how to Add Program Launcher to Menu on Linux Mint 20, to run idea.sh in /opt/idea-IC-203.5981.155/bin folder.

Thursday, December 10, 2020

Install IntelliJ IDEA on Linux Mint 20

Steps to install Jetbrains IntelliJ IDEA Community Edition 2020.3 on Linux Mint 20, tested on VirtualBox.
 

IntelliJ IDEA is a cross-platform IDE on the Windows, macOS, and Linux operating systems. It is available in the following editions:

  • Community Edition is free and open-source, licensed under Apache 2.0. It provides all the basic features for JVM and Android development.
  • IntelliJ IDEA Ultimate is commercial, distributed with a 30-day trial period. It provides additional tools and features for web and enterprise development.

To install IntelliJ IDEA Community Edition on Linux Mint:

Visit: https://www.jetbrains.com/idea/download/

Download .tar.gz of Community Edition.

Extract the tarball to a directory that supports file execution.
For example, to extract it to the recommended /opt directory, run the following command:

$ sudo tar -xzf <downloaded file> -C /opt

Execute the idea.sh script from the extracted directory to run IntelliJ IDEA. or add a program launcher to Linux Mint Menu to run idea.sh.

ref: https://www.jetbrains.com/help/idea/installation-guide.html


Saturday, November 14, 2020

How to power-on without using POWER button, Xiaomi/Redmi Phone

It is a common case that the POWER button of your phone is broken, such that you cannot power it on in power-off mode. This video show how to power up Xiaomi phone in Recovery Mode, then switch to normal mode, without POWER button.
 

How to power-on without using POWER button, Xiaomi/Redmi Phone

When phone is Power OFF:
Press and Hold VOL-UP button, Insert USB Power cable, to enter Recovery Mode.

With Reboot option selected, just WAIT, the phone will reboot in around 4 minutes.

Tested on Xiaomi Mi 10 Lite 5G, also Redmi 5 Plus/Note 4X.


Monday, November 2, 2020

Android exercise: ImageFilterView (Kotlin)

ImageFilterView is a An ImageView that can display, combine and filter images, to handle various common filtering operations. You can set saturation, contrast, warmth and some othters (refer to the document) in layout XML, or change it at run-time.

ImageFilterView was added in ConstraintLayout 2.0, so make sure dependencies of implementation 'androidx.constraintlayout:constraintlayout:2.0.0' or higher is include in your build.grade(Module:) file.


build.grade(Module:)
dependencies {
    implementation 'androidx.constraintlayout:constraintlayout:2.0.4'
}
Layout XML:
<?xml version="1.0" encoding="utf-8"?>
<androidx.constraintlayout.widget.ConstraintLayout
    xmlns:android="http://schemas.android.com/apk/res/android"
    xmlns:app="http://schemas.android.com/apk/res-auto"
    xmlns:tools="http://schemas.android.com/tools"
    android:layout_width="match_parent"
    android:layout_height="match_parent"
    android:layout_margin="20dp"
    tools:context=".MainActivity">

    <LinearLayout
        android:id="@+id/header"
        android:layout_width="match_parent"
        android:layout_height="wrap_content"
        android:orientation="vertical"
        app:layout_constraintBottom_toTopOf="@id/imagefilterview"
        app:layout_constraintLeft_toLeftOf="parent"
        app:layout_constraintRight_toRightOf="parent"
        app:layout_constraintTop_toTopOf="parent">

        <TextView
            android:layout_width="wrap_content"
            android:layout_height="wrap_content"
            android:layout_gravity="center"
            android:text="ImageFilterView Example (Kotlin)"
            android:textStyle="bold" />

        <TextView
            android:layout_width="wrap_content"
            android:layout_height="wrap_content"
            android:layout_gravity="center"
            android:text="Android-er.blogspot.com" />
        <ImageView
            android:layout_width="wrap_content"
            android:layout_height="wrap_content"
            android:src="@android:mipmap/sym_def_app_icon"/>

    </LinearLayout>

    <androidx.constraintlayout.utils.widget.ImageFilterView
        android:id="@+id/imagefilterview"
        android:src="@android:mipmap/sym_def_app_icon"
        android:layout_width="0dp"
        android:layout_height="0dp"
        app:layout_constraintBottom_toTopOf="@id/panel"
        app:layout_constraintLeft_toLeftOf="parent"
        app:layout_constraintRight_toRightOf="parent"
        app:layout_constraintTop_toBottomOf="@id/header"
        app:saturation="1.0"
        app:contrast="1.0"
        app:brightness="1.0"/>

    <LinearLayout
        android:id="@+id/panel"
        android:layout_width="match_parent"
        android:layout_height="wrap_content"
        android:orientation="vertical"
        app:layout_constraintBottom_toBottomOf="parent"
        app:layout_constraintLeft_toLeftOf="parent"
        app:layout_constraintRight_toRightOf="parent"
        app:layout_constraintTop_toBottomOf="@id/imagefilterview">

        <TextView
            android:layout_width="match_parent"
            android:layout_height="wrap_content"
            android:text="Saturation"/>
        <TextView
            android:id="@+id/sat"
            android:layout_width="match_parent"
            android:layout_height="wrap_content"/>
        <SeekBar
            android:id="@+id/seekBarSat"
            android:layout_width="match_parent"
            android:layout_height="wrap_content"
            android:max="100"
            android:progress="50"/>

        <TextView
            android:layout_width="match_parent"
            android:layout_height="wrap_content"
            android:text="Contrast"/>
        <TextView
            android:id="@+id/cont"
            android:layout_width="match_parent"
            android:layout_height="wrap_content"/>
        <SeekBar
            android:id="@+id/seekBarCont"
            android:layout_width="match_parent"
            android:layout_height="wrap_content"
            android:max="100"
            android:progress="50"/>

        <TextView
            android:layout_width="match_parent"
            android:layout_height="wrap_content"
            android:text="Warmth"/>
        <TextView
            android:id="@+id/warm"
            android:layout_width="match_parent"
            android:layout_height="wrap_content"/>
        <SeekBar
            android:id="@+id/seekBarWarm"
            android:layout_width="match_parent"
            android:layout_height="wrap_content"
            android:max="100"
            android:progress="50"/>
    </LinearLayout>

</androidx.constraintlayout.widget.ConstraintLayout>
Kotlin code:
package com.blogspot.android_er.eximgfilterview2

import androidx.appcompat.app.AppCompatActivity
import android.os.Bundle
import android.widget.SeekBar
import android.widget.TextView
import androidx.constraintlayout.utils.widget.ImageFilterView

class MainActivity : AppCompatActivity() {
    override fun onCreate(savedInstanceState: Bundle?) {
        super.onCreate(savedInstanceState)
        setContentView(R.layout.activity_main)

        val MyImageFilterView =
                findViewById<ImageFilterView>(R.id.imagefilterview)

        val MySeekBarSat = findViewById<SeekBar>(R.id.seekBarSat)
        val MyTextViewSat = findViewById<TextView>(R.id.sat)
        val MySeekBarCont = findViewById<SeekBar>(R.id.seekBarCont)
        val MyTextViewCont = findViewById<TextView>(R.id.cont)
        val MySeekBarWarm = findViewById<SeekBar>(R.id.seekBarWarm)
        val MyTextViewWarm = findViewById<TextView>(R.id.warm)

        //Get the first-run setting of saturation, contrast and warmth
        MyTextViewSat.text= MyImageFilterView.saturation.toString()
        MyTextViewCont.text= MyImageFilterView.contrast.toString()
        MyTextViewWarm.text= MyImageFilterView.warmth.toString()

        MySeekBarSat.setOnSeekBarChangeListener(
                object : SeekBar.OnSeekBarChangeListener{
            override fun onProgressChanged(seekBar: SeekBar?,
                                           progress: Int, fromUser: Boolean) {
                //update saturation
                MyImageFilterView.saturation = (progress / 100.0f) * 2
                //read back the saturation
                MyTextViewSat.text= MyImageFilterView.saturation.toString()
            }

            override fun onStartTrackingTouch(seekBar: SeekBar?) {}

            override fun onStopTrackingTouch(seekBar: SeekBar?) {}
        })

        MySeekBarCont.setOnSeekBarChangeListener(
                object : SeekBar.OnSeekBarChangeListener{
            override fun onProgressChanged(seekBar: SeekBar?,
                                           progress: Int, fromUser: Boolean) {
                MyImageFilterView.contrast = (progress / 100.0f) * 2
                MyTextViewCont.text= MyImageFilterView.contrast.toString()
            }

            override fun onStartTrackingTouch(seekBar: SeekBar?) {}

            override fun onStopTrackingTouch(seekBar: SeekBar?) {}
        })

        MySeekBarWarm.setOnSeekBarChangeListener(
                object : SeekBar.OnSeekBarChangeListener{
            override fun onProgressChanged(seekBar: SeekBar?,
                                           progress: Int, fromUser: Boolean) {
                MyImageFilterView.warmth = (progress / 100.0f) * 2
                MyTextViewWarm.text= MyImageFilterView.warmth.toString()
            }

            override fun onStartTrackingTouch(seekBar: SeekBar?) {}

            override fun onStopTrackingTouch(seekBar: SeekBar?) {}
        })
    }
}


Then add the feature to change Crossfade, also show how overlay setting affect the crossfade result.


Layout XML:

<?xml version="1.0" encoding="utf-8"?>
<androidx.constraintlayout.widget.ConstraintLayout
    xmlns:android="http://schemas.android.com/apk/res/android"
    xmlns:app="http://schemas.android.com/apk/res-auto"
    xmlns:tools="http://schemas.android.com/tools"
    android:layout_width="match_parent"
    android:layout_height="match_parent"
    android:layout_margin="20dp"
    tools:context=".MainActivity">

    <LinearLayout
        android:id="@+id/header"
        android:layout_width="match_parent"
        android:layout_height="wrap_content"
        android:orientation="vertical"
        app:layout_constraintBottom_toTopOf="@id/imagefilterview"
        app:layout_constraintLeft_toLeftOf="parent"
        app:layout_constraintRight_toRightOf="parent"
        app:layout_constraintTop_toTopOf="parent">

        <TextView
            android:layout_width="wrap_content"
            android:layout_height="wrap_content"
            android:layout_gravity="center"
            android:text="ImageFilterView Example (Kotlin)"
            android:textStyle="bold" />

        <TextView
            android:layout_width="wrap_content"
            android:layout_height="wrap_content"
            android:layout_gravity="center"
            android:text="Android-er.blogspot.com" />
        <ImageView
            android:layout_width="wrap_content"
            android:layout_height="wrap_content"
            android:src="@android:mipmap/sym_def_app_icon"/>

    </LinearLayout>

    <androidx.constraintlayout.utils.widget.ImageFilterView
        android:id="@+id/imagefilterview"
        android:layout_width="0dp"
        android:layout_height="0dp"
        app:layout_constraintBottom_toTopOf="@id/panel"
        app:layout_constraintLeft_toLeftOf="parent"
        app:layout_constraintRight_toRightOf="parent"
        app:layout_constraintTop_toBottomOf="@id/header"

        android:src="@android:mipmap/sym_def_app_icon"
        app:altSrc="@android:drawable/btn_star_big_on"
        app:overlay="false"
        app:crossfade="0.0"
        app:saturation="1.0"
        app:contrast="1.0"
        app:warmth="1.0"
         />

    <LinearLayout
        android:id="@+id/panel"
        android:layout_width="match_parent"
        android:layout_height="wrap_content"
        android:orientation="vertical"
        app:layout_constraintBottom_toBottomOf="parent"
        app:layout_constraintLeft_toLeftOf="parent"
        app:layout_constraintRight_toRightOf="parent"
        app:layout_constraintTop_toBottomOf="@id/imagefilterview">

        <TextView
            android:layout_width="match_parent"
            android:layout_height="wrap_content"
            android:text="Crossfade"/>
        <TextView
            android:id="@+id/crossfade"
            android:layout_width="match_parent"
            android:layout_height="wrap_content"/>
        <SeekBar
            android:id="@+id/seekBarCrossfade"
            android:layout_width="match_parent"
            android:layout_height="wrap_content"
            android:max="100"
            android:progress="0"/>

        <TextView
            android:layout_width="match_parent"
            android:layout_height="wrap_content"
            android:text="Saturation"/>
        <TextView
            android:id="@+id/sat"
            android:layout_width="match_parent"
            android:layout_height="wrap_content"/>
        <SeekBar
            android:id="@+id/seekBarSat"
            android:layout_width="match_parent"
            android:layout_height="wrap_content"
            android:max="100"
            android:progress="50"/>

        <TextView
            android:layout_width="match_parent"
            android:layout_height="wrap_content"
            android:text="Contrast"/>
        <TextView
            android:id="@+id/cont"
            android:layout_width="match_parent"
            android:layout_height="wrap_content"/>
        <SeekBar
            android:id="@+id/seekBarCont"
            android:layout_width="match_parent"
            android:layout_height="wrap_content"
            android:max="100"
            android:progress="50"/>

        <TextView
            android:layout_width="match_parent"
            android:layout_height="wrap_content"
            android:text="Warmth"/>
        <TextView
            android:id="@+id/warm"
            android:layout_width="match_parent"
            android:layout_height="wrap_content"/>
        <SeekBar
            android:id="@+id/seekBarWarm"
            android:layout_width="match_parent"
            android:layout_height="wrap_content"
            android:max="100"
            android:progress="50"/>
    </LinearLayout>

</androidx.constraintlayout.widget.ConstraintLayout>

Kotlin code:

package com.blogspot.android_er.eximgfilterview2

import androidx.appcompat.app.AppCompatActivity
import android.os.Bundle
import android.widget.SeekBar
import android.widget.TextView
import androidx.constraintlayout.utils.widget.ImageFilterView

class MainActivity : AppCompatActivity() {
    override fun onCreate(savedInstanceState: Bundle?) {
        super.onCreate(savedInstanceState)
        setContentView(R.layout.activity_main)

        val MyImageFilterView =
                findViewById<ImageFilterView>(R.id.imagefilterview)

        val MySeekBarCrossfade = findViewById<SeekBar>(R.id.seekBarCrossfade)
        val MyTextViewCrossfade = findViewById<TextView>(R.id.crossfade)

        val MySeekBarSat = findViewById<SeekBar>(R.id.seekBarSat)
        val MyTextViewSat = findViewById<TextView>(R.id.sat)
        val MySeekBarCont = findViewById<SeekBar>(R.id.seekBarCont)
        val MyTextViewCont = findViewById<TextView>(R.id.cont)
        val MySeekBarWarm = findViewById<SeekBar>(R.id.seekBarWarm)
        val MyTextViewWarm = findViewById<TextView>(R.id.warm)

        //Get the first-run setting of crossfade, saturation, contrast and warmth
        MyTextViewCrossfade.text= MyImageFilterView.crossfade.toString()
        MyTextViewSat.text= MyImageFilterView.saturation.toString()
        MyTextViewCont.text= MyImageFilterView.contrast.toString()
        MyTextViewWarm.text= MyImageFilterView.warmth.toString()

        MySeekBarCrossfade.setOnSeekBarChangeListener(
                object : SeekBar.OnSeekBarChangeListener{
                    override fun onProgressChanged(seekBar: SeekBar?,
                                                   progress: Int, fromUser: Boolean) {
                        //update saturation
                        MyImageFilterView.crossfade = (progress / 100.0f)
                        //read back the saturation
                        MyTextViewCrossfade.text= MyImageFilterView.crossfade.toString()
                    }

                    override fun onStartTrackingTouch(seekBar: SeekBar?) {}

                    override fun onStopTrackingTouch(seekBar: SeekBar?) {}
                })

        MySeekBarSat.setOnSeekBarChangeListener(
                object : SeekBar.OnSeekBarChangeListener{
            override fun onProgressChanged(seekBar: SeekBar?,
                                           progress: Int, fromUser: Boolean) {
                //update saturation
                MyImageFilterView.saturation = (progress / 100.0f) * 2
                //read back the saturation
                MyTextViewSat.text= MyImageFilterView.saturation.toString()
            }

            override fun onStartTrackingTouch(seekBar: SeekBar?) {}

            override fun onStopTrackingTouch(seekBar: SeekBar?) {}
        })

        MySeekBarCont.setOnSeekBarChangeListener(
                object : SeekBar.OnSeekBarChangeListener{
            override fun onProgressChanged(seekBar: SeekBar?,
                                           progress: Int, fromUser: Boolean) {
                MyImageFilterView.contrast = (progress / 100.0f) * 2
                MyTextViewCont.text= MyImageFilterView.contrast.toString()
            }

            override fun onStartTrackingTouch(seekBar: SeekBar?) {}

            override fun onStopTrackingTouch(seekBar: SeekBar?) {}
        })

        MySeekBarWarm.setOnSeekBarChangeListener(
                object : SeekBar.OnSeekBarChangeListener{
            override fun onProgressChanged(seekBar: SeekBar?,
                                           progress: Int, fromUser: Boolean) {
                MyImageFilterView.warmth = (progress / 100.0f) * 2
                MyTextViewWarm.text= MyImageFilterView.warmth.toString()
            }

            override fun onStartTrackingTouch(seekBar: SeekBar?) {}

            override fun onStopTrackingTouch(seekBar: SeekBar?) {}
        })
    }
}

Sunday, October 11, 2020

What's the difference between system image with Google API and Google APIs? when create Android Virtual Device


When you create a Android Virtual Device, you have to select a system image from a list of available images. Some marked Google Play, and some marked Google APIs, so what's the difference?

A system image labeled with Google APIs includes access to Google Play services. A system image labeled with the Google Play logo in the Play Store column includes the Google Play Store app and access to Google Play services.

reference: https://developer.android.com/studio/run/managing-avds#system-image


Including a Google Play tab in the Extended controls dialog that provides a convenient button for updating Google Play services on the device.


Thursday, September 3, 2020

Kotlin Multiplatform Mobile Alpha and portal released

Kotlin Multiplatform Mobile is a solution to write once for Android and iOS apps, using Kotlin.

Kotlin Multiplatform Mobile is an SDK that allows developers to use the same business logic code in both iOS and Android applications. KMM now goes Alpha, and you can start sharing business logic in your mobile apps with it right away. It includes the new KMM Plugin for Android Studio, which allows you to write, run, test, and debug shared code in the same IDE.

details: Kotlin Blog - Kotlin Multiplatform Mobile Goes Alpha

The new Kotlin Multiplatform Mobile developer portal is up, have all you need to know to create cross-platform apps.


Wednesday, August 26, 2020

Chronometer example (Kotlin)

 Android example of using Chronometer (count-up and count-down) widget, with Kotlin

Layout with Chronometer

<?xml version="1.0" encoding="utf-8"?>
<LinearLayout
    xmlns:android="http://schemas.android.com/apk/res/android"
    xmlns:app="http://schemas.android.com/apk/res-auto"
    xmlns:tools="http://schemas.android.com/tools"
    android:layout_width="match_parent"
    android:layout_height="match_parent"
    android:orientation="vertical"
    tools:context=".MainActivity"
    android:layout_margin="10dp">

    <TextView
        android:layout_width="wrap_content"
        android:layout_height="wrap_content"
        android:textStyle="bold"
        android:text="Chronometer Example (Kotlin)"
        android:layout_gravity="center"/>
    <TextView
        android:layout_width="wrap_content"
        android:layout_height="wrap_content"
        android:text="Android-er.blogspot.com"
        android:layout_gravity="center"/>
    <Chronometer
        android:id="@+id/chronometer"
        android:layout_width="match_parent"
        android:layout_height="wrap_content"
        android:textSize="34dp"
        android:textStyle="bold"/>
    <Button
        android:id="@+id/start"
        android:layout_width="match_parent"
        android:layout_height="wrap_content"
        android:text="Start (Count Up)"/>
    <Button
        android:id="@+id/stop"
        android:layout_width="match_parent"
        android:layout_height="wrap_content"
        android:text="Stop"/>
    <Button
        android:id="@+id/reset"
        android:layout_width="match_parent"
        android:layout_height="wrap_content"
        android:text="Reset"/>

    <Chronometer
        android:id="@+id/chronometerDn"
        android:layout_width="match_parent"
        android:layout_height="wrap_content"
        android:textSize="34dp"
        android:textStyle="bold"
        android:countDown="true"/>
    <Button
        android:id="@+id/startDn"
        android:layout_width="match_parent"
        android:layout_height="wrap_content"
        android:text="Start (Count Down)"/>
    <Button
        android:id="@+id/stopDn"
        android:layout_width="match_parent"
        android:layout_height="wrap_content"
        android:text="Stop"/>
    <Button
        android:id="@+id/resetDn"
        android:layout_width="match_parent"
        android:layout_height="wrap_content"
        android:text="Reset"/>

</LinearLayout>
Android Kotlin code


package com.blogspot.android_er.androidchronometer

import androidx.appcompat.app.AppCompatActivity
import android.os.Bundle
import android.os.SystemClock
import android.widget.Button
import android.widget.Chronometer
import android.widget.Toast

class MainActivity : AppCompatActivity() {
    override fun onCreate(savedInstanceState: Bundle?) {
        super.onCreate(savedInstanceState)
        setContentView(R.layout.activity_main)

        val myChronometer = findViewById<Chronometer>(R.id.chronometer)
        val btnStart = findViewById<Button>(R.id.start)
        val btnStop = findViewById<Button>(R.id.stop)
        val btnReset = findViewById<Button>(R.id.reset)

        btnStart.setOnClickListener(){
            myChronometer.start();
            Toast.makeText(this,
                    "myChronometer.start()",
                    Toast.LENGTH_LONG).show()
        }

        btnStop.setOnClickListener(){
            myChronometer.stop();
            Toast.makeText(this,
                    "myChronometer.stop()",
                    Toast.LENGTH_LONG).show()
        }

        btnReset.setOnClickListener(){
            myChronometer.base = SystemClock.elapsedRealtime()
            Toast.makeText(this,
                    "myChronometer.base = SystemClock.elapsedRealtime()",
                    Toast.LENGTH_LONG).show()
        }

        val myChronometerDn = findViewById<Chronometer>(R.id.chronometerDn)
        val btnStartDn = findViewById<Button>(R.id.startDn)
        val btnStopDn = findViewById<Button>(R.id.stopDn)
        val btnResetDn = findViewById<Button>(R.id.resetDn)

        btnStartDn.setOnClickListener(){
            myChronometerDn.base = SystemClock.elapsedRealtime() + 10000
            myChronometerDn.start()
            Toast.makeText(this,
                    "myChronometerDn.base = " +
                            "SystemClock.elapsedRealtime() + 10000 \n" +
                            "myChronometerDn.start()",
                    Toast.LENGTH_LONG).show()
        }

        btnStopDn.setOnClickListener(){
            myChronometerDn.stop()
            Toast.makeText(this,
                    "myChronometerDn.stop()",
                    Toast.LENGTH_LONG).show()
        }

        btnResetDn.setOnClickListener(){
            myChronometerDn.base = SystemClock.elapsedRealtime()
            Toast.makeText(this,
                    "myChronometerDn.base = SystemClock.elapsedRealtime()",
                    Toast.LENGTH_LONG).show()
        }

    }
}


Saturday, August 22, 2020

Simple example using TextClock with Kotlin

TextClock can display the current date and/or time as a formatted string. It's a simple example of using TextClock with Kotlin.

layout XML with TextClock

<?xml version="1.0" encoding="utf-8"?>
<androidx.constraintlayout.widget.ConstraintLayout
    xmlns:android="http://schemas.android.com/apk/res/android"
    xmlns:app="http://schemas.android.com/apk/res-auto"
    xmlns:tools="http://schemas.android.com/tools"
    android:layout_width="match_parent"
    android:layout_height="match_parent"
    tools:context=".MainActivity">

    <TextClock
        android:id="@+id/mytextclock"
        android:layout_width="wrap_content"
        android:layout_height="wrap_content"
        android:textStyle="italic|bold"
        android:textSize="40dp"
        android:format12Hour="hh:mm:ss a"
        app:layout_constraintBottom_toBottomOf="parent"
        app:layout_constraintLeft_toLeftOf="parent"
        app:layout_constraintRight_toRightOf="parent"
        app:layout_constraintTop_toTopOf="parent"
        />

</androidx.constraintlayout.widget.ConstraintLayout>

Access TextClock using Kotlin

package com.blogspot.android_er.androidtextclock

import androidx.appcompat.app.AppCompatActivity
import android.os.Bundle
import android.view.View
import android.widget.TextClock
import android.widget.Toast

class MainActivity : AppCompatActivity() {
    override fun onCreate(savedInstanceState: Bundle?) {
        super.onCreate(savedInstanceState)
        setContentView(R.layout.activity_main)

        val myTextClock = findViewById<TextClock>(R.id.mytextclock)
        myTextClock.setOnClickListener{
            val s = myTextClock.text
            Toast.makeText(this, s, Toast.LENGTH_LONG).show()
        }

    }
}


Friday, August 21, 2020

Get Android and SDK version using Kotlin

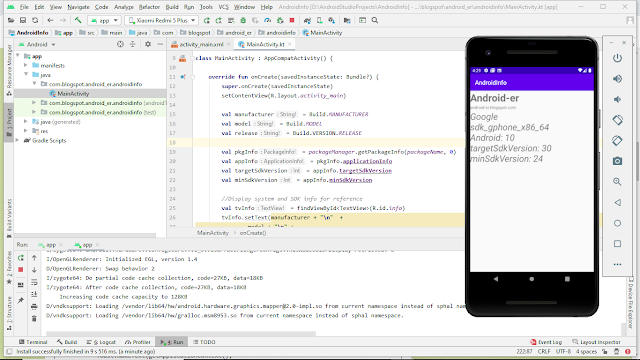
 Exercise to get Android device info and compile SDK version using Kotlin.

Run on Android Emulator of Android 10

Run on Redmi 5 Plus (Android 8.1.0)

MainActivity.kt

package com.blogspot.android_er.androidinfo

import android.os.Build
import androidx.appcompat.app.AppCompatActivity
import android.os.Bundle
import android.widget.TextView
import androidx.annotation.RequiresApi

class MainActivity : AppCompatActivity() {

    override fun onCreate(savedInstanceState: Bundle?) {
        super.onCreate(savedInstanceState)
        setContentView(R.layout.activity_main)

        val manufacturer = Build.MANUFACTURER
        val model = Build.MODEL
        val release = Build.VERSION.RELEASE

        val pkgInfo = packageManager.getPackageInfo(packageName, 0)
        val appInfo = pkgInfo.applicationInfo
        val targetSdkVersion = appInfo.targetSdkVersion
        val minSdkVersion = appInfo.minSdkVersion

        //Display system and SDK info for reference
        val tvInfo = findViewById<TextView>(R.id.info)
        tvInfo.setText(manufacturer + "\n"  +
                model + "\n" +
                "Android: " + release + "\n" +
                "targetSdkVersion: " + targetSdkVersion + "\n" +
                "minSdkVersion: " + minSdkVersion)
    }
}

layout xml

<?xml version="1.0" encoding="utf-8"?>
<LinearLayout
    xmlns:android="http://schemas.android.com/apk/res/android"
    xmlns:app="http://schemas.android.com/apk/res-auto"
    xmlns:tools="http://schemas.android.com/tools"
    android:layout_width="match_parent"
    android:layout_height="match_parent"
    android:orientation="vertical"
    tools:context=".MainActivity">

    <TextView
        android:layout_width="wrap_content"
        android:layout_height="wrap_content"
        android:text="Android-er"
        android:textStyle="bold"
        android:textSize="34dp" />
    <TextView
        android:layout_width="wrap_content"
        android:layout_height="wrap_content"
        android:text="android-er.blogspot.com   " />
    <TextView
        android:id="@+id/info"
        android:layout_width="match_parent"
        android:layout_height="wrap_content"
        android:textStyle="italic"
        android:textSize="30dp"/>

</LinearLayout>


Wednesday, July 22, 2020

Android Codelab - Getting Started with CameraX

The Android developer codelab, Getting Started with CameraX, guide you how to create a camera app that uses CameraX to show a viewfinder, take photos, and analyze an image stream from the camera.

Introduce the concept of use cases in CameraX, which you can use for a variety of camera operations, from displaying a viewfinder to analyzing frames in real time.

Android developer codelab, Getting Started with CameraX


Friday, July 17, 2020

Support for newer Java language APIs


When you use Android Gradle Plugin 4.0.0 and newer, you can now use several hundred APIs from newer OpenJDK versions and your app will work on any Android device? Some of these newer Java APIs in Android 11 are supported through backporting while other APIs are also available via desugaring on older devices where the Android platform does not have the APIs on the runtime.

Resources:
Check out the website → https://goo.gle/30FDT8S
Full list of supported Java 8+ APIs → https://goo.gle/3enaGD5


Thursday, May 28, 2020

What's new in Android Studio 4.0


The Android Studio 4.0 release introduces a new Motion Editor, Build Speed window, Live Layout inspector, Multi Preview for your layouts, support for Kotlin DSL script files, and a Smart editor for R8 rules.

The new Build Analyzer feature helps you understand and diagnose issues with your build process, such as disabled optimizations and improperly configured tasks.

Saturday, May 23, 2020

Virtually Maker Faire – May 23, 2020

Featuring Makers Responding to COVID-19

24 Hours of Presentations, Workshops, Demos, and Exhibits Across All Time Zones

Across the world, makers have responded to shortages of medical supplies and equipment with agile designs, adaptive distributed manufacturing, and community organizing. Virtually Maker Faire will be a stage to share the projects and learn from the people behind this extraordinary civic response.

Virtually Maker Faire will take place online through video sessions and an exhibit showcase on Make: Projects.

Tuesday, May 19, 2020

Google Play - Spring 2020 Policy Updates

Google Play PolicyBytes - Spring 2020 Policy Updates


explains the spring 2020 Play policy updates on subscriptions, background location access, malware, resource downloads, and more. Stay tuned to learn more about these updates, plus best practices for app compliance on Google Play and resources to help you understand the new updates.

Thursday, April 30, 2020

Playing Samsung Galaxy Tab S6 Lite


Samsung Galaxy Tab S6 Lite is the newest tab from Samsung, is available to buy today, April 30, 2020. Running Android 10, Octa-Core (2.3GHz, 1.7GHz), 4G Ram, 10.4", 2000x1200 TFT display. Come with S Pen. You can check the full-spec here (https://www.samsung.com/uk/tablets/galaxy-tab-s6-lite/SM-P610NZBABTU/). You have to choice your region/language on the most lower-left, different region with have slightly different configuration.


Just buy one and play:)

Remote control Raspberry Pi with VNC Viewer

VNC Viewer turns the Tab S6 Lite (or other phones) into a remote desktop, remote control Mac, Windows and Linux computers (Raspberry Pi in my case) from anywhere in the world. You can view your computer's desktop remotely, and control its mouse and keyboard as though you were sitting down in front of it.

This view show how Galaxy Tab S6 Lite running VNC Viewer to control Raspberry Pi Zero W. It's supposed you have already enable VNC in Raspberry Pi Configuration -> Interface, and install in tablet, and setup completely.


Play dual Pokemon GO


Yes, you can install two copy of Pokemon Go from both Google Play Store and Samsung Galaxy Store, currently version 0.173.2-G and 0.173.2-S. Then you can run both Pokemon Go with different account at same time.


Monday, April 13, 2020

How to display layout xml in code view, for Android Studio 3.6.2

With Android Studio updated (currently 3.6.2), when you view layout xml file, the original design/code option (on lower-left corner) removed. So how to view its xml code?
Answer: The option is now moved to upper-right corner, you can view it in Code/Splite/Design view.


Tuesday, March 24, 2020

What's new in Android game development tools

Learn about our new development and profiling tools built specifically for Android game developers. Improve productivity with new features that allow you to build and deploy your game more efficiently, and use updated profilers to fine tune your game's performance.


Google for Games Developer Summit Keynote
Game Developers Conference is one of our most anticipated times of the year to connect with the gaming industry and share our latest product updates.

Sunday, January 19, 2020

Android-x86 - Run Android on your PC

Android-x86 is a project to port Android open source project to x86 platform. This is an open source project licensed under Apache Public License 2.0. Some components are licensed under GNU General Public License (GPL) 2.0 or later.


To know more and try it, visit: https://www.android-x86.org/