All ItemDecorations are drawn in the order they were added, before the item views (in onDraw() and after the items (in onDrawOver(Canvas, RecyclerView, RecyclerView.State).
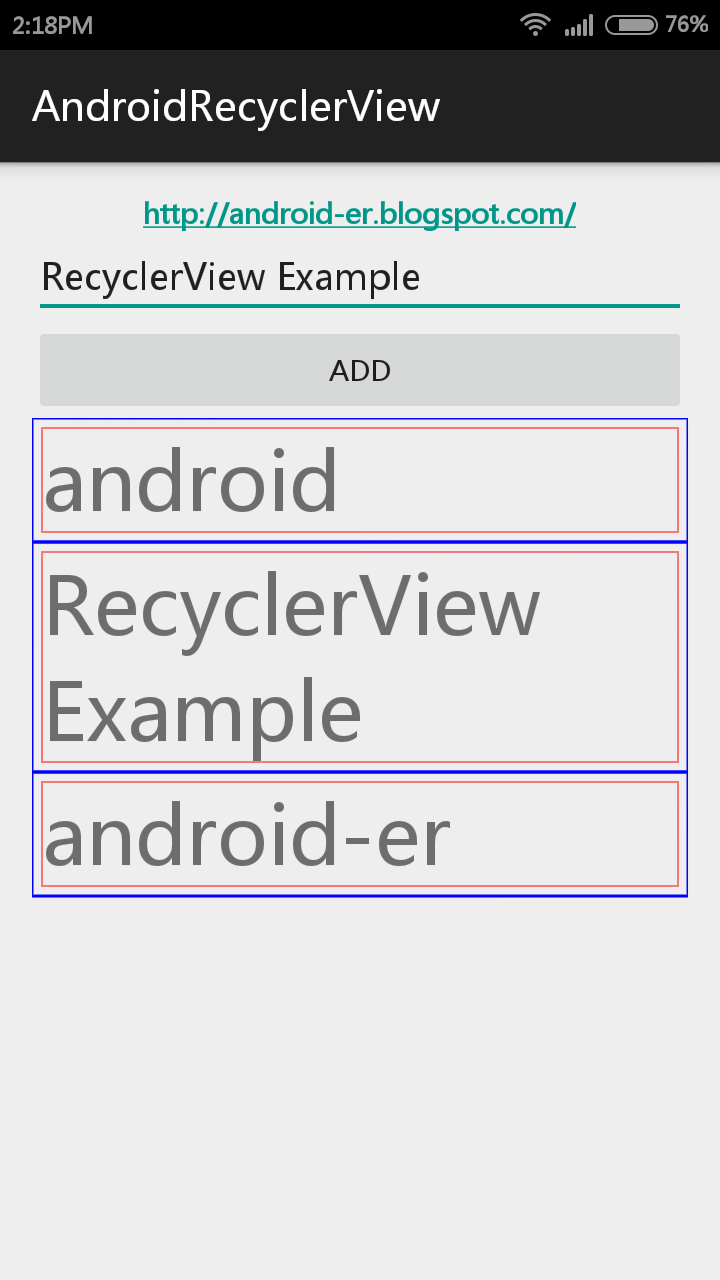
In this example, we implement our custom RecyclerView.ItemDecoration, com.example.androidrecyclerview.MyItemDecoration to add offset to the views. And override onDraw(Canvas c, RecyclerView parent, RecyclerView.State state) method to draw line on the views. Then add it to our RecyclerView, by calling myRecyclerView.addItemDecoration(new MyItemDecoration()) in onCreate(Bundle savedInstanceState) method of MainActivity.java.
com.example.androidrecyclerview.MyItemDecoration
package com.example.androidrecyclerview;

import android.content.Context;
import android.graphics.Canvas;
import android.graphics.Color;
import android.graphics.Paint;
import android.graphics.Rect;
import android.support.v7.widget.RecyclerView;
import android.view.View;
import android.widget.Toast;

public class MyItemDecoration extends RecyclerView.ItemDecoration{

    private Paint paintBlue, paintRed;
    private int offset;

    public MyItemDecoration(){
        offset = 10;
        paintBlue = new Paint(Paint.ANTI_ALIAS_FLAG);
        paintBlue.setColor(Color.BLUE);
        paintBlue.setStyle(Paint.Style.STROKE);
        paintBlue.setStrokeWidth(3);

        paintRed = new Paint(Paint.ANTI_ALIAS_FLAG);
        paintRed.setColor(Color.RED);
        paintRed.setStyle(Paint.Style.STROKE);
        paintRed.setStrokeWidth(1);
    }

    @Override
    public void getItemOffsets(Rect outRect, View view, RecyclerView parent, RecyclerView.State state) {
        super.getItemOffsets(outRect, view, parent, state);
        outRect.set(offset, offset, offset, offset);
    }

    @Override
    public void onDraw(Canvas c, RecyclerView parent, RecyclerView.State state) {
        super.onDraw(c, parent, state);

        final RecyclerView.LayoutManager layoutManager = parent.getLayoutManager();

        for(int i=0; i<parent.getChildCount(); i++){
            final View child = parent.getChildAt(i);
            c.drawRect(
                    layoutManager.getDecoratedLeft(child),
                    layoutManager.getDecoratedTop(child),
                    layoutManager.getDecoratedRight(child),
                    layoutManager.getDecoratedBottom(child),
                    paintBlue);
            c.drawRect(
                    layoutManager.getDecoratedLeft(child) + offset,
                    layoutManager.getDecoratedTop(child) + offset,
                    layoutManager.getDecoratedRight(child) - offset,
                    layoutManager.getDecoratedBottom(child) - offset,
                    paintRed);

        }
    }
}
Call myRecyclerView.addItemDecoration(new MyItemDecoration()) to add our custom ItemDecoration in com.example.androidrecyclerview.MainActivity.java
package com.example.androidrecyclerview;

import android.os.Bundle;
import android.support.v7.app.ActionBarActivity;
import android.support.v7.widget.LinearLayoutManager;
import android.support.v7.widget.RecyclerView;
import android.view.View;
import android.widget.Button;
import android.widget.EditText;
import android.widget.Toast;

public class MainActivity extends ActionBarActivity implements RecyclerViewAdapter.OnItemClickListener{

    private RecyclerView myRecyclerView;
    private LinearLayoutManager linearLayoutManager;
    private RecyclerViewAdapter myRecyclerViewAdapter;

    EditText nameField;
    Button btnAdd;

    @Override
    protected void onCreate(Bundle savedInstanceState) {
        super.onCreate(savedInstanceState);
        setContentView(R.layout.activity_main);
        myRecyclerView = (RecyclerView)findViewById(R.id.myrecyclerview);

        linearLayoutManager =
                new LinearLayoutManager(this, LinearLayoutManager.VERTICAL, false);
        /*
        linearLayoutManager =
                new LinearLayoutManager(this, LinearLayoutManager.HORIZONTAL, false);
        */

        myRecyclerViewAdapter = new RecyclerViewAdapter(this);
        myRecyclerViewAdapter.setOnItemClickListener(this);
        myRecyclerView.setAdapter(myRecyclerViewAdapter);
        myRecyclerView.setLayoutManager(linearLayoutManager);

        //Add MyItemDecoration
        myRecyclerView.addItemDecoration(new MyItemDecoration());

        nameField = (EditText)findViewById(R.id.namefield);
        btnAdd = (Button)findViewById(R.id.addbutton);
        btnAdd.setOnClickListener(new View.OnClickListener(){
            @Override
            public void onClick(View v) {
                String newName = nameField.getText().toString();

                if(!newName.equals("")){
                    if(myRecyclerViewAdapter.getItemCount()>1){
                        myRecyclerViewAdapter.add(1, newName);
                    }else{
                        myRecyclerViewAdapter.add(0, newName);
                    }
                }
            }
        });
    }

    @Override
    public void onItemClick(RecyclerViewAdapter.ItemHolder item, int position) {
        Toast.makeText(this,
                "Remove " + position + " : " + item.getItemName(),
                Toast.LENGTH_SHORT).show();
        myRecyclerViewAdapter.remove(position);
    }
}
Refer last exercise "Add and remove items to RecyclerView, with default animation" for layout/activity_main.xml file. And keep using the files RecyclerViewAdapter.java and layout_item.xmlin the exercise of "Simple RecyclerView example".
Next:
- LinearLayoutManager and GridLayoutManager for RecyclerView
- More step-by-step examples of RecyclerView.
1 comment:
It is very useful. I need not to allow same text again again what we have to do for that.
Post a Comment