Thursday, February 28, 2013

New test build of Android-x86 released, based on the Android 4.2.2


Android-x86 is a project to port Android open source project to x86 platform, Run Android on Your PC.

The test build 20130228 is based on the latest Android 4.2.2 release (JB-MR1.1 branch). We have fixed and added x86 specified code to let the system runs smoothly on most x86 platforms, especially for tablets and netbooks.

The key features in this release are:
  • Use the latest kernel 3.8.0 to support more drivers.
  • OpenGL ES hardware acceleration for AMD Radeon and Intel chipsets (not included chips with PVR). You may disable it by adding HWACCEL=0 to the cmdline if you have trouble to use it.
  • Support Multi-touch, Wifi, Audio, G-sensor, Camera and Backlight control.
  • Simulate SDCard by internal storage.
  • Auto mount usb driver and sdcard on plugging.
  • Multi-user support (max 8).
  • Support Ethernet (DHCP only).
  • Support VM like Virtual Box.

Draw tranparent circle for Google Maps Android API v2

This exercise demonstrate how to draw tranparent circle for Google Maps Android API v2. To create a CircleOptions with TRANSPARENT collor, call fillColor(Color.TRANSPARENT) method; actually it's the default value. We can also set the most signification byte of the parameter to make it semi-tranparent.

Draw tranparent circle for Google Maps Android API v2

Modify from the exercise "Draw Circle on GoogleMap".
package com.example.androidmapsv2;

import com.google.android.gms.common.ConnectionResult;
import com.google.android.gms.common.GooglePlayServicesUtil;
import com.google.android.gms.maps.GoogleMap;
import com.google.android.gms.maps.GoogleMap.OnMapClickListener;
import com.google.android.gms.maps.GoogleMap.OnMapLongClickListener;
import com.google.android.gms.maps.MapFragment;
import com.google.android.gms.maps.model.Circle;
import com.google.android.gms.maps.model.CircleOptions;
import com.google.android.gms.maps.model.LatLng;
import android.app.Activity;
import android.app.AlertDialog;
import android.app.FragmentManager;
import android.graphics.Color;
import android.os.Bundle;
import android.view.Menu;
import android.view.MenuItem;
import android.widget.TextView;
import android.widget.Toast;

public class MainActivity extends Activity 
 implements OnMapClickListener, OnMapLongClickListener{
 
 final int RQS_GooglePlayServices = 1;
 private GoogleMap myMap;
 
 TextView tvLocInfo;
 
 Circle myCircle;

 @Override
 protected void onCreate(Bundle savedInstanceState) {
  super.onCreate(savedInstanceState);
  setContentView(R.layout.activity_main);
  
  tvLocInfo = (TextView)findViewById(R.id.locinfo);
  
  FragmentManager myFragmentManager = getFragmentManager();
  MapFragment myMapFragment 
   = (MapFragment)myFragmentManager.findFragmentById(R.id.map);
  myMap = myMapFragment.getMap();

  myMap.setMapType(GoogleMap.MAP_TYPE_HYBRID);
  
  myMap.setOnMapClickListener(this);
  myMap.setOnMapLongClickListener(this);

 }
 
 @Override
 public boolean onCreateOptionsMenu(Menu menu) {
  // Inflate the menu; this adds items to the action bar if it is present.
  getMenuInflater().inflate(R.menu.activity_main, menu);
  return true;
 }

 @Override
 public boolean onOptionsItemSelected(MenuItem item) {
  switch (item.getItemId()) {
     case R.id.menu_legalnotices:
      String LicenseInfo = GooglePlayServicesUtil.getOpenSourceSoftwareLicenseInfo(
        getApplicationContext());
      AlertDialog.Builder LicenseDialog = new AlertDialog.Builder(MainActivity.this);
      LicenseDialog.setTitle("Legal Notices");
      LicenseDialog.setMessage(LicenseInfo);
      LicenseDialog.show();
         return true;
     }
  return super.onOptionsItemSelected(item);
 }

 @Override
 protected void onResume() {

  super.onResume();

  int resultCode = GooglePlayServicesUtil.isGooglePlayServicesAvailable(getApplicationContext());
  
  if (resultCode == ConnectionResult.SUCCESS){
   Toast.makeText(getApplicationContext(), 
     "isGooglePlayServicesAvailable SUCCESS", 
     Toast.LENGTH_LONG).show();
  }else{
   GooglePlayServicesUtil.getErrorDialog(resultCode, this, RQS_GooglePlayServices);
  }
  
 }


 @Override
 public void onMapClick(LatLng point) {
  CircleOptions circleOptions = new CircleOptions()
  .center(point)   //set center
  .radius(500)   //set radius in meters
  .fillColor(Color.TRANSPARENT)  //default
  .strokeColor(Color.BLUE)
  .strokeWidth(5);
  
  myCircle = myMap.addCircle(circleOptions);
 }

 @Override
 public void onMapLongClick(LatLng point) {
  CircleOptions circleOptions = new CircleOptions()
  .center(point)   //set center
  .radius(500)   //set radius in meters
  .fillColor(0x40ff0000)  //semi-transparent
  .strokeColor(Color.BLUE)
  .strokeWidth(5);
  
  myCircle = myMap.addCircle(circleOptions);
  
 }

}


download filesDownload the files.

The series:
A simple example using Google Maps Android API v2, step by step.

Wednesday, February 27, 2013

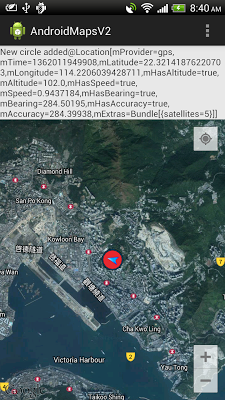
Implement OnMyLocationChangeListener for Google Maps Android API v2

With Google Play services v3.0, and Android SDK Platform-tools with Google Play Services updated, we can implement OnMyLocationChangeListener, called when the Location of the My Location dot has changed.

Implement OnMyLocationChangeListener for Google Maps Android API v2


Modify the Java code from the last exercise "Draw Circle on GoogleMap".
package com.example.androidmapsv2;

import com.google.android.gms.common.ConnectionResult;
import com.google.android.gms.common.GooglePlayServicesUtil;
import com.google.android.gms.maps.CameraUpdateFactory;
import com.google.android.gms.maps.GoogleMap;
import com.google.android.gms.maps.GoogleMap.OnMyLocationChangeListener;
import com.google.android.gms.maps.MapFragment;
import com.google.android.gms.maps.model.Circle;
import com.google.android.gms.maps.model.CircleOptions;
import com.google.android.gms.maps.model.LatLng;
import android.app.Activity;
import android.app.AlertDialog;
import android.app.FragmentManager;
import android.graphics.Color;
import android.location.Location;
import android.os.Bundle;
import android.view.Menu;
import android.view.MenuItem;
import android.widget.TextView;
import android.widget.Toast;

public class MainActivity extends Activity 
 implements OnMyLocationChangeListener{
 
 final int RQS_GooglePlayServices = 1;
 private GoogleMap myMap;
 
 TextView tvLocInfo;
 
 Circle myCircle;

 @Override
 protected void onCreate(Bundle savedInstanceState) {
  super.onCreate(savedInstanceState);
  setContentView(R.layout.activity_main);
  
  tvLocInfo = (TextView)findViewById(R.id.locinfo);
  
  FragmentManager myFragmentManager = getFragmentManager();
  MapFragment myMapFragment 
   = (MapFragment)myFragmentManager.findFragmentById(R.id.map);
  myMap = myMapFragment.getMap();

  myMap.setMapType(GoogleMap.MAP_TYPE_HYBRID);

  myMap.setMyLocationEnabled(true);
  myMap.setOnMyLocationChangeListener(this);

 }
 
 @Override
 public boolean onCreateOptionsMenu(Menu menu) {
  // Inflate the menu; this adds items to the action bar if it is present.
  getMenuInflater().inflate(R.menu.activity_main, menu);
  return true;
 }

 @Override
 public boolean onOptionsItemSelected(MenuItem item) {
  switch (item.getItemId()) {
     case R.id.menu_legalnotices:
      String LicenseInfo = GooglePlayServicesUtil.getOpenSourceSoftwareLicenseInfo(
        getApplicationContext());
      AlertDialog.Builder LicenseDialog = new AlertDialog.Builder(MainActivity.this);
      LicenseDialog.setTitle("Legal Notices");
      LicenseDialog.setMessage(LicenseInfo);
      LicenseDialog.show();
         return true;
     }
  return super.onOptionsItemSelected(item);
 }

 @Override
 protected void onResume() {

  super.onResume();

  int resultCode = GooglePlayServicesUtil.isGooglePlayServicesAvailable(getApplicationContext());
  
  if (resultCode == ConnectionResult.SUCCESS){
   Toast.makeText(getApplicationContext(), 
     "isGooglePlayServicesAvailable SUCCESS", 
     Toast.LENGTH_LONG).show();
  }else{
   GooglePlayServicesUtil.getErrorDialog(resultCode, this, RQS_GooglePlayServices);
  }
  
 }

 @Override
 public void onMyLocationChange(Location location) {
  tvLocInfo.setText("New circle added@" + location.toString());
  
  LatLng locLatLng = new LatLng(location.getLatitude(), location.getLongitude());
  double accuracy = location.getAccuracy();
  
  if(myCircle == null){
   CircleOptions circleOptions = new CircleOptions()
   .center(locLatLng)   //set center
   .radius(accuracy)   //set radius in meters
   .fillColor(Color.RED)
   .strokeColor(Color.BLACK)
   .strokeWidth(5);
   
   myCircle = myMap.addCircle(circleOptions);
  }else{
   myCircle.setCenter(locLatLng);
   myCircle.setRadius(accuracy);
  }
  
  myMap.animateCamera(CameraUpdateFactory.newLatLng(locLatLng));

 }

}


download filesDownload the files.


The series:
A simple example using Google Maps Android API v2, step by step.

Tuesday, February 26, 2013

Draw Circle on GoogleMap

With Google Play services v3.0, now we can draw circle on Google Maps API V2. To use the new feature, you have to update Android SDK Platform-tools.

Draw Circle on GoogleMap


The code modify from the exercise of Draw Polygon on GoogleMap.

package com.example.androidmapsv2;

import com.google.android.gms.common.ConnectionResult;
import com.google.android.gms.common.GooglePlayServicesUtil;
import com.google.android.gms.maps.GoogleMap;
import com.google.android.gms.maps.GoogleMap.OnMapLongClickListener;
import com.google.android.gms.maps.MapFragment;
import com.google.android.gms.maps.model.CircleOptions;
import com.google.android.gms.maps.model.LatLng;
import android.app.Activity;
import android.app.AlertDialog;
import android.app.FragmentManager;
import android.graphics.Color;
import android.os.Bundle;
import android.view.Menu;
import android.view.MenuItem;
import android.widget.TextView;
import android.widget.Toast;

public class MainActivity extends Activity 
 implements OnMapLongClickListener{
 
 final int RQS_GooglePlayServices = 1;
 private GoogleMap myMap;
 
 TextView tvLocInfo;

 @Override
 protected void onCreate(Bundle savedInstanceState) {
  super.onCreate(savedInstanceState);
  setContentView(R.layout.activity_main);
  
  tvLocInfo = (TextView)findViewById(R.id.locinfo);
  
  FragmentManager myFragmentManager = getFragmentManager();
  MapFragment myMapFragment 
   = (MapFragment)myFragmentManager.findFragmentById(R.id.map);
  myMap = myMapFragment.getMap();

  myMap.setMapType(GoogleMap.MAP_TYPE_HYBRID);

  myMap.setOnMapLongClickListener(this);

 }
 
 @Override
 public boolean onCreateOptionsMenu(Menu menu) {
  // Inflate the menu; this adds items to the action bar if it is present.
  getMenuInflater().inflate(R.menu.activity_main, menu);
  return true;
 }

 @Override
 public boolean onOptionsItemSelected(MenuItem item) {
  switch (item.getItemId()) {
     case R.id.menu_legalnotices:
      String LicenseInfo = GooglePlayServicesUtil.getOpenSourceSoftwareLicenseInfo(
        getApplicationContext());
      AlertDialog.Builder LicenseDialog = new AlertDialog.Builder(MainActivity.this);
      LicenseDialog.setTitle("Legal Notices");
      LicenseDialog.setMessage(LicenseInfo);
      LicenseDialog.show();
         return true;
     }
  return super.onOptionsItemSelected(item);
 }

 @Override
 protected void onResume() {

  super.onResume();

  int resultCode = GooglePlayServicesUtil.isGooglePlayServicesAvailable(getApplicationContext());
  
  if (resultCode == ConnectionResult.SUCCESS){
   Toast.makeText(getApplicationContext(), 
     "isGooglePlayServicesAvailable SUCCESS", 
     Toast.LENGTH_LONG).show();
  }else{
   GooglePlayServicesUtil.getErrorDialog(resultCode, this, RQS_GooglePlayServices);
  }
  
 }

 @Override
 public void onMapLongClick(LatLng point) {
  tvLocInfo.setText("New circle added@" + point.toString());
  
  CircleOptions circleOptions = new CircleOptions()
  .center(point)   //set center
  .radius(1000)   //set radius in meters
  .fillColor(Color.RED)
  .strokeColor(Color.BLACK)
  .strokeWidth(5);
  
  myMap.addCircle(circleOptions);
 }

}


download filesDownload the files.

Next: Draw tranparent circle

The series:
A simple example using Google Maps Android API v2, step by step.

Google Maps Android API v2 now support anti-clockwise polygons

With Google Play services v3.0 and Android SDK Platform-tools updated. Google Maps Android API v2 now support anti-clockwise polygons.


The code is here: Google Maps Android API v2 example: Draw Polygon on GoogleMap. With video of playing in old version Google Play Services without support of anti-clockwise polygons.

Android SDK Platform-tools updated

To update Android SDK in Eclipse, click Window -> Android SDK Manager. Updates of Android SDK Platform-tools, Extras of Google Play Services, and a number of features are available.

Android SDK Platform-tools updated

Over-The-Air Installs - stay connected to users across their devices


With Google Play services v3.0, now you can drive automatic Android downloads from your website sign-ins. After signing in with Google on the web, users have the option to send your Android app to their device instantly, without them ever leaving your website. Direct installs from the Google Play Store are limited to free apps that exceed a quality threshold.

Link: https://developers.google.com/+/features/play-installs


Google Play services updated v3.0


Google roll out Google Play services v3.0, includes great Google+ Sign-In and Google Maps Android API improvements.

Know more: Android Developers Blog - Google+ Sign-In Now Part of Google Play Services

Sunday, February 24, 2013

Get memory information

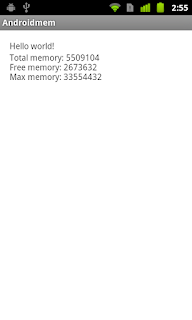
Example to get memory information using Runtime.

memory information


package com.example.androidmem;

import android.os.Bundle;
import android.app.Activity;
import android.widget.TextView;

public class MainActivity extends Activity {

    @Override
    protected void onCreate(Bundle savedInstanceState) {
        super.onCreate(savedInstanceState);
        setContentView(R.layout.activity_main);
        
        TextView memInfo = (TextView)findViewById(R.id.meminfo);
        
        String info = "";
        
        info += "Total memory: " + Runtime.getRuntime().totalMemory() + "\n";
        info += "Free memory: " + Runtime.getRuntime().freeMemory() + "\n";
        info += "Max memory: " + Runtime.getRuntime().maxMemory() + "\n";
        
        memInfo.setText(info);
    }

}


<LinearLayout xmlns:android="http://schemas.android.com/apk/res/android"
    xmlns:tools="http://schemas.android.com/tools"
    android:layout_width="match_parent"
    android:layout_height="match_parent"
    android:paddingBottom="@dimen/activity_vertical_margin"
    android:paddingLeft="@dimen/activity_horizontal_margin"
    android:paddingRight="@dimen/activity_horizontal_margin"
    android:paddingTop="@dimen/activity_vertical_margin"
    android:orientation="vertical"
    tools:context=".MainActivity" >

    <TextView
        android:layout_width="wrap_content"
        android:layout_height="wrap_content"
        android:text="@string/hello_world" />
    <TextView
        android:id="@+id/meminfo"
        android:layout_width="wrap_content"
        android:layout_height="wrap_content" />

</LinearLayout>


Friday, February 22, 2013

Instant Android Fragmentation Management How-to


There are currently 7 different versions of operating systems for Android. A growing issue is fragmentation. With the number of Android users and the variety of versions available, Android fragmentation is a huge problem. This little book is the solution.

Android Fragmentation Management How-to is a step-by-step guide to writing applications that can run on all devices starting from Android 1.6. With simple solutions for complex problems, this book will walk you through the biggest issues facing Android developers today.

This book will take you through the newest features in the latest version of Android, and shows you how to utilize them in the older versions using the compatibility library. This practical guide allows you to focus on  creating the best application possible without worrying about compatibility.

All the heavy lifting is done for you. Using user interface, adapting your application will work perfectly on any Android operating system. Asynchronous data management will also allow your applications to run smoothly on any device.

Everything you need to run your app on any version of Android is right here.

Approach
Filled with practical, step-by-step instructions and clear explanations for the most important and useful tasks. Get the job done and learn as you go. Written in the easy to understand Packt How-to format, this book offers the solution to the big issues in Android application development.

Who this book is for
If you want the best possible reviews for your apps, regardless of device or Android operating system, then this book is for you.


Thursday, February 21, 2013

Instructions for flashing a phone or tablet device with Ubuntu

Ubuntu Wiki post Instructions for flashing a phone or tablet device with Ubuntu.

The Ubuntu Touch Developer Preview is intended to be used for development and evaluation purposes only. It does not provide all of the features and services of a retail phone and cannot replace your current handset. This preview is the first release of a very new and unfinished version of Ubuntu and it will evolve quickly. If you want to install this release, please follow the guide provided, which details the available features and how to navigate the user experience.

This process will delete all data from the device. Restoring Android will not restore this data.


Wednesday, February 20, 2013

Android SDK Tools and ADT plugin updated Revision 21.1.0


Android SDK Tools updated Revision 21.1.0, you can now update it in Eclipse by select Windows -> Android SDK Manager.

The SDK Tools r21.1.0 is designed for use with ADT 21.1.0 and later, to update ADT in Eclipse, select Help -> Check for updates.

Remark: if you cannot update ADT (No updates were found), double check the setting of your software site (in Help -> Install New Software...), make sure https://dl-ssl.google.com/android/eclipse/ is included. In my case, the default included site is http://dl-ssl.google.com/android/eclipse/, no updates were found at this moment!

HTC One, full press conference led by HTC CEO Peter Chou in London.

HTC One - The Unveiling

introduced the brand new HTC One to the world in London and New York on 19 February, 2013. This is the full press conference led by HTC CEO Peter Chou in London.

Demo video of Google Glass


Monday, February 18, 2013

File Explorer, access SD Card on Samsung Galaxy S3

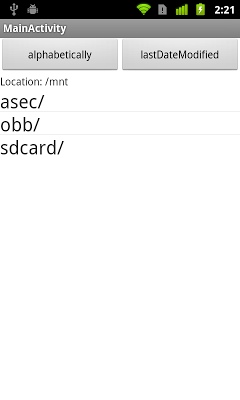
In the exercise of "File Explorer", the root is set as Environment.getExternalStorageDirectory(). But if you run it on Samsung Galaxy S3, it cannot access the removable external SD Card. It's because what getExternalStorageDirectory() return is /storage/sdcard0, but the SD Card is mounted on /storage/extSdCard, not under the tree of /storage/sdcard0. To solve this case, we have to set root as Environment.getExternalStorageDirectory().getParent(), it's /storage.

access SD Card on Samsung Galaxy S3


package com.example.androidexplorer;

import java.io.File;
import java.util.ArrayList;
import java.util.Arrays;
import java.util.Comparator;
import java.util.List;

import android.os.Bundle;
import android.os.Environment;
import android.app.AlertDialog;
import android.app.ListActivity;
import android.view.View;
import android.view.View.OnClickListener;
import android.widget.ArrayAdapter;
import android.widget.Button;
import android.widget.ListView;
import android.widget.TextView;

public class MainActivity extends ListActivity {
 
 private List<String> item = null;
 private List<String> path = null;
 private String root;
 private TextView myPath;
 
 private String currentPath;
 Comparator<? super File> comparator;

    @Override
    public void onCreate(Bundle savedInstanceState) {
        super.onCreate(savedInstanceState);
        setContentView(R.layout.activity_main);
        myPath = (TextView)findViewById(R.id.path);
        
        comparator = filecomparatorByAlphabetically;
        //root = Environment.getExternalStorageDirectory().getPath();
        root = Environment.getExternalStorageDirectory().getParent();
        getDir(root);
        
        Button btnAlphabetically = (Button)findViewById(R.id.button_alphabetically);
        btnAlphabetically.setOnClickListener(new OnClickListener(){

   @Override
   public void onClick(View arg0) {
    comparator = filecomparatorByAlphabetically;
    getDir(currentPath);
    
   }});
        
        Button btnLastDateModified = (Button)findViewById(R.id.button_lastDateModified);
        btnLastDateModified.setOnClickListener(new OnClickListener(){

   @Override
   public void onClick(View arg0) {
    comparator = filecomparatorByLastModified;
          getDir(currentPath);
    
   }});
    }
    
    private void getDir(String dirPath)
    {
     currentPath = dirPath;
     
     myPath.setText("Location: " + dirPath);
     item = new ArrayList<String>();
     path = new ArrayList<String>();
     File f = new File(dirPath);
     File[] files = f.listFiles();
     
     if(!dirPath.equals(root))
     {
      item.add(root);
      path.add(root);
      item.add("../");
      path.add(f.getParent()); 
     }
     
     Arrays.sort(files, comparator);
     
     for(int i=0; i < files.length; i++)
     {
      File file = files[i];
      
      if(!file.isHidden() && file.canRead()){
       path.add(file.getPath());
          if(file.isDirectory()){
           item.add(file.getName() + "/");
          }else{
           item.add(file.getName());
          }
      } 
     }

     ArrayAdapter<String> fileList =
       new ArrayAdapter<String>(this, R.layout.row, item);
     setListAdapter(fileList); 
    }
    
    Comparator<? super File> filecomparatorByLastModified = new Comparator<File>(){
  
  public int compare(File file1, File file2) {

   if(file1.isDirectory()){
    if (file2.isDirectory()){
     return Long.valueOf(file1.lastModified()).compareTo(file2.lastModified());
    }else{
     return -1;
    }
   }else {
    if (file2.isDirectory()){
     return 1;
    }else{
     return Long.valueOf(file1.lastModified()).compareTo(file2.lastModified());
    }
   }
    
  }  
 };
    
    Comparator<? super File> filecomparatorByAlphabetically = new Comparator<File>(){
  
  public int compare(File file1, File file2) {

   if(file1.isDirectory()){
    if (file2.isDirectory()){
     return String.valueOf(file1.getName().toLowerCase()).compareTo(file2.getName().toLowerCase());
    }else{
     return -1;
    }
   }else {
    if (file2.isDirectory()){
     return 1;
    }else{
     return String.valueOf(file1.getName().toLowerCase()).compareTo(file2.getName().toLowerCase());
    }
   }
    
  }  
 };
 
 @Override
 protected void onListItemClick(ListView l, View v, int position, long id) {
  // TODO Auto-generated method stub
  File file = new File(path.get(position));
  
  if (file.isDirectory())
  {
   if(file.canRead()){
    getDir(path.get(position));
   }else{
    new AlertDialog.Builder(this)
     .setIcon(R.drawable.ic_launcher)
     .setTitle("[" + file.getName() + "] folder can't be read!")
     .setPositiveButton("OK", null).show(); 
   } 
  }else {
   new AlertDialog.Builder(this)
     .setIcon(R.drawable.ic_launcher)
     .setTitle("[" + file.getName() + "]")
     .setPositiveButton("OK", null).show();

    }
 }

}


download filesDownload the files.

Please notice that it's not a standard approach. For example, if you run it on Nexus One, you will see some un-expected folder in /storage.

Run on Nexus One

Sunday, February 17, 2013

SharedPreferences.Editor for RadioButton in RadioGroup

Last post demonstrate how to "Read index of the checked RadioButton in RadioGroup" and explain why you cannot save in SharedPreferences.Editor base on IDs. This exercise demonstrate how to save the checked index of RadioButton in RadioGroup using SharedPreferences.Editor.

save the checked index of RadioButton in RadioGroup using SharedPreferences.Editor.


package com.example.androidradiogroup;

import android.os.Bundle;
import android.widget.RadioButton;
import android.widget.RadioGroup;
import android.widget.RadioGroup.OnCheckedChangeListener;
import android.widget.TextView;
import android.app.Activity;
import android.content.SharedPreferences;

public class MainActivity extends Activity {
 
 RadioGroup radioGroup;
 TextView textCheckedID, textCheckedIndex;
 
 final String KEY_SAVED_RADIO_BUTTON_INDEX = "SAVED_RADIO_BUTTON_INDEX";

    @Override
    protected void onCreate(Bundle savedInstanceState) {
        super.onCreate(savedInstanceState);
        setContentView(R.layout.activity_main);
        radioGroup = (RadioGroup)findViewById(R.id.radiogroup);
        radioGroup.setOnCheckedChangeListener(radioGroupOnCheckedChangeListener);
        
        textCheckedID = (TextView)findViewById(R.id.checkedid);
        textCheckedIndex = (TextView)findViewById(R.id.checkedindex);
        
        LoadPreferences();
    }
    
    OnCheckedChangeListener radioGroupOnCheckedChangeListener =
      new OnCheckedChangeListener(){

    @Override
    public void onCheckedChanged(RadioGroup group, int checkedId) {

     RadioButton checkedRadioButton = (RadioButton)radioGroup.findViewById(checkedId);
     int checkedIndex = radioGroup.indexOfChild(checkedRadioButton);
     
     textCheckedID.setText("checkedID = " + checkedId);
     textCheckedIndex.setText("checkedIndex = " + checkedIndex);
     SavePreferences(KEY_SAVED_RADIO_BUTTON_INDEX, checkedIndex);
    }};

 private void SavePreferences(String key, int value){
  SharedPreferences sharedPreferences = getSharedPreferences("MY_SHARED_PREF", MODE_PRIVATE);
  SharedPreferences.Editor editor = sharedPreferences.edit();
  editor.putInt(key, value);
  editor.commit(); 
 }
 
 private void LoadPreferences(){
  SharedPreferences sharedPreferences = getSharedPreferences("MY_SHARED_PREF", MODE_PRIVATE);
  int savedRadioIndex = sharedPreferences.getInt(KEY_SAVED_RADIO_BUTTON_INDEX, 0);
  RadioButton savedCheckedRadioButton = (RadioButton)radioGroup.getChildAt(savedRadioIndex);
  savedCheckedRadioButton.setChecked(true);
 }
}


<LinearLayout xmlns:android="http://schemas.android.com/apk/res/android"
    xmlns:tools="http://schemas.android.com/tools"
    android:layout_width="match_parent"
    android:layout_height="match_parent"
    android:orientation="vertical"
    tools:context=".MainActivity" >

    <TextView
        android:layout_width="wrap_content"
        android:layout_height="wrap_content"
        android:text="@string/hello_world" />

    <RadioGroup
        android:id="@+id/radiogroup"
        android:layout_width="fill_parent"
        android:layout_height="wrap_content"
        android:orientation="vertical">
        <RadioButton
            android:id="@+id/option1"
            android:layout_width="wrap_content"
            android:layout_height="wrap_content"
            android:text="Option 1" />
        <RadioButton
            android:id="@+id/option2"
            android:layout_width="wrap_content"
            android:layout_height="wrap_content"
            android:text="Option 2" />
        <RadioButton
            android:id="@+id/option3"
            android:layout_width="wrap_content"
            android:layout_height="wrap_content"
            android:text="Option 3" />
    </RadioGroup>
    
    <TextView
        android:id="@+id/checkedid"
        android:layout_width="wrap_content"
        android:layout_height="wrap_content" />
    <TextView
        android:id="@+id/checkedindex"
        android:layout_width="wrap_content"
        android:layout_height="wrap_content" />

</LinearLayout>

Related:
- Example of using SharedPreferences.Editor; getPreferences() for a single activity.
- Use getSharedPreferences() to retrieve a preferences object shared across multiple activity.


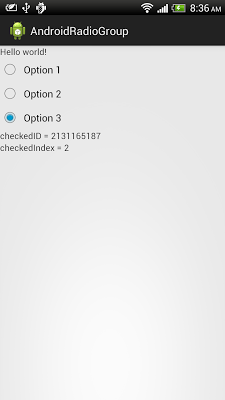
Read index of the checked RadioButton in RadioGroup

This example demonstrate how to get the index of the checked RadioButton in RadioGroup.

Read index of the checked RadioButton in RadioGroup


package com.example.androidradiogroup;

import android.os.Bundle;
import android.widget.RadioButton;
import android.widget.RadioGroup;
import android.widget.RadioGroup.OnCheckedChangeListener;
import android.widget.TextView;
import android.app.Activity;

public class MainActivity extends Activity {
 
 RadioGroup radioGroup;
 TextView textCheckedID, textCheckedIndex;

    @Override
    protected void onCreate(Bundle savedInstanceState) {
        super.onCreate(savedInstanceState);
        setContentView(R.layout.activity_main);
        radioGroup = (RadioGroup)findViewById(R.id.radiogroup);
        radioGroup.setOnCheckedChangeListener(radioGroupOnCheckedChangeListener);
        
        textCheckedID = (TextView)findViewById(R.id.checkedid);
        textCheckedIndex = (TextView)findViewById(R.id.checkedindex);
        
    }
    
    OnCheckedChangeListener radioGroupOnCheckedChangeListener =
      new OnCheckedChangeListener(){

    @Override
    public void onCheckedChanged(RadioGroup group, int checkedId) {

     RadioButton checkedRadioButton = (RadioButton)radioGroup.findViewById(checkedId);
     int checkedIndex = radioGroup.indexOfChild(checkedRadioButton);
     
     textCheckedID.setText("checkedID = " + checkedId);
     textCheckedIndex.setText("checkedIndex = " + checkedIndex);
    }};

}


<LinearLayout xmlns:android="http://schemas.android.com/apk/res/android"
    xmlns:tools="http://schemas.android.com/tools"
    android:layout_width="match_parent"
    android:layout_height="match_parent"
    android:orientation="vertical"
    tools:context=".MainActivity" >

    <TextView
        android:layout_width="wrap_content"
        android:layout_height="wrap_content"
        android:text="@string/hello_world" />
    
    <TextView
        android:id="@+id/checkedid"
        android:layout_width="wrap_content"
        android:layout_height="wrap_content" />
    <TextView
        android:id="@+id/checkedindex"
        android:layout_width="wrap_content"
        android:layout_height="wrap_content" />

    <RadioGroup
        android:id="@+id/radiogroup"
        android:layout_width="fill_parent"
        android:layout_height="wrap_content"
        android:orientation="vertical">
        <RadioButton
            android:id="@+id/option1"
            android:layout_width="wrap_content"
            android:layout_height="wrap_content"
            android:text="Option 1" />
        <RadioButton
            android:id="@+id/option2"
            android:layout_width="wrap_content"
            android:layout_height="wrap_content"
            android:text="Option 2" />
        <RadioButton
            android:id="@+id/option3"
            android:layout_width="wrap_content"
            android:layout_height="wrap_content"
            android:text="Option 3" />
    </RadioGroup>

</LinearLayout>


Please note that you cannot assume the checkedId passed to onCheckedChanged() of OnCheckedChangeListener always same for the same button. Specially when you want to set Preference for RadioButton in RadioGroup. The ADT will re-generate the IDs base on your layout. So, after you modify the layout, the IDs will be changed. I read some posts advise keep preference of RadioButton in RadioGroup base on the checkID. Yes, it work if you will not update your APK in the furture.

The IDs changed after re-layout


Next:
- SharedPreferences.Editor for RadioButton in RadioGroup


Back to Home Screen directly using ACTION_MAIN with category CATEGORY_HOME

If you want to go to Home Screen directly, using the code:


    Intent intent = new Intent(Intent.ACTION_MAIN);
    intent.addCategory(Intent.CATEGORY_HOME);
    startActivity(intent);


Python for Android

Python for android is a project to create your own Python distribution including the modules you want, and create an apk including python, libs, and your application.

know more: http://python-for-android.readthedocs.org/

Friday, February 15, 2013

Get user last know location

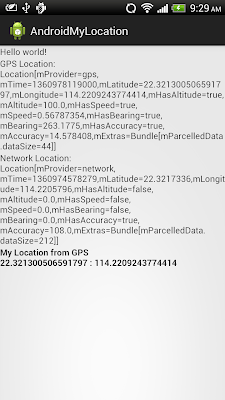
There are two location provider in Android, NETWORK_PROVIDER and GPS_PROVIDER. In case you want to get last known user location, which one you should use?

It's a example to get last know location from both NETWORK_PROVIDER and GPS_PROVIDER, and choice the provider base on its accuracy.

Get user last know location


Please note that:
- More accuracy not means most recent in time.
- If no accuracy, 0.0 will be return from getLastKnownLocation() method. The code haven't concern this case.
- The code get last known location one time only, if you have to monitor continuously, and estimate the best location, refer Android documenet here.

Main code:
package com.example.androidmylocation;

import android.location.Location;
import android.location.LocationManager;
import android.os.Bundle;
import android.widget.TextView;
import android.app.Activity;
import android.content.Context;

public class MainActivity extends Activity {
 
 TextView textView_GpsLocation, textView_NetworkLocation, textView_MyLocation;
 
 final String gpsLocationProvider = LocationManager.GPS_PROVIDER;
 final String networkLocationProvider = LocationManager.NETWORK_PROVIDER;

    @Override
    protected void onCreate(Bundle savedInstanceState) {
        super.onCreate(savedInstanceState);
        setContentView(R.layout.activity_main);
        textView_GpsLocation = (TextView)findViewById(R.id.textgpslocation);
        textView_NetworkLocation = (TextView)findViewById(R.id.textnetworklocation);
        textView_MyLocation = (TextView)findViewById(R.id.textmylocation);

        
        LocationManager locationManager = 
          (LocationManager)this.getSystemService(Context.LOCATION_SERVICE);
        
        Location lastKnownLocation_byGps = 
          locationManager.getLastKnownLocation(gpsLocationProvider);
        Location lastKnownLocation_byNetwork = 
          locationManager.getLastKnownLocation(networkLocationProvider);
        
        if(lastKnownLocation_byGps==null){
         textView_GpsLocation.setText("GPS Last Location not available");
         
         if(lastKnownLocation_byNetwork==null){
          textView_NetworkLocation.setText("Network Last Location not available");
          textView_MyLocation.setText("No Last Known Location!");
         }else{
          textView_NetworkLocation.setText("Network Location:\n" + lastKnownLocation_byNetwork.toString());
          
          textView_MyLocation.setText(
            "My Location is " + lastKnownLocation_byNetwork.getLatitude() +
            " : " + lastKnownLocation_byNetwork.getLongitude());
         }
         
         
        }else{
         textView_GpsLocation.setText("GPS Location:\n" + lastKnownLocation_byGps.toString());
         
         if(lastKnownLocation_byNetwork==null){
          textView_NetworkLocation.setText("Network Last Location not available");
          textView_MyLocation.setText(
            "My Location is " + lastKnownLocation_byGps.getLatitude() +
            " : " + lastKnownLocation_byGps.getLongitude());
         }else{
          textView_NetworkLocation.setText("Network Location:\n" + lastKnownLocation_byNetwork.toString());
          
          //Both Location provider have last location
          //decide location base on accuracy
          if(lastKnownLocation_byGps.getAccuracy() <= lastKnownLocation_byNetwork.getAccuracy()){
           textView_MyLocation.setText(
                "My Location from GPS\n" + lastKnownLocation_byGps.getLatitude() +
                " : " + lastKnownLocation_byGps.getLongitude());
          }else{
           textView_MyLocation.setText(
                "My Location from Network\n" + lastKnownLocation_byNetwork.getLatitude() +
                " : " + lastKnownLocation_byNetwork.getLongitude());
          }
          
         }
        }

    }

}


Layout:
<LinearLayout xmlns:android="http://schemas.android.com/apk/res/android"
    xmlns:tools="http://schemas.android.com/tools"
    android:layout_width="match_parent"
    android:layout_height="match_parent"
    android:orientation="vertical"
    tools:context=".MainActivity" >

    <TextView
        android:layout_width="wrap_content"
        android:layout_height="wrap_content"
        android:text="@string/hello_world" />
    <TextView
        android:id="@+id/textgpslocation"
        android:layout_width="wrap_content"
        android:layout_height="wrap_content" />
    <TextView
        android:id="@+id/textnetworklocation"
        android:layout_width="wrap_content"
        android:layout_height="wrap_content" />
    <TextView
        android:id="@+id/textmylocation"
        android:layout_width="wrap_content"
        android:layout_height="wrap_content"
        android:textStyle="bold" />

</LinearLayout>


In order to use both NETWORK_PROVIDER and GPS_PROVIDER, only the ACCESS_FINE_LOCATION permission is need, because it includes permission for both providers. (Permission for ACCESS_COARSE_LOCATION includes permission only for NETWORK_PROVIDER.)

download filesDownload the files.

Wednesday, February 13, 2013

The Copy Protection feature of Android App is being deprecated

Google is standardizing on two primary tools for helping developers protect against unauthorized copying: app encryption in Jelly Bean and the Licensing Service for all platforms. The older Copy Protection feature, which announced have be deprecating back in 2010, is now going away in favor of these more advanced tools. The Copy Protection feature will no longer be available in the Developer Console starting February 27, 2013 and will no longer be applied on new downloads in Google Play very soon after that. If your app has been using this feature and you would like to continue to protect against unauthorized copying, please begin using the Licensing Service. 

Learn more.

Tuesday, February 12, 2013

Convert between LatLng and Location

This example demonstrate how to convert between LatLng and Location. Refer onMapClick() in the code.

Convert between LatLng and Location


package com.example.androidmapsv2;

import java.util.Date;

import com.google.android.gms.maps.GoogleMap;
import com.google.android.gms.maps.GoogleMap.OnMapClickListener;
import com.google.android.gms.maps.MapFragment;
import com.google.android.gms.maps.model.LatLng;
import com.google.android.gms.maps.model.MarkerOptions;

import android.location.Location;
import android.os.Bundle;
import android.app.Activity;
import android.app.FragmentManager;
import android.widget.TextView;

public class MainActivity extends Activity 
 implements OnMapClickListener{

 private GoogleMap myMap;
 
 TextView info;
 
    @Override
    protected void onCreate(Bundle savedInstanceState) {
        super.onCreate(savedInstanceState);
        setContentView(R.layout.activity_main);
        
        FragmentManager myFragmentManager = getFragmentManager();
        MapFragment myMapFragment = 
          (MapFragment)myFragmentManager.findFragmentById(R.id.map);
        myMap = myMapFragment.getMap();
        
        myMap.setOnMapClickListener(this);
        
        info = (TextView)findViewById(R.id.info);

        myMap.setMapType(GoogleMap.MAP_TYPE_HYBRID);
        myMap.getUiSettings().setZoomControlsEnabled(true);
        myMap.getUiSettings().setCompassEnabled(true);
        myMap.getUiSettings().setAllGesturesEnabled(true);
    }


 @Override
 public void onMapClick(LatLng point) {
  //myMap.addMarker(new MarkerOptions().position(point).title(point.toString()));

  //The code below demonstrate how to convert between LatLng and Location
  
  //Convert LatLng to Location
  Location location = new Location("Test");
  location.setLatitude(point.latitude);
  location.setLongitude(point.longitude);
  location.setTime(new Date().getTime()); //Set time as current Date
  info.setText(location.toString());
  
  //Convert Location to LatLng
  LatLng newLatLng = new LatLng(location.getLatitude(), location.getLongitude());
  
  MarkerOptions markerOptions = new MarkerOptions()
           .position(newLatLng)
           .title(newLatLng.toString());
  
  myMap.addMarker(markerOptions);

 }

}


<LinearLayout xmlns:android="http://schemas.android.com/apk/res/android"
    xmlns:tools="http://schemas.android.com/tools"
    android:layout_width="match_parent"
    android:layout_height="match_parent"
    android:orientation="vertical"
    tools:context=".MainActivity" >

 <TextView 
     android:id="@+id/info"
     android:layout_width="match_parent"
     android:layout_height="wrap_content" />

    <fragment
        android:id="@+id/map"
        android:layout_width="match_parent"
        android:layout_height="match_parent"
        class="com.google.android.gms.maps.MapFragment"/>

</LinearLayout>


The series:
A simple example using Google Maps Android API v2, step by step.

Monday, February 11, 2013

Query Contacts database using Loader, with search function.

Example of query Contacts database using Loader, with search menu item.

Query Contacts database using Loader, with search function.


package com.example.androidsearchcontact;

import android.net.Uri;
import android.os.Bundle;
import android.provider.ContactsContract.Contacts;
import android.app.ListActivity;
import android.app.LoaderManager;
import android.app.LoaderManager.LoaderCallbacks;
import android.content.CursorLoader;
import android.content.Loader;
import android.database.Cursor;
import android.text.TextUtils;
import android.view.Menu;
import android.view.MenuItem;
import android.view.View;
import android.widget.ListView;
import android.widget.SearchView;
import android.widget.SearchView.OnQueryTextListener;
import android.widget.SimpleCursorAdapter;
import android.widget.Toast;

public class MainActivity extends ListActivity implements 
 OnQueryTextListener, LoaderCallbacks<Cursor>{
 
 SimpleCursorAdapter simpleCursorAdapter;
 String cursorFilter;

    @Override
    protected void onCreate(Bundle savedInstanceState) {
        super.onCreate(savedInstanceState);
        //setContentView(R.layout.activity_main);
        
        String[] from = new String[]{
          Contacts.DISPLAY_NAME, 
          Contacts.CONTACT_STATUS};
        
        int[] to = new int[]{
          android.R.id.text1, 
          android.R.id.text2};
        
        simpleCursorAdapter = new SimpleCursorAdapter(this,
                android.R.layout.simple_list_item_2, 
                null,
                from,
                to, 
                0);
        
        setListAdapter(simpleCursorAdapter);
        
        LoaderManager loaderManager = getLoaderManager();
        loaderManager.initLoader(0, null, this);
    }

    @Override
    public boolean onCreateOptionsMenu(Menu menu) {
        // Inflate the menu; this adds items to the action bar if it is present.
        //getMenuInflater().inflate(R.menu.activity_main, menu);
     
     MenuItem item = menu.add("Search");
        item.setIcon(android.R.drawable.ic_menu_search);
        item.setShowAsAction(MenuItem.SHOW_AS_ACTION_IF_ROOM);
        SearchView searchView = new SearchView(MainActivity.this);
        searchView.setOnQueryTextListener(this);
        item.setActionView(searchView);
     
        return true;
    }

 @Override
 public Loader<Cursor> onCreateLoader(int arg0, Bundle arg1) {
  Uri baseUri;
        if (cursorFilter != null) {
            baseUri = Uri.withAppendedPath(Contacts.CONTENT_FILTER_URI,
                    Uri.encode(cursorFilter));
        } else {
            baseUri = Contacts.CONTENT_URI;
        }

        String select = "((" + Contacts.DISPLAY_NAME + " NOTNULL) AND ("
                + Contacts.HAS_PHONE_NUMBER + "=1) AND ("
                + Contacts.DISPLAY_NAME + " != '' ))";
        
        String[] projection = new String[] {
            Contacts._ID,
            Contacts.DISPLAY_NAME,
            Contacts.CONTACT_STATUS,
            Contacts.CONTACT_PRESENCE,
            Contacts.PHOTO_ID,
            Contacts.LOOKUP_KEY,
        };
        
        CursorLoader cursorLoader = new CursorLoader(
          MainActivity.this, 
          baseUri,
                projection, 
                select, 
                null,
                Contacts.DISPLAY_NAME);
        
        return cursorLoader;
 }

 @Override
 public void onLoadFinished(Loader<Cursor> arg0, Cursor arg1) {
  simpleCursorAdapter.swapCursor(arg1);
 }

 @Override
 public void onLoaderReset(Loader<Cursor> arg0) {
  simpleCursorAdapter.swapCursor(null);
 }

 @Override
 public boolean onQueryTextChange(String arg0) {
  cursorFilter = !TextUtils.isEmpty(arg0) ? arg0 : null;
        getLoaderManager().restartLoader(0, null, this);
        return true;
 }

 @Override
 public boolean onQueryTextSubmit(String arg0) {
  // TODO Auto-generated method stub
  return false;
 }

 @Override
 protected void onListItemClick(ListView l, View v, int position, long id) {
  
  Cursor cursor = (Cursor)l.getItemAtPosition(position);
  int item_ID = cursor.getInt(cursor.getColumnIndex(Contacts._ID));
  String item_DisplayName = cursor.getString(cursor.getColumnIndex(Contacts.DISPLAY_NAME));
  String item_LookUp = cursor.getString(cursor.getColumnIndex(Contacts.LOOKUP_KEY));
  
  String item = String.valueOf(item_ID) + ": " + item_DisplayName + "\n" 
    + "LOOKUP_KEY: " + item_LookUp;

  Toast.makeText(getApplicationContext(), 
    item, 
    Toast.LENGTH_LONG).show();
  
 }
    
}


download filesDownload the files.

Compare: Query Contacts database.

Sunday, February 10, 2013

Implement own App Launcher

This example demonstrate how to implement our own App Launcher; list icons of installed App in GridView, and launchth the app once clicked.

our own App Launcher

Modify layout to XML to use GridView.
<GridView xmlns:android="http://schemas.android.com/apk/res/android"
    android:id="@+id/gridview"
    android:layout_width="fill_parent"
    android:layout_height="fill_parent"
    android:numColumns="auto_fit"
    android:verticalSpacing="10dp"
    android:horizontalSpacing="10dp"
    android:columnWidth="50dp"
    android:stretchMode="columnWidth"
    android:gravity="center"/>


Main Code.
package com.example.androidapplauncher;

import java.util.List;

import android.os.Bundle;
import android.view.View;
import android.view.ViewGroup;
import android.widget.AdapterView;
import android.widget.AdapterView.OnItemClickListener;
import android.widget.BaseAdapter;
import android.widget.GridView;
import android.widget.ImageView;
import android.app.Activity;
import android.content.Context;
import android.content.Intent;
import android.content.pm.ActivityInfo;
import android.content.pm.PackageManager;
import android.content.pm.ResolveInfo;

public class MainActivity extends Activity {
 
 PackageManager myPackageManager;
 
 public class MyBaseAdapter extends BaseAdapter {
  
  private Context myContext;
  private List<ResolveInfo> MyAppList;

  MyBaseAdapter(Context c, List<ResolveInfo> l){
   myContext = c;
   MyAppList = l;
  }
  
  @Override
  public int getCount() {
   return MyAppList.size();
  }
  
  @Override
  public Object getItem(int position) {
   return MyAppList.get(position);
  }
  
  @Override
  public long getItemId(int position) {
   return position;
  }
  
  @Override
  public View getView(int position, View convertView, ViewGroup parent) {
   
   ImageView imageView;
   if (convertView == null) {
    // if it's not recycled, initialize some attributes
    imageView = new ImageView(myContext);
    imageView.setLayoutParams(new GridView.LayoutParams(85, 85));
    imageView.setScaleType(ImageView.ScaleType.CENTER_CROP);
    imageView.setPadding(8, 8, 8, 8); 
   } else {
    imageView = (ImageView)convertView; 
   }
   
   ResolveInfo resolveInfo = MyAppList.get(position);
   imageView.setImageDrawable(resolveInfo.loadIcon(myPackageManager));

   return imageView;
         
  }
  
 }

    @Override
    protected void onCreate(Bundle savedInstanceState) {
        super.onCreate(savedInstanceState);
        setContentView(R.layout.activity_main);
        
        myPackageManager = getPackageManager();
        
        Intent intent = new Intent(Intent.ACTION_MAIN, null);
        intent.addCategory(Intent.CATEGORY_LAUNCHER);
        List<ResolveInfo> intentList = getPackageManager().queryIntentActivities(intent, 0);
        
        GridView gridview = (GridView) findViewById(R.id.gridview);
        gridview.setAdapter(new MyBaseAdapter(this, intentList));
        
        gridview.setOnItemClickListener(myOnItemClickListener);
    }
    
    OnItemClickListener myOnItemClickListener =
      new OnItemClickListener(){

    @Override
    public void onItemClick(AdapterView<?> parent, View view,
      int position, long id) {
     ResolveInfo cleckedResolveInfo = 
       (ResolveInfo)parent.getItemAtPosition(position);
     ActivityInfo clickedActivityInfo = 
       cleckedResolveInfo.activityInfo;

     Intent intent = new Intent(Intent.ACTION_MAIN);
        intent.addCategory(Intent.CATEGORY_LAUNCHER);
        intent.setClassName(
          clickedActivityInfo.applicationInfo.packageName,
          clickedActivityInfo.name);
        intent.setFlags(Intent.FLAG_ACTIVITY_NEW_TASK | 
          Intent.FLAG_ACTIVITY_RESET_TASK_IF_NEEDED);
        startActivity(intent);
      
    }

    };
    
}


download filesDownload the files.
Saturday, February 9, 2013

Implement shape of oval using XML

Last exercise demonstrate how to "Implement shape of rounded-rect using XML", with little bit of modification, we can shape of oval. Like this:

shape of oval


/res/drawable/oval.xml
<?xml version="1.0" encoding="utf-8"?>
<shape
    xmlns:android="http://schemas.android.com/apk/res/android"
    android:shape="oval">

    <gradient
        android:angle="90"
        android:startColor="#FF000000"
        android:endColor="#FFFFFFFF"
        android:type= "linear" />   
    <stroke
        android:width="1dp"
        android:color="#FF000000" />
    <padding
        android:left="15dp"
        android:top="15dp"
        android:right="15dp"
        android:bottom="15dp" />
</shape>


Layout with shape of oval.
<LinearLayout xmlns:android="http://schemas.android.com/apk/res/android"
    xmlns:tools="http://schemas.android.com/tools"
    android:layout_width="match_parent"
    android:layout_height="match_parent"
    android:orientation="vertical"
    android:padding="10dp"
    tools:context=".MainActivity" >

    <TextView
        android:layout_width="wrap_content"
        android:layout_height="wrap_content"
        android:text="@string/hello_world" />

    <LinearLayout
        android:layout_width="match_parent"
        android:layout_height="match_parent"
        android:orientation="vertical"
        android:background="@drawable/oval" >
        
        <ImageView 
            android:layout_width="wrap_content"
            android:layout_height="wrap_content"
            android:src="@drawable/ic_launcher"
            android:background="@drawable/oval" />
        <TextView
            android:layout_width="match_parent"
            android:layout_height="wrap_content"
            android:text="normal TextView"
            android:layout_margin="5dp" />
        <TextView
            android:layout_width="match_parent"
            android:layout_height="wrap_content"
            android:text="TextView with roundrect"
            android:layout_margin="5dp"
            android:background="@drawable/oval" />
        <EditText
            android:layout_width="match_parent"
            android:layout_height="wrap_content"
            android:hint="normal EditText"
            android:layout_margin="5dp" />
        <EditText
            android:layout_width="match_parent"
            android:layout_height="wrap_content"
            android:hint="EditText with roundrect"
            android:text="Hello"
            android:layout_margin="5dp"
            android:background="@drawable/oval" />
    </LinearLayout>

</LinearLayout>


Define shape of rounded-rect for View using XML

This example demonstrate how to define rounded-rect shape for View, in XML; to implement layout as shown here:

rounded-rect shape


Create /res/drawable/roundrect.xml to define our custom shape.
<?xml version="1.0" encoding="utf-8"?>
<shape
    xmlns:android="http://schemas.android.com/apk/res/android"
    android:shape="rectangle">
    <corners
        android:radius="15dp" />
    <gradient
        android:angle="90"
        android:startColor="#FF000000"
        android:endColor="#FFFFFFFF"
        android:type= "linear" />   
    <stroke
        android:width="1dp"
        android:color="#FF000000" />
    <padding
        android:left="15dp"
        android:top="15dp"
        android:right="15dp"
        android:bottom="15dp" />
</shape>


Include View using the custom shape, with android:background="@drawable/roundrect".
<LinearLayout xmlns:android="http://schemas.android.com/apk/res/android"
    xmlns:tools="http://schemas.android.com/tools"
    android:layout_width="match_parent"
    android:layout_height="match_parent"
    android:orientation="vertical"
    android:padding="10dp"
    tools:context=".MainActivity" >

    <TextView
        android:layout_width="wrap_content"
        android:layout_height="wrap_content"
        android:text="@string/hello_world" />

    <LinearLayout
        android:layout_width="match_parent"
        android:layout_height="match_parent"
        android:orientation="vertical"
        android:background="@drawable/roundrect" >
        
        <ImageView 
            android:layout_width="wrap_content"
            android:layout_height="wrap_content"
            android:src="@drawable/ic_launcher"
            android:background="@drawable/roundrect" />
        <TextView
            android:layout_width="match_parent"
            android:layout_height="wrap_content"
            android:text="normal TextView"
            android:layout_margin="5dp" />
        <TextView
            android:layout_width="match_parent"
            android:layout_height="wrap_content"
            android:text="TextView with roundrect"
            android:layout_margin="5dp"
            android:background="@drawable/roundrect" />
        <EditText
            android:layout_width="match_parent"
            android:layout_height="wrap_content"
            android:hint="normal EditText"
            android:layout_margin="5dp" />
        <EditText
            android:layout_width="match_parent"
            android:layout_height="wrap_content"
            android:hint="EditText with roundrect"
            android:text="Hello"
            android:layout_margin="5dp"
            android:background="@drawable/roundrect" />
    </LinearLayout>

</LinearLayout>


Related: Implement shape of oval using XML


Wednesday, February 6, 2013

android.widget.Space

android.widget.Space added in API level 14, is a lightweight View subclass that may be used to create gaps between components in general purpose layouts.

Example:
<GridLayout xmlns:android="http://schemas.android.com/apk/res/android"
    xmlns:tools="http://schemas.android.com/tools"
    android:layout_width="match_parent"
    android:layout_height="match_parent"
    android:columnCount="3"
    tools:context=".MainActivity" >

    <TextView
        android:textSize="28sp"
        android:text="@string/hello_world" />
    <TextView
        android:textSize="28sp"
        android:background="#D0D0D0"
        android:text="Cell 2" />
    <TextView
        android:textSize="28sp"
        android:background="#B0B0B0"
        android:layout_rowSpan="2"
        android:text="Double Row Cell 3" />
    <TextView
        android:textSize="28sp"
        android:background="#909090"
        android:layout_columnSpan="2"
        android:text="Double Column Cell 4" />
    <Space
        android:layout_columnSpan="2" />
    <TextView
        android:textSize="28sp"
        android:background="#00FF00"
        android:text="Cell 9" />
    <TextView
        android:textSize="28sp"
        android:background="#0000FF"
        android:layout_columnSpan="2"
        android:text="Double Column Cell 10" />
    <TextView
        android:textSize="28sp"
        android:background="#E0E0E0"
        android:text="Cell 12" />
</GridLayout>


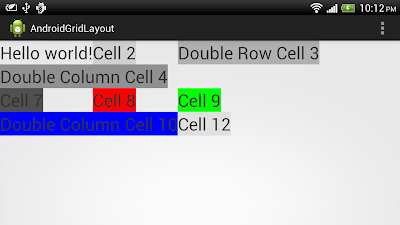
Space in GridLayout

GridLayout

android.widget.GridLayout added in API level 14, is a layout that places its children in a rectangular grid.

Example:

<GridLayout xmlns:android="http://schemas.android.com/apk/res/android"
    xmlns:tools="http://schemas.android.com/tools"
    android:layout_width="match_parent"
    android:layout_height="match_parent"
    android:columnCount="3"
    tools:context=".MainActivity" >

    <TextView
        android:textSize="28sp"
        android:text="@string/hello_world" />
    <TextView
        android:textSize="28sp"
        android:background="#D0D0D0"
        android:text="Cell 2" />
    <TextView
        android:textSize="28sp"
        android:background="#B0B0B0"
        android:layout_rowSpan="2"
        android:text="Double Row Cell 3" />
    <TextView
        android:textSize="28sp"
        android:background="#909090"
        android:layout_columnSpan="2"
        android:text="Double Column Cell 4" />
    <TextView
        android:textSize="28sp"
        android:background="#505050"
        android:text="Cell 7" />
    <TextView
        android:textSize="28sp"
        android:background="#FF0000"
        android:text="Cell 8" />
    <TextView
        android:textSize="28sp"
        android:background="#00FF00"
        android:text="Cell 9" />
    <TextView
        android:textSize="28sp"
        android:background="#0000FF"
        android:layout_columnSpan="2"
        android:text="Double Column Cell 10" />
    <TextView
        android:textSize="28sp"
        android:background="#E0E0E0"
        android:text="Cell 12" />
</GridLayout>


GridLayout example

Monday, February 4, 2013

Google Maps V2 Animation with bearing

With the help of "android.location.Location.bearingTo(Location dest)", modify the last exercise "GoogleMap animation with zoom" to include bearing in Maps animation.


package com.example.androidmapsv2;

import java.util.ArrayList;
import java.util.List;

import com.google.android.gms.maps.CameraUpdateFactory;
import com.google.android.gms.maps.GoogleMap;
import com.google.android.gms.maps.GoogleMap.CancelableCallback;
import com.google.android.gms.maps.GoogleMap.OnMapClickListener;
import com.google.android.gms.maps.MapFragment;
import com.google.android.gms.maps.model.CameraPosition;
import com.google.android.gms.maps.model.LatLng;
import com.google.android.gms.maps.model.MarkerOptions;
import com.google.android.gms.maps.model.Polyline;
import com.google.android.gms.maps.model.PolylineOptions;

import android.location.Location;
import android.os.Bundle;
import android.app.Activity;
import android.app.FragmentManager;
import android.graphics.Color;
import android.view.View;
import android.view.View.OnClickListener;
import android.widget.Button;
import android.widget.SeekBar;
import android.widget.TextView;
import android.widget.Toast;

public class MainActivity extends Activity 
 implements OnMapClickListener{

 private GoogleMap myMap;
 PolylineOptions polylineOptions;
 Polyline polyline;
 List<LatLng> listPoint;
 int currentPt;
 
 TextView info;
 SeekBar zoomBar;
 
    @Override
    protected void onCreate(Bundle savedInstanceState) {
        super.onCreate(savedInstanceState);
        setContentView(R.layout.activity_main);
        
        FragmentManager myFragmentManager = getFragmentManager();
        MapFragment myMapFragment = 
          (MapFragment)myFragmentManager.findFragmentById(R.id.map);
        myMap = myMapFragment.getMap();
        
        myMap.setOnMapClickListener(this);
        
        listPoint = new ArrayList<LatLng>();
        clearPolyline();
        
        zoomBar = (SeekBar)findViewById(R.id.zoombgar);
        Button btnClear = (Button)findViewById(R.id.clear);
        Button btnAnimate = (Button)findViewById(R.id.animate);
        Button btnStop = (Button)findViewById(R.id.stopanimate);
        info = (TextView)findViewById(R.id.info);
        
        btnClear.setOnClickListener(new OnClickListener(){

   @Override
   public void onClick(View arg0) {
    clearPolyline();
   }});

        btnAnimate.setOnClickListener(btnAnimateOnClickListener);
        
        btnStop.setOnClickListener(new OnClickListener(){

   @Override
   public void onClick(View arg0) {
    myMap.stopAnimation();
   }});
        
        myMap.setMapType(GoogleMap.MAP_TYPE_HYBRID);
        myMap.getUiSettings().setZoomControlsEnabled(true);
        myMap.getUiSettings().setCompassEnabled(true);
        myMap.getUiSettings().setAllGesturesEnabled(true);
    }
    
    OnClickListener btnAnimateOnClickListener =
      new OnClickListener(){

    @Override
    public void onClick(View v) {
     if(listPoint==null || listPoint.isEmpty()){
      Toast.makeText(getApplicationContext(), 
        "Not enought point!", 
        Toast.LENGTH_LONG).show();
     }else{

      float zoomValue = (float)(zoomBar.getProgress() + 2);
      
      myMap.animateCamera(
        CameraUpdateFactory.zoomTo(zoomValue), 
        5000,
        MyCancelableCallback);      
      
      currentPt = 0-1;
      
      info.setText("Zoom to: " + String.valueOf(zoomValue));

     }
    }
     
    };
    
    private void clearPolyline(){
     if(polyline != null){
      polyline.remove();
     }
     
     polylineOptions = new PolylineOptions();
     polylineOptions.color(Color.RED);
     
     listPoint.clear();
     
     myMap.clear();
    }


 @Override
 public void onMapClick(LatLng point) {
  myMap.addMarker(new MarkerOptions().position(point).title(point.toString()));

  polylineOptions.add(point);
  if(polyline != null){
   polyline.remove();
  }
  
  polyline = myMap.addPolyline(polylineOptions);
  listPoint.add(point);
 }
 
 CancelableCallback MyCancelableCallback =
   new CancelableCallback(){

    @Override
    public void onCancel() {
     info.setText("onCancel()");
    }

    @Override
    public void onFinish() {

     if(++currentPt < listPoint.size()){
      
      //Get the current location
      Location startingLocation = new Location("starting point");
      startingLocation.setLatitude(myMap.getCameraPosition().target.latitude);
      startingLocation.setLongitude(myMap.getCameraPosition().target.longitude);
      
      //Get the target location
      Location endingLocation = new Location("ending point");
      endingLocation.setLatitude(listPoint.get(currentPt).latitude);
      endingLocation.setLongitude(listPoint.get(currentPt).longitude);
      
      //Find the Bearing from current location to next location
      float targetBearing = startingLocation.bearingTo(endingLocation);
      
      LatLng targetLatLng = listPoint.get(currentPt);
      float targetZoom = zoomBar.getProgress();
      
      //Create a new CameraPosition
      CameraPosition cameraPosition =
        new CameraPosition.Builder()
          .target(targetLatLng)
                         .bearing(targetBearing)
                         .zoom(targetZoom)
                         .build();
 
      
      myMap.animateCamera(
        CameraUpdateFactory.newCameraPosition(cameraPosition), 
        5000,
        MyCancelableCallback);
      info.setText("Animate to: " + listPoint.get(currentPt) + "\n" +
        "Bearing: " + targetBearing);


     }else{
      info.setText("onFinish()");
     }
     
    }
  
 };

}


download filesDownload the files.

The series:
A simple example using Google Maps Android API v2, step by step.

Get bearing between two location using android.location.Location

android.location.Location provide bearingTo(Location dest) method the approximate initial bearing in degrees East of true North when traveling along the shortest path between this location and the given location. The shortest path is defined using the WGS84 ellipsoid. Locations that are (nearly) antipodal may produce meaningless results.

Example:
      //Get the current location
      Location startingLocation = new Location("starting point");
      startingLocation.setLatitude(myMap.getCameraPosition().target.latitude);
      startingLocation.setLongitude(myMap.getCameraPosition().target.longitude);
      
      //Get the target location
      Location endingLocation = new Location("ending point");
      endingLocation.setLatitude(<target>.latitude);
      endingLocation.setLongitude(<target>.longitude);
      
      //Find the Bearing from current location to next location
      float targetBearing = startingLocation.bearingTo(endingLocation);


Sunday, February 3, 2013

GoogleMap animation with zoom

It's modified from the exercise "Animation on Google Maps Android API v2". Also enable various ui control, such as ZoomControls, Compass and All Gestures.


Re-allocate layout to include a seekbar to set the expected zoom level.
<LinearLayout xmlns:android="http://schemas.android.com/apk/res/android"
    xmlns:tools="http://schemas.android.com/tools"
    android:layout_width="match_parent"
    android:layout_height="match_parent"
    android:orientation="vertical"
    tools:context=".MainActivity" >
    <LinearLayout
        android:layout_width="match_parent"
        android:layout_height="wrap_content"
        android:orientation="vertical" >
        <LinearLayout 
            android:layout_width="match_parent"
            android:layout_height="wrap_content"
            android:orientation="horizontal">
            <Button
                android:id="@+id/clear"
             android:layout_width="0dp"
             android:layout_height="wrap_content"
             android:layout_weight="1"
             android:text="Clear" />
            <Button
                android:id="@+id/animate"
                android:layout_width="0dp"
                android:layout_height="wrap_content"
                android:layout_weight="1"
                android:text="Start" />
            <Button
                android:id="@+id/stopanimate"
                android:layout_width="0dp"
                android:layout_height="wrap_content"
                android:layout_weight="1"
                android:text="Stop" />
        </LinearLayout >
        <LinearLayout 
            android:layout_width="match_parent"
            android:layout_height="wrap_content"
            android:orientation="horizontal">
            <TextView
             android:layout_width="wrap_content"
             android:layout_height="wrap_content"
             android:text="Zoom" />
            <SeekBar
                android:id="@+id/zoombgar"
                android:layout_width="match_parent"
                android:layout_height="wrap_content"
                android:max="19"
                android:progress="0"
                android:text="Start" />
            <Button
                android:id="@+id/stopanimate"
                android:layout_width="0dp"
                android:layout_height="wrap_content"
                android:layout_weight="1"
                android:text="Stop" />
        </LinearLayout >
        <TextView 
            android:id="@+id/info"
            android:layout_width="match_parent"
            android:layout_height="wrap_content" />
    </LinearLayout>

    <fragment
        android:id="@+id/map"
        android:layout_width="match_parent"
        android:layout_height="match_parent"
        class="com.google.android.gms.maps.MapFragment"/>

</LinearLayout>


Modify the code to animate to the expected zoom level by calling animateCamera() method with CameraUpdateFactory.zoomTo(zoomValue), and animation duration also.
package com.example.androidmapsv2;

import java.util.ArrayList;
import java.util.List;

import com.google.android.gms.maps.CameraUpdateFactory;
import com.google.android.gms.maps.GoogleMap;
import com.google.android.gms.maps.GoogleMap.CancelableCallback;
import com.google.android.gms.maps.GoogleMap.OnMapClickListener;
import com.google.android.gms.maps.MapFragment;
import com.google.android.gms.maps.model.LatLng;
import com.google.android.gms.maps.model.MarkerOptions;
import com.google.android.gms.maps.model.Polyline;
import com.google.android.gms.maps.model.PolylineOptions;

import android.os.Bundle;
import android.app.Activity;
import android.app.FragmentManager;
import android.graphics.Color;
import android.view.View;
import android.view.View.OnClickListener;
import android.widget.Button;
import android.widget.SeekBar;
import android.widget.TextView;
import android.widget.Toast;

public class MainActivity extends Activity 
 implements OnMapClickListener{

 private GoogleMap myMap;
 PolylineOptions polylineOptions;
 Polyline polyline;
 List<LatLng> listPoint;
 int currentPt;
 
 TextView info;
 SeekBar zoomBar;
 
    @Override
    protected void onCreate(Bundle savedInstanceState) {
        super.onCreate(savedInstanceState);
        setContentView(R.layout.activity_main);
        
        FragmentManager myFragmentManager = getFragmentManager();
        MapFragment myMapFragment = 
          (MapFragment)myFragmentManager.findFragmentById(R.id.map);
        myMap = myMapFragment.getMap();
        
        myMap.setOnMapClickListener(this);
        
        listPoint = new ArrayList<LatLng>();
        clearPolyline();
        
        zoomBar = (SeekBar)findViewById(R.id.zoombgar);
        Button btnClear = (Button)findViewById(R.id.clear);
        Button btnAnimate = (Button)findViewById(R.id.animate);
        Button btnStop = (Button)findViewById(R.id.stopanimate);
        info = (TextView)findViewById(R.id.info);
        
        btnClear.setOnClickListener(new OnClickListener(){

   @Override
   public void onClick(View arg0) {
    clearPolyline();
   }});

        btnAnimate.setOnClickListener(btnAnimateOnClickListener);
        
        btnStop.setOnClickListener(new OnClickListener(){

   @Override
   public void onClick(View arg0) {
    myMap.stopAnimation();
   }});
        
        myMap.setMapType(GoogleMap.MAP_TYPE_HYBRID);
        myMap.getUiSettings().setZoomControlsEnabled(true);
        myMap.getUiSettings().setCompassEnabled(true);
        myMap.getUiSettings().setAllGesturesEnabled(true);
    }
    
    OnClickListener btnAnimateOnClickListener =
      new OnClickListener(){

    @Override
    public void onClick(View v) {
     if(listPoint==null || listPoint.isEmpty()){
      Toast.makeText(getApplicationContext(), 
        "Not enought point!", 
        Toast.LENGTH_LONG).show();
     }else{

      float zoomValue = (float)(zoomBar.getProgress() + 2);
      
      myMap.animateCamera(
        CameraUpdateFactory.zoomTo(zoomValue), 
        5000,
        MyCancelableCallback);      
      
      currentPt = 0-1;
      
      info.setText("Zoom to: " + String.valueOf(zoomValue));

     }
    }
     
    };
    
    private void clearPolyline(){
     if(polyline != null){
      polyline.remove();
     }
     
     polylineOptions = new PolylineOptions();
     polylineOptions.color(Color.RED);
     
     listPoint.clear();
     
     myMap.clear();
    }


 @Override
 public void onMapClick(LatLng point) {
  myMap.addMarker(new MarkerOptions().position(point).title(point.toString()));

  polylineOptions.add(point);
  if(polyline != null){
   polyline.remove();
  }
  
  polyline = myMap.addPolyline(polylineOptions);
  listPoint.add(point);
 }
 
 CancelableCallback MyCancelableCallback =
   new CancelableCallback(){

    @Override
    public void onCancel() {
     info.setText("onCancel()");
    }

    @Override
    public void onFinish() {
     if(++currentPt < listPoint.size()){
      myMap.animateCamera(
        CameraUpdateFactory.newLatLng(listPoint.get(currentPt)), 
        5000,
        MyCancelableCallback);
      info.setText("Animate to: " + listPoint.get(currentPt));
     }else{
      info.setText("onFinish()");
     }
     
    }
  
 };

}


Next:
- Google Maps V2 Animation with bearing

download filesDownload the files.

The series:
A simple example using Google Maps Android API v2, step by step.