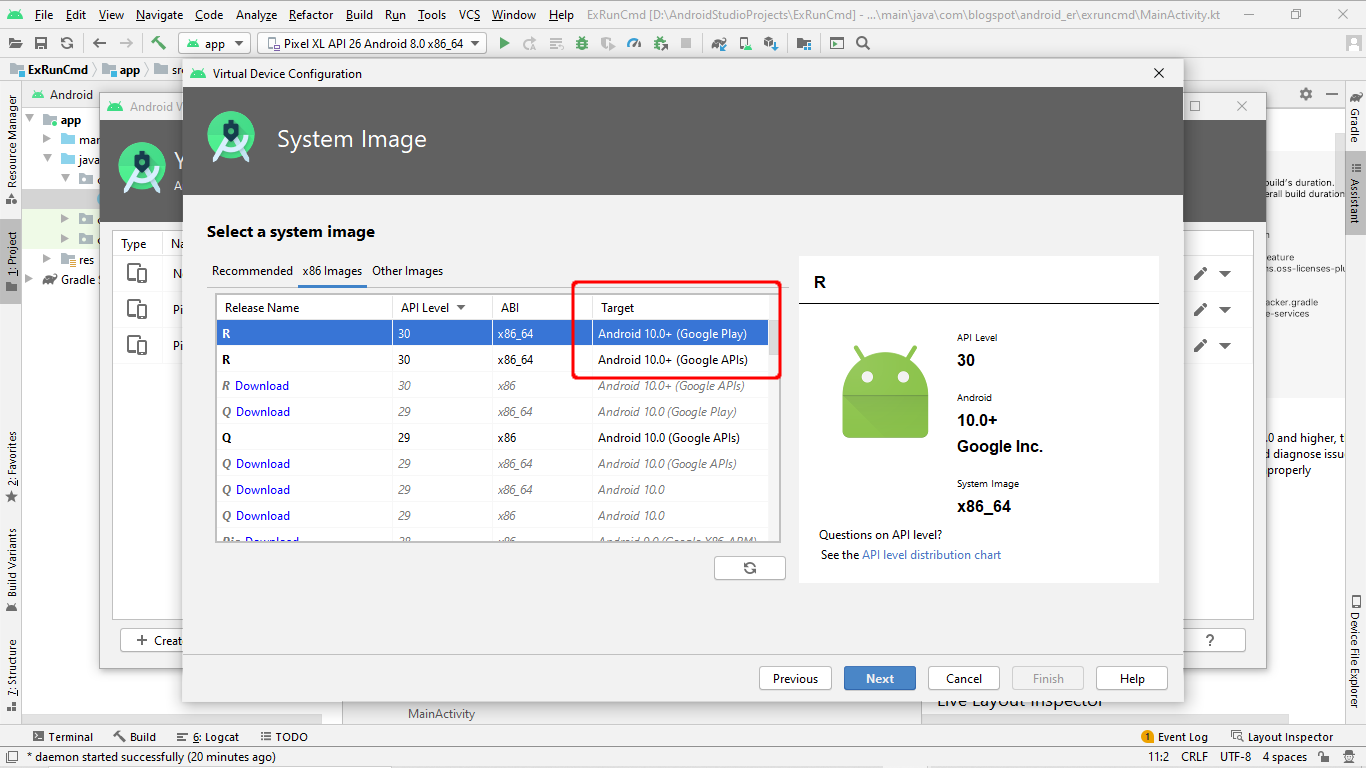
When you create a Android Virtual Device, you have to select a system image from a list of available images. Some marked Google Play, and some marked Google APIs, so what's the difference?
A system image labeled with Google APIs includes access to Google Play services. A system image labeled with the Google Play logo in the Play Store column includes the Google Play Store app and access to Google Play services.
With Android Studio updated (currently 3.6.2), when you view layout xml file, the original design/code option (on lower-left corner) removed. So how to view its xml code?
Answer: The option is now moved to upper-right corner, you can view it in Code/Splite/Design view.
With latest Android Studio, I change the targetSdkVersion and compileSdkVersion of my old exercise to 28. And I also have to use updated com.android.support:appcompat-v7 and com.android.support.constraint:constraint-layout. After fail in rebuild, it's a number of WARNING and ERROR.
----------------------------- ERROR: Failed to resolve: com.android.support:appcompat-v7:28.0.0 Add Google Maven repository and sync project Show in Project Structure dialog Affected Modules: app ERROR: Failed to resolve: com.android.support.constraint:constraint-layout:1.1.3 Add Google Maven repository and sync project Show in Project Structure dialog Affected Modules: app WARNING: Configuration 'compile' is obsolete and has been replaced with 'implementation' and 'api'. It will be removed at the end of 2018. For more information see: http://d.android.com/r/tools/update-dependency-configurations.html Affected Modules: app WARNING: Configuration 'testCompile' is obsolete and has been replaced with 'testImplementation'. It will be removed at the end of 2018. For more information see: http://d.android.com/r/tools/update-dependency-configurations.html Affected Modules: app WARNING: Configuration 'androidTestCompile' is obsolete and has been replaced with 'androidTestImplementation'. It will be removed at the end of 2018. For more information see: http://d.android.com/r/tools/update-dependency-configurations.html Affected Modules: app
-----------------------------
As suggested, I change 'compile', 'testCompile' and 'androidTestCompile' to 'implementation', 'testImplementation' and 'androidTestImplementation', in app/build.gradle.
To fix the error of Failed to resolve: com.android.support:appcompat-v7:28.0.0 and com.android.support.constraint:constraint-layout:1.1.3, I add the follow lines of Google Maven repository to build.gradle.
        maven {
            url 'https://maven.google.com/'
            name 'Google'
        }
And rebuild the project. At least it works for me now.
So, how to know the latest version of com.android.support:appcompat-v7 and com.android.support.constraint:constraint-layout?
28.0.0 is the recentest stable release of Support Library released on September 21, 2018 and will be the last feature release under the android.support packaging.
It's a reference to built-in XML layout that is part of the Android OS, HERE. Basically, all reference start with android.R is reference to Android built-in resource.
You can locate the source file in your development setup from Android Studio (BUT DON'T EDIT IT):
> Select it and right click > Go to > Declaration
Android Studio will open it for you, and the location will be shown on top bar.
The video show how to set Java version on Studio 3.3.1.
By default, the Java language version used to compile your project is based on your project's compileSdkVersion (because different versions of Android support different versions of Java). If necessary, you can override this default Java version by adding the following CompileOptions {} block to your build.gradle file:
You can also set using Android Studio menu:
- File > Project Structure.
- In Structure Project dialog, Select App on the left, and select Properties tab.
- You can see option boxes of Source Compatibility and Target Compatibility).
sourceCompatibility vs targetCompatibility
According to Gradle documentation:
JavaVersion sourceCompatibility - Java version compatibility to use when compiling Java source. Default value: version of the current JVM in use JavaVersion. Can also set using a String or a Number, e.g. '1.5' or 1.5.
JavaVersion targetCompatibility - Java version to generate classes for. Default value: sourceCompatibility. Can also set using a String or Number, e.g. '1.5' or 1.5.
Android can reclaim memory from your app or kill your app entirely if necessary to free up memory for critical tasks. To help balance the system memory and avoid the system's need to kill your app process, you can implement the ComponentCallbacks2 interface and override onTrimMemory() callback method to listen for memory related events when your app is in either the foreground or the background, and then release objects in response to app lifecycle or system events that indicate the system needs to reclaim memory.
When the system begins killing processes in the LRU cache, it primarily works bottom-up. The system also considers which processes consume more memory and thus provide the system more memory gain if killed.The less memory you consume while in the LRU list overall, the better your chances are to remain in the list and be able to quickly resume.
Here is a example code to implement the ComponentCallbacks2 interface and override onTrimMemory() callback method.
package com.blogspot.android_er.androidontrimmemory;

import android.content.ComponentCallbacks2;
import android.os.Bundle;
import android.support.v7.app.AppCompatActivity;
import android.util.Log;

/*
http://android-er.blogspot.com/
Example to use onTrimMemory()
 */
public class MainActivity extends AppCompatActivity
        implements ComponentCallbacks2 {

    private static final String TAG = "MyActivity";

    @Override
    protected void onCreate(Bundle savedInstanceState) {
        super.onCreate(savedInstanceState);
        setContentView(R.layout.activity_main);

        Log.v(TAG, "onCreate() called");
    }

    public void onTrimMemory(int level){
        Log.v(TAG, "onTrimMemory(" + level + ")");
        switch(level){

            case ComponentCallbacks2.TRIM_MEMORY_UI_HIDDEN:
                Log.v(TAG, "TRIM_MEMORY_UI_HIDDEN");
                break;
            case ComponentCallbacks2.TRIM_MEMORY_RUNNING_MODERATE:
                Log.v(TAG, "TRIM_MEMORY_RUNNING_MODERATE");
                break;
            case ComponentCallbacks2.TRIM_MEMORY_RUNNING_LOW:
                Log.v(TAG, "TRIM_MEMORY_RUNNING_LOW");
                break;
            case ComponentCallbacks2.TRIM_MEMORY_RUNNING_CRITICAL:
                Log.v(TAG, "TRIM_MEMORY_RUNNING_CRITICA");
                break;
            case ComponentCallbacks2.TRIM_MEMORY_BACKGROUND:
                Log.v(TAG, "TRIM_MEMORY_BACKGROUND");
                break;
            case ComponentCallbacks2.TRIM_MEMORY_MODERATE:
                Log.v(TAG, "TRIM_MEMORY_MODERATE");
                break;
            case ComponentCallbacks2.TRIM_MEMORY_COMPLETE:
                Log.v(TAG, "TRIM_MEMORY_COMPLETE");
                break;

            default:
                Log.v(TAG, "default");
        }
    }

}
To simulate the memory low condition, you can use the adb command:
adb shell am send-trim-memory
Example for my case, it's:
adb shell am send-trim-memory com.blogspot.android_er.androidontrimmemory MODERATE
Notice that you cannot set background level if your app is in foreground. Otherwise the following exception will be thrown, as shown in the video.
java.lang.IllegalArgumentException: Unable to set a background trim level on a foreground process
Dex In Process (introduced from Android 2.1) is a feature that can improve build times, as well as Instant Run performance. To take advantage of Dex In Process, you’ll need to modify your gradle.properties file and increase the amount of memory allocated to the Gradle Daemon VM to a minimum of 2 Gb, using the org.gradle.jvmargs property.
Android Studio 3.0 brings a ton of new features and improvements, including Kotlin support, Android O APIs, Java 8 language features support, external APK debugging, Instant Apps modules and refactoring, an integrated Android Profiler and more.
Migrating to Android Gradle Plugin 3.0.0:
Android Studio 3.0: Android Profiler:
Android Studio 3.0: Java 8 Language Features Support:
Download Android Studio 3.0 Canary, visit https://developer.android.com/studio/preview/index.html
Unpack the ZIP file, to any directory you want.
Open a terminal, navigate into <android-studio>/bin/ and execute studio.sh
If you install Android Studio on 64-bit Linux and reported with error: Unable to run mksdcard SDK tool
Most probably some 32-bit libraries are missed.
If you are running a 64-bit version of Ubuntu, you need to install some 32-bit libraries with the following command: sudo apt-get install libc6:i386 libncurses5:i386 libstdc++6:i386 lib32z1 lib32bz2-1.0
If you are running 64-bit Fedora, the command is: sudo yum install zlib.i686 ncurses-libs.i686 bzip2-libs.i686
The errors reported: E: Unable to locate package lib32bz2-1.0 E: Couldn't find any package by glob 'lib32bz2-1.0' E: Couldn't find any package by regex 'lib32bz2-1.0'
To fixed it, add 32 bit architecture with the command:
The new Layout Editor in Android Studio 2.2 include a new blueprint mode, revamped properties inspector and support for ConstraintLayout, a new way to define layouts for your apps.
In this Android Tool Time episode Wojtek Kaliciński shows you the basics of working with ConstraintLayouts in the visual editor. If you want to try it out yourself, you can find our codelab here: https://codelabs.developers.google.com/codelabs/constraint-layout
When you’re familiar with the layout editor interface, read the rest of our Medium article where you’ll find some more advanced tips and tricks for ConstraintLayout: https://goo.gl/a5orYw
When I prepare the example "Display PDF in assets folder (inside APK)", I face with the error of "java.io.IOException: not create document. Error". It should be generated by the code:
As the dominant mobile platform today, the Android OS is a powerful and flexible platform for mobile device. The new Android 7 release (New York Cheesecake) boasts significant new features and enhancements for both smartphone and tablet applications. This step-by-step resource takes a hands-on approach to teaching you how to create Android applications for the latest OS and the newest devices, including both smartphones and tablets.
Shows you how to install, get started with, and use Android Studio 2 - the simplest Android developer tool ever for beginners
Addresses how to display notifications, create rich user interfaces, and use activities and intents
Reviews mastering views and menus and managing data
Discusses working with SMS
Looks at packaging and publishing applications to the Android market
Beginning Android Programming with Android Studio starts with the basics and goes on to provide you with everything you need to know to begin to successfully develop your own Android applications.