It is a common case that the POWER button of your phone is broken, such that you cannot power it on in power-off mode. This video show how to power up Xiaomi phone in Recovery Mode, then switch to normal mode, without POWER button.
How to power-on without using POWER button, Xiaomi/Redmi Phone
When phone is Power OFF: Press and Hold VOL-UP button, Insert USB Power cable, to enter Recovery Mode.
With Reboot option selected, just WAIT, the phone will reboot in around 4 minutes.
Tested on Xiaomi Mi 10 Lite 5G, also Redmi 5 Plus/Note 4X.
By default, Oracle VirtualBox support USB 1.1 only. This video show how to enable USB 2.0/3.0 for VirtualBox 6.0.4/Windows 10 by installing VirtualBox Extension Pack.
Visit VirtualBox Downloads page, scroll down to download and install VirtualBox 6.0.4 Oracle VM VirtualBox Extension Pack.
Support for USB 2.0 and USB 3.0 devices, VirtualBox RDP, disk encryption, NVMe and PXE boot for Intel cards. See this chapter from the User Manual for an introduction to this Extension Pack. The Extension Pack binaries are released under the VirtualBox Personal Use and Evaluation License (PUEL). Please install the same version extension pack as your installed version of VirtualBox.
JetBrains Toolbox App is a lightweight cross-platform companion application for JetBrains' coding tools, to manage installed tools, download new ones and open recent projects.
System requirement to install Toolbox App for Linux:
64-bit x86, glibc 2.17 (Ubuntu 14.04 or newer). JetBrains Toolbox App is packaged in AppImage and requires FUSE to run.
To check the version of your glibc, it's a simple method, using ldd command in Terminal: $ ldd --version
It will show something like this:
ldd (Ubuntu GLIBC 2.27-3ubuntu1) 2.27
To install and set FUSE, follow the steps in AppImage Wiki.
To install RedMi 2 (紅米手機2) USB and ADB drivers, tested on Windows 10:
- Plug in your phone to PC, using USB cable. You will find a CD Driver, click to run the Setup.
- It will install the Xiaomi Assistance program, USB and ADB driver.
To enable USB debug, you have to allow USB debugging on your phone.
To enable ADB Wireless debugging, your PC and your phone should be in the same WiFi network:
- Switch to platform-tools directory, normally in "C:\Program Files (x86)\Android\android-sdk\platform-tools"
- Run "adb devices", you should find the usb connected device.
- Run "adb tcpip 5555" to reset the tcpip connection.
- Run "adb connect <your phone's IP>" to connect adb with wireless
- Run "adb devices" again, you should find both the usb connected and WiFi connected devices.
- Now, you can remove the USB connection, and debug with ADB wirelessly.
Intel® Processor Identification Utility is designed to identify current Intel® Processors and technologies, and it enables you to run and save a processor ID report. The utility also features a frequency test to make sure that the processor is working at the rated speed.
This video walks you through how to download and install the application. It also provides an overview of the most common technologies supported by the processor.
To know version of the installed Google Play services on your Android devices, go to Setting -> Apps Manager, tap Google Play services to view App info.
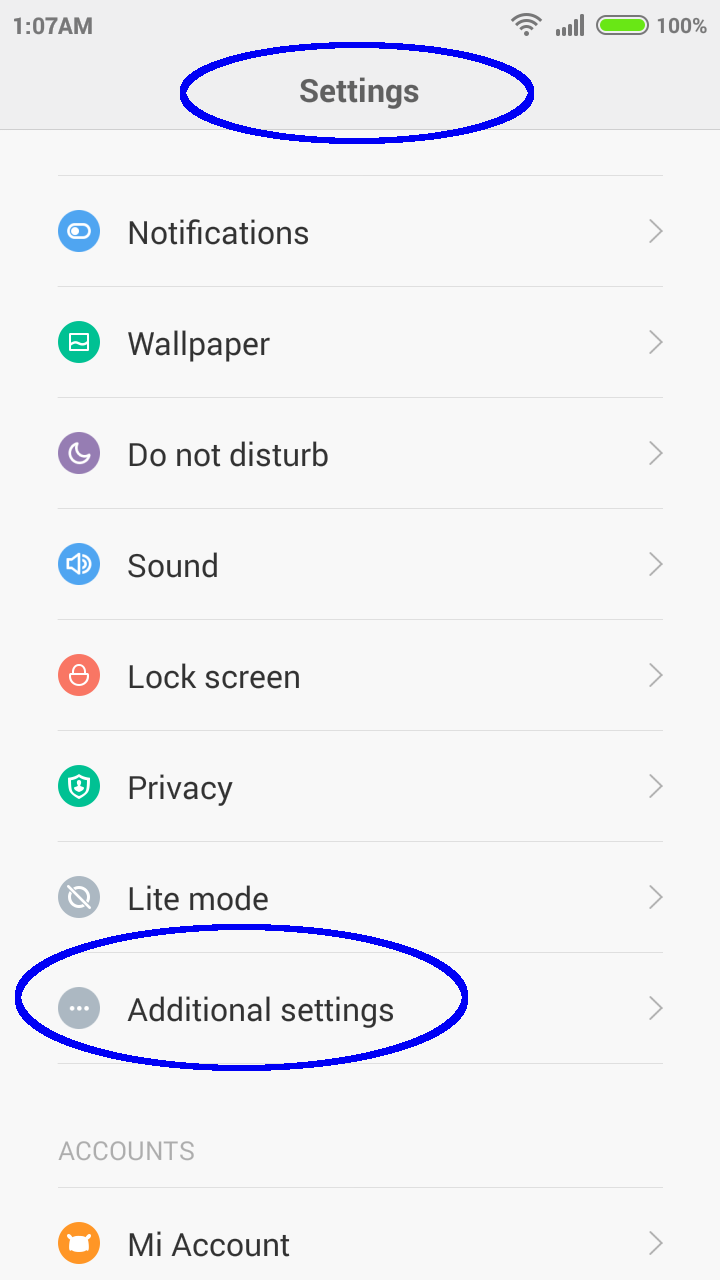
To enable Developer Options on Xiaomi Redmi 2 (紅米手機2), running Android 4.4.4:
> Settings
> About phone
> Tap on "MIUI version" 7 times to enable Developer Options.
Once enabled, to access Developer Options:
> Settings
> Additional settings
> Developer options
This video show how to set up Google Play Services on Eclipse with Android SDK, reference Google document Setting Up Google Play Services.
Include how to:
- Install Google Play services SDK using Android SDK Manager.
- Import library project google-play-services_lib.
- Add referencing to google-play-services_lib in your project.
- Modify AndroidManifest.xml, to add <meta-data android:name="com.google.android.gms.version" android:value="@integer/google_play_services_version" /> under <application>.
Also override onResume() method, to call GooglePlayServicesUtil.isGooglePlayServicesAvailable() method to test our setup.
Then finally, try something wrong, in case:
- With google-play-services_lib project closed, Errors of java.lang.NullPointerException occurred during the build.
- Without <meta-data...> in AndroidManifest.xml, no error in compiling, but fail in run time.
- Without referencing to google-play-services_lib, cannot resolve com.google
Once you've set up your project to reference the library project, you can begin developing features with the Google Play services APIs.
Recently after updated SDK on Android-Eclipse, tried to import my old example, and have the following error reported:
Found 2 versions of android-support-v4.jar in the dependency list, but not all the versions are identical (check is based on SHA-1 only at this time). ...
My solution is to delete the file android-support-v4.jar in libs folder of my project.
Normally we will call getContentResolver() in our Activity or ActionBarActivity... to get a ContentResolver instance for your application's package. In case you try to call it at seperate class, you will be reported error of "The method getContentResolver() is undefined for the type...". You have to pass Context of your activity to the another class to call getContentResolver(), as shown in the video.
This example also show different ContentResolver return with different context passed.
Open Setting -> Language & input, scroll down to Keyboard & Input Method. If you see the option of iWnn IME (Emoji), that means your device built-in support Emoji input. Check to enable it.
When you enter text, press and hold SpaceBar, to switch to Emoji (iWnn IME).
It's a common error "The import android.support.v7 cannot be resolved" on import android.support.v7.app.ActionBarActivity; and "ActionBarActivity cannot be resolved to a type" on extends ActionBarActivity. It may be various reason to cause it. One of the reason is the auto-generated project appcompat_v7 closed.
This post show how to install VirtualBox 4.3 on Ubuntu 14.04, from repository.
The list of repository sources can be found at https://www.virtualbox.org/wiki/Linux_Downloads. For 14.04 ("Trusty Tahr"), it is "deb http://download.virtualbox.org/virtualbox/debian trusty contrib".
Run the command to add apt repository to your sources list:
$ sudo add-apt-repository "deb http://download.virtualbox.org/virtualbox/debian trusty contrib"
Before update apt source list, you have to add Oracle public key. Download the Oracle public key for apt-secure (oracle_vbox.asc) from the same page. It should be like this.
Then run the command:
$ sudo apt-key add oracle_vbox.asc
After install fresh Ubuntu 14.04.1 and Eclipse ADT with Android SDK, 'Android SDK Content Loader' has encountered a problem of parseSdkContent failed, Could not initialize class android.graphics.Typeface.
To fix it, delete Android L (API 20, L preview) in Android SDK Manager and restart Eclipse. It work in my case. Even re-install Android L (API 20, L preview).
#
# A fatal error has been detected by the Java Runtime Environment:
#
#  SIGSEGV (0xb) at pc=0x6115b86d, pid=4231, tid=3076355840
#
# JRE version: Java(TM) SE Runtime Environment (8.0_11-b12) (build 1.8.0_11-b12)
# Java VM: Java HotSpot(TM) Client VM (25.11-b03 mixed mode linux-x86 )
# Problematic frame:
# C  [libsoup-2.4.so.1+0x5486d]  soup_session_feature_detach+0x1d
#
# Failed to write core dump. Core dumps have been disabled. To enable core dumping, try "ulimit -c unlimited" before starting Java again
#
# An error report file with more information is saved as:
# /home/u/Android/eclipse/hs_err_pid4231.log
#
# If you would like to submit a bug report, please visit:
#   http://bugreport.sun.com/bugreport/crash.jsp
# The crash happened outside the Java Virtual Machine in native code.
# See problematic frame for where to report the bug.
#
This solution work for me:
Edit the file <Android SDK-Eclipse folder>/eclipse/eclipse.ini.
Insert the line: -Dorg.eclipse.swt.browser.DefaultType=mozilla
By default, the bottom bar will disappear when running RecordMyDesktop to record your screen activity. To fix it, run with Extra Options of --no-frame.
- Click Advanced button.
- Select Misc tab.
- Enter "--no-frame" in Extra Options box.