Saturday, October 29, 2011

Generate Random number, Random()

java.util.Random is a class provides methods that return pseudo-random values.

Normally (in other language/system), we will generate random number with seek of current time, to try to make the pseudo-random un-predictable. But in case of Android, it's not necessary and not recommended - Because "It is dangerous to seed Random with the current time because that value is more predictable to an attacker than the default seed." - refer to Android document java.util.Random.

The default constructs, Random(), already come with an initial state that is unlikely to be duplicated by a subsequent instantiation.

Here is a example to generate 10 integer using Random().

Generate Random number, Random()

package com.exercise.AndroidRandom;

import java.util.Random;

import android.app.Activity;
import android.os.Bundle;
import android.view.View;
import android.widget.Button;
import android.widget.TextView;

public class AndroidRandomActivity extends Activity {

Button generateRandom;
TextView randomResult;
Random myRandom;

/** Called when the activity is first created. */
@Override
public void onCreate(Bundle savedInstanceState) {
super.onCreate(savedInstanceState);
setContentView(R.layout.main);
generateRandom = (Button)findViewById(R.id.generate);
randomResult = (TextView)findViewById(R.id.randomresult);

generateRandom.setOnClickListener(new Button.OnClickListener(){

@Override
public void onClick(View arg0) {
// TODO Auto-generated method stub
String result = "";
myRandom = new Random();

for(int i = 0; i < 10; i++){
result += String.valueOf(myRandom.nextInt()) + "\n";
}

randomResult.setText(result);
}});

}
}


<?xml version="1.0" encoding="utf-8"?>
<LinearLayout xmlns:android="http://schemas.android.com/apk/res/android"
android:orientation="vertical"
android:layout_width="fill_parent"
android:layout_height="fill_parent"
>
<TextView
android:layout_width="fill_parent"
android:layout_height="wrap_content"
android:text="@string/hello"
/>
<Button
android:id="@+id/generate"
android:layout_width="fill_parent"
android:layout_height="wrap_content"
android:text="Generate Random Number"
/>
<TextView
android:id="@+id/randomresult"
android:layout_width="fill_parent"
android:layout_height="wrap_content"
/>
</LinearLayout>

Friday, October 28, 2011

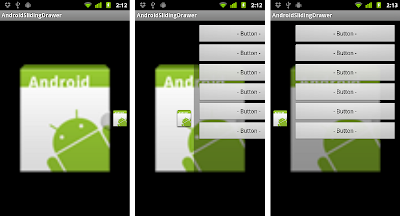
Inflate SlidingDrawer from XML

Inflate SlidingDrawer from XML

To inflate SlidingDrawer from XML, create our SlidingDrawer, /res/layout/horizontalslidingdrawer.xml.
<?xml version="1.0" encoding="utf-8"?>
<SlidingDrawer xmlns:android="http://schemas.android.com/apk/res/android"
android:id="@+id/drawer"
android:layout_width="fill_parent"
android:layout_height="fill_parent"
android:orientation="horizontal"
android:handle="@+id/handle"
android:content="@+id/content">
<ImageView
android:id="@id/handle"
android:layout_width="wrap_content"
android:layout_height="fill_parent"
android:src="@drawable/icon"/>
<LinearLayout
android:id="@id/content"
android:layout_width="fill_parent"
android:layout_height="fill_parent"
android:orientation="vertical"
android:padding="10dp"
android:background="#55000000">
<Button
android:layout_width="fill_parent"
android:layout_height="wrap_content"
android:text=" - Button - "/>
<Button
android:layout_width="fill_parent"
android:layout_height="wrap_content"
android:text=" - Button - "/>
<Button
android:layout_width="fill_parent"
android:layout_height="wrap_content"
android:text=" - Button - "/>
<Button
android:layout_width="fill_parent"
android:layout_height="wrap_content"
android:text=" - Button - "/>
<Button
android:layout_width="fill_parent"
android:layout_height="wrap_content"
android:text=" - Button - "/>
<Button
android:layout_width="fill_parent"
android:layout_height="wrap_content"
android:text=" - Button - "/>
</LinearLayout>
</SlidingDrawer>


In Java:
package com.exercise.SlidingDrawer;

import android.app.Activity;
import android.content.Context;
import android.os.Bundle;
import android.view.LayoutInflater;
import android.view.ViewGroup.LayoutParams;
import android.widget.LinearLayout;
import android.widget.SlidingDrawer;

public class AndroidSlidingDrawerActivity extends Activity {

/** Called when the activity is first created. */
@Override
public void onCreate(Bundle savedInstanceState) {
super.onCreate(savedInstanceState);

LinearLayout mainLayout = new LinearLayout(this);
LayoutParams mainLayoutParams
= new LayoutParams(LayoutParams.FILL_PARENT,
LayoutParams.FILL_PARENT);
mainLayout.setLayoutParams(mainLayoutParams);
mainLayout.setOrientation(LinearLayout.VERTICAL);

LayoutInflater inflater
= (LayoutInflater)getSystemService(
Context.LAYOUT_INFLATER_SERVICE);
SlidingDrawer mySlidingDrawer
= (SlidingDrawer)inflater.inflate(
R.layout.horizontalslidingdrawer,
mainLayout, false);
mainLayout.addView(mySlidingDrawer);

setContentView(mainLayout);

}
}


Related:
- SlidingDrawer in vertical
- SlidingDrawer in horizontal

Thursday, October 27, 2011

Get XML parse event; using XmlResourceParser.getEventType()

The XML parsing interface returned for an XML resource. This is a standard XmlPullParser interface, as well as an extended AttributeSet interface and an additional close() method on this interface for the client to indicate when it is done reading the resource.

Normally, xml file will be placed under /res/xml/ folder; as a example /res/layout/main.xml is used here.

Get XML parse event; using XmlResourceParser.getEventType()

package com.exercise.XmlResourceParser;

import java.io.IOException;

import org.xmlpull.v1.XmlPullParser;
import org.xmlpull.v1.XmlPullParserException;

import android.app.Activity;
import android.content.res.XmlResourceParser;
import android.os.Bundle;
import android.widget.TextView;

public class AndroidXmlParserActivity extends Activity {
/** Called when the activity is first created. */
@Override
public void onCreate(Bundle savedInstanceState) {
super.onCreate(savedInstanceState);
setContentView(R.layout.main);
TextView result = (TextView)findViewById(R.id.result);

String XmlParseResult = getXmlEvent();
result.setText(XmlParseResult);
}

private String getXmlEvent(){
String xmlResult = "";

//Normally, the XML files should be placed under /res/xml/ folder
//XmlResourceParser xmlResourceParser = getResources().getXml(R.xml.xxx);
XmlResourceParser xmlResourceParser = getResources().getXml(R.layout.main);

try {
int eventType;
do{
xmlResourceParser.next();
eventType = xmlResourceParser.getEventType();

switch(eventType){
case XmlPullParser.START_DOCUMENT:
xmlResult += "START_DOCUMENT\n";
break;
case XmlPullParser.END_DOCUMENT:
xmlResult += "END_DOCUMENT\n";
break;
case XmlPullParser.START_TAG:
xmlResult += "START_TAG: " + xmlResourceParser.getName() + "\n";
break;
case XmlPullParser.END_TAG:
xmlResult += "END_TAG: " + xmlResourceParser.getName() + "\n";
break;
case XmlPullParser.TEXT:
xmlResult += "TEXT: " + xmlResourceParser.getText() + "\n";
break;
}

}while (eventType != XmlPullParser.END_DOCUMENT);

} catch (XmlPullParserException e) {
// TODO Auto-generated catch block
e.printStackTrace();
} catch (IOException e) {
// TODO Auto-generated catch block
e.printStackTrace();
}

return xmlResult;
}
}


/res/layout/main.xml
<?xml version="1.0" encoding="utf-8"?>
<LinearLayout xmlns:android="http://schemas.android.com/apk/res/android"
android:orientation="vertical"
android:layout_width="fill_parent"
android:layout_height="fill_parent"
>
<TextView
android:layout_width="fill_parent"
android:layout_height="wrap_content"
android:text="@string/hello"
/>
<TextView
android:id="@+id/result"
android:layout_width="fill_parent"
android:layout_height="wrap_content"
/>
</LinearLayout>


Download the files.


Wednesday, October 26, 2011

Video Capture using MediaRecorder with Flash Light

During video recording using MediaRecorder, we can control the build-in flash light via Camera.setParameters().

Video Capture using MediaRecorder with Flash Light

Modify from the article "A simple exercise of Video Capture using MediaRecorder, for Android 2.3 or higher":

package com.exercise.AndroidVideoCapture;

import java.io.IOException;

import android.app.Activity;
import android.content.Context;
import android.hardware.Camera;
import android.hardware.Camera.Parameters;
import android.media.CamcorderProfile;
import android.media.MediaRecorder;
import android.os.Bundle;
import android.view.MotionEvent;
import android.view.SurfaceHolder;
import android.view.SurfaceView;
import android.view.View;
import android.widget.Button;
import android.widget.FrameLayout;
import android.widget.RadioButton;
import android.widget.Toast;

public class AndroidVideoCapture extends Activity{

private Camera myCamera;
private MyCameraSurfaceView myCameraSurfaceView;
private MediaRecorder mediaRecorder;

Button myButton;
RadioButton flashOff, flashTorch;
SurfaceHolder surfaceHolder;
boolean recording;

/** Called when the activity is first created. */
@Override
public void onCreate(Bundle savedInstanceState) {
super.onCreate(savedInstanceState);

recording = false;

setContentView(R.layout.main);

//Get Camera for preview
myCamera = getCameraInstance();
if(myCamera == null){
Toast.makeText(AndroidVideoCapture.this,
"Fail to get Camera",
Toast.LENGTH_LONG).show();
}

myCameraSurfaceView = new MyCameraSurfaceView(this, myCamera);
FrameLayout myCameraPreview = (FrameLayout)findViewById(R.id.videoview);
myCameraPreview.addView(myCameraSurfaceView);

myButton = (Button)findViewById(R.id.mybutton);
myButton.setOnClickListener(myButtonOnClickListener);

flashOff = (RadioButton)findViewById(R.id.flashoff);
flashTorch = (RadioButton)findViewById(R.id.flashtorch);
}

Button.OnTouchListener flashButtonOnTouchListener
= new Button.OnTouchListener(){

@Override
public boolean onTouch(View arg0, MotionEvent arg1) {
// TODO Auto-generated method stub

if(myCamera != null){
Parameters parameters = myCamera.getParameters();

switch (arg1.getAction()){
case MotionEvent.ACTION_DOWN:
parameters.setFlashMode(Parameters.FLASH_MODE_TORCH);
myCamera.setParameters(parameters);
break;
case MotionEvent.ACTION_UP:
parameters.setFlashMode(Parameters.FLASH_MODE_OFF);
myCamera.setParameters(parameters);
break;
};
}

return true;
}};

Button.OnClickListener flashModeButtonOnClickListener
= new Button.OnClickListener(){

@Override
public void onClick(View v) {
// TODO Auto-generated method stub

}
};

Button.OnClickListener myButtonOnClickListener
= new Button.OnClickListener(){

@Override
public void onClick(View v) {
// TODO Auto-generated method stub
if(recording){
// stop recording and release camera
mediaRecorder.stop(); // stop the recording
releaseMediaRecorder(); // release the MediaRecorder object

//Exit after saved
finish();
}else{

//Release Camera before MediaRecorder start
releaseCamera();

if(!prepareMediaRecorder()){
Toast.makeText(AndroidVideoCapture.this,
"Fail in prepareMediaRecorder()!\n - Ended -",
Toast.LENGTH_LONG).show();
finish();
}

mediaRecorder.start();
recording = true;
myButton.setText("STOP");
}
}};

private Camera getCameraInstance(){
// TODO Auto-generated method stub
Camera c = null;
try {
c = Camera.open(); // attempt to get a Camera instance
}
catch (Exception e){
// Camera is not available (in use or does not exist)
}
return c; // returns null if camera is unavailable
}


private String getFlashModeSetting(){
if(flashTorch.isChecked()){
return Parameters.FLASH_MODE_TORCH;
}else {
return Parameters.FLASH_MODE_OFF;
}
}

private boolean prepareMediaRecorder(){
myCamera = getCameraInstance();

Parameters parameters = myCamera.getParameters();
parameters.setFlashMode(getFlashModeSetting());
myCamera.setParameters(parameters);

mediaRecorder = new MediaRecorder();

myCamera.unlock();
mediaRecorder.setCamera(myCamera);

mediaRecorder.setAudioSource(MediaRecorder.AudioSource.CAMCORDER);
mediaRecorder.setVideoSource(MediaRecorder.VideoSource.CAMERA);

mediaRecorder.setProfile(CamcorderProfile.get(CamcorderProfile.QUALITY_HIGH));

mediaRecorder.setOutputFile("/sdcard/myvideo.mp4");
mediaRecorder.setMaxDuration(60000); // Set max duration 60 sec.
mediaRecorder.setMaxFileSize(5000000); // Set max file size 5M

mediaRecorder.setPreviewDisplay(myCameraSurfaceView.getHolder().getSurface());

try {
mediaRecorder.prepare();
} catch (IllegalStateException e) {
releaseMediaRecorder();
return false;
} catch (IOException e) {
releaseMediaRecorder();
return false;
}
return true;

}

@Override
protected void onPause() {
super.onPause();
releaseMediaRecorder(); // if you are using MediaRecorder, release it first
releaseCamera(); // release the camera immediately on pause event
}

private void releaseMediaRecorder(){
if (mediaRecorder != null) {
mediaRecorder.reset(); // clear recorder configuration
mediaRecorder.release(); // release the recorder object
mediaRecorder = null;
myCamera.lock(); // lock camera for later use
}
}

private void releaseCamera(){
if (myCamera != null){
myCamera.release(); // release the camera for other applications
myCamera = null;
}
}

public class MyCameraSurfaceView extends SurfaceView implements SurfaceHolder.Callback{

private SurfaceHolder mHolder;
private Camera mCamera;

public MyCameraSurfaceView(Context context, Camera camera) {
super(context);
mCamera = camera;

// Install a SurfaceHolder.Callback so we get notified when the
// underlying surface is created and destroyed.
mHolder = getHolder();
mHolder.addCallback(this);
// deprecated setting, but required on Android versions prior to 3.0
mHolder.setType(SurfaceHolder.SURFACE_TYPE_PUSH_BUFFERS);
}

@Override
public void surfaceChanged(SurfaceHolder holder, int format, int weight,
int height) {
// If your preview can change or rotate, take care of those events here.
// Make sure to stop the preview before resizing or reformatting it.

if (mHolder.getSurface() == null){
// preview surface does not exist
return;
}

// stop preview before making changes
try {
mCamera.stopPreview();
} catch (Exception e){
// ignore: tried to stop a non-existent preview
}

// make any resize, rotate or reformatting changes here

// start preview with new settings
try {
mCamera.setPreviewDisplay(mHolder);
mCamera.startPreview();

} catch (Exception e){
}
}

@Override
public void surfaceCreated(SurfaceHolder holder) {
// TODO Auto-generated method stub
// The Surface has been created, now tell the camera where to draw the preview.
try {
mCamera.setPreviewDisplay(holder);
mCamera.startPreview();
} catch (IOException e) {
}
}

@Override
public void surfaceDestroyed(SurfaceHolder holder) {
// TODO Auto-generated method stub

}
}
}


main.xml
<?xml version="1.0" encoding="utf-8"?>
<LinearLayout xmlns:android="http://schemas.android.com/apk/res/android"
android:orientation="vertical"
android:layout_width="fill_parent"
android:layout_height="fill_parent"
>
<LinearLayout
android:orientation="horizontal"
android:layout_width="fill_parent"
android:layout_height="fill_parent"
>
<FrameLayout
android:id="@+id/videoview"
android:layout_width="720px"
android:layout_height="480px"/>
<LinearLayout
android:orientation="vertical"
android:layout_width="fill_parent"
android:layout_height="fill_parent">
<Button
android:id="@+id/mybutton"
android:layout_width="fill_parent"
android:layout_height="wrap_content"
android:text="REC"
android:textSize="12dp"/>
<RadioGroup
android:layout_width="fill_parent"
android:layout_height="wrap_content"
android:orientation="vertical">
<RadioButton
android:id="@+id/flashoff"
android:layout_width="wrap_content"
android:layout_height="wrap_content"
android:text="OFF"
android:textSize="8dp"
android:checked="true"/>
<RadioButton
android:id="@+id/flashtorch"
android:layout_width="wrap_content"
android:layout_height="wrap_content"
android:text="Torch"
android:textSize="8dp"/>
</RadioGroup>
</LinearLayout>
</LinearLayout>
</LinearLayout>


Refer to the article "A simple exercise of Video Capture using MediaRecorder, for Android 2.3 or higher" for AndroidManifest.xml.

Download the files.

Tuesday, October 25, 2011

SlidingDrawer in horizontal

SlidingDrawer in horizontal

<?xml version="1.0" encoding="utf-8"?>
<FrameLayout xmlns:android="http://schemas.android.com/apk/res/android"
android:layout_width="fill_parent"
android:layout_height="fill_parent">

<ImageView
android:layout_width="fill_parent"
android:layout_height="fill_parent"
android:src="@drawable/icon"/>

<SlidingDrawer
android:id="@+id/drawer"
android:layout_width="fill_parent"
android:layout_height="fill_parent"
android:orientation="horizontal"
android:handle="@+id/handle"
android:content="@+id/content">
<ImageView
android:id="@id/handle"
android:layout_width="wrap_content"
android:layout_height="fill_parent"
android:src="@drawable/icon"/>
<LinearLayout
android:id="@id/content"
android:layout_width="fill_parent"
android:layout_height="fill_parent"
android:orientation="vertical"
android:padding="10dp"
android:background="#55000000">
<Button
android:layout_width="fill_parent"
android:layout_height="wrap_content"
android:text=" - Button - "/>
<Button
android:layout_width="fill_parent"
android:layout_height="wrap_content"
android:text=" - Button - "/>
<Button
android:layout_width="fill_parent"
android:layout_height="wrap_content"
android:text=" - Button - "/>
<Button
android:layout_width="fill_parent"
android:layout_height="wrap_content"
android:text=" - Button - "/>
<Button
android:layout_width="fill_parent"
android:layout_height="wrap_content"
android:text=" - Button - "/>
<Button
android:layout_width="fill_parent"
android:layout_height="wrap_content"
android:text=" - Button - "/>
</LinearLayout>
</SlidingDrawer>
</FrameLayout>


Related:
- SlidingDrawer in vertical
- Inflate SlidingDrawer from XML


Monday, October 24, 2011

Ice Cream Sandwich running on the Google Nexus One


Install Oracle JDK 7 on Ubuntu 11.10

Download JDK7 on http://www.oracle.com/technetwork/java/javase/downloads/index.html. The most updated is Java SE 7u1.

Follow the steps to Installation the JDK on Linux Platforms, http://download.oracle.com/javase/7/docs/webnotes/install/linux/linux-jdk.html.
eg. This procedure installs the Java Development Kit (JDK) for 32-bit Linux, using an archive binary file (.tar.gz).

These instructions use the following file:

jdk-7u<version>-linux-i586.tar.gz
1. Download the file. Before the file can be downloaded, you must accept the license agreement. The archive binary can be installed by anyone (not only root users), in any location that you can write to. However, only the root user can install the JDK into the system location.

2. Change directory to the location where you would like the JDK to be installed. Move the .tar.gz archive binary to the current directory.

3. Unpack the tarball and install the JDK.

% tar zxvf jdk-7u<version>-linux-i586.tar.gz
The Java Development Kit files are installed in a directory called jdk1.7.0_<version> in the current directory.

4. Delete the .tar.gz file if you want to save disk space.


Up to now, you have downloaded and installed JDK7 on your machine, but not yet installed in your system!

In Terminal, type the command to install the java alternative.
$sudo update-alternatives --install /usr/bin/javac javac /usr/lib/jvm/jdk1.7.0/bin/javac 1

Where:
  • /usr/lib/jvm/ is the directory the JDK installed, on step 2; such that javac should be at /usr/bin/javac javac /usr/lib/jvm/jdk1.7.0/bin/javac.
  • The last number, 1, is an integer of "priority"; it should be work on any integer number.


Finally, may be you have to config your javac alternative, if you have more than one javac installed.
$sudo update-alternatives --config javac

Note: Up to this minute, only JDK 5 and JDK 6 are officially supported for Android development, according to Android SDK document: System Requirements. May be, it will be officially support JDK 7 in short future.

A simple exercise of Video Capture using MediaRecorder, for Android 2.3 or higher

Refer to my old exercise "A simple exercise of Video Capture using MediaRecorder" for SDK Level 8 Android 2.2. But it fail to run on Android 2.3!!! So I re-write it for SDK Level 10, Android 2.3.3. Tested on Nexus One running Android 2.3.6.

A simple exercise of Video Capture using MediaRecorder, run on Nexus One running 2.3.6

Main Code:
package com.exercise.AndroidVideoCapture;

import java.io.IOException;

import android.app.Activity;
import android.content.Context;
import android.hardware.Camera;
import android.media.CamcorderProfile;
import android.media.MediaRecorder;
import android.os.Bundle;
import android.view.SurfaceHolder;
import android.view.SurfaceView;
import android.view.View;
import android.widget.Button;
import android.widget.FrameLayout;
import android.widget.Toast;

public class AndroidVideoCapture extends Activity{

private Camera myCamera;
private MyCameraSurfaceView myCameraSurfaceView;
private MediaRecorder mediaRecorder;

Button myButton;
SurfaceHolder surfaceHolder;
boolean recording;

/** Called when the activity is first created. */
@Override
public void onCreate(Bundle savedInstanceState) {
super.onCreate(savedInstanceState);

recording = false;

setContentView(R.layout.main);

//Get Camera for preview
myCamera = getCameraInstance();
if(myCamera == null){
Toast.makeText(AndroidVideoCapture.this,
"Fail to get Camera",
Toast.LENGTH_LONG).show();
}

myCameraSurfaceView = new MyCameraSurfaceView(this, myCamera);
FrameLayout myCameraPreview = (FrameLayout)findViewById(R.id.videoview);
myCameraPreview.addView(myCameraSurfaceView);

myButton = (Button)findViewById(R.id.mybutton);
myButton.setOnClickListener(myButtonOnClickListener);
}

Button.OnClickListener myButtonOnClickListener
= new Button.OnClickListener(){

@Override
public void onClick(View v) {
// TODO Auto-generated method stub
if(recording){
// stop recording and release camera
mediaRecorder.stop(); // stop the recording
releaseMediaRecorder(); // release the MediaRecorder object

//Exit after saved
finish();
}else{

//Release Camera before MediaRecorder start
releaseCamera();

if(!prepareMediaRecorder()){
Toast.makeText(AndroidVideoCapture.this,
"Fail in prepareMediaRecorder()!\n - Ended -",
Toast.LENGTH_LONG).show();
finish();
}

mediaRecorder.start();
recording = true;
myButton.setText("STOP");
}
}};

private Camera getCameraInstance(){
// TODO Auto-generated method stub
Camera c = null;
try {
c = Camera.open(); // attempt to get a Camera instance
}
catch (Exception e){
// Camera is not available (in use or does not exist)
}
return c; // returns null if camera is unavailable
}

private boolean prepareMediaRecorder(){
myCamera = getCameraInstance();
mediaRecorder = new MediaRecorder();

myCamera.unlock();
mediaRecorder.setCamera(myCamera);

mediaRecorder.setAudioSource(MediaRecorder.AudioSource.CAMCORDER);
mediaRecorder.setVideoSource(MediaRecorder.VideoSource.CAMERA);

mediaRecorder.setProfile(CamcorderProfile.get(CamcorderProfile.QUALITY_HIGH));

mediaRecorder.setOutputFile("/sdcard/myvideo.mp4");
mediaRecorder.setMaxDuration(60000); // Set max duration 60 sec.
mediaRecorder.setMaxFileSize(5000000); // Set max file size 5M

mediaRecorder.setPreviewDisplay(myCameraSurfaceView.getHolder().getSurface());

try {
mediaRecorder.prepare();
} catch (IllegalStateException e) {
releaseMediaRecorder();
return false;
} catch (IOException e) {
releaseMediaRecorder();
return false;
}
return true;

}

@Override
protected void onPause() {
super.onPause();
releaseMediaRecorder(); // if you are using MediaRecorder, release it first
releaseCamera(); // release the camera immediately on pause event
}

private void releaseMediaRecorder(){
if (mediaRecorder != null) {
mediaRecorder.reset(); // clear recorder configuration
mediaRecorder.release(); // release the recorder object
mediaRecorder = null;
myCamera.lock(); // lock camera for later use
}
}

private void releaseCamera(){
if (myCamera != null){
myCamera.release(); // release the camera for other applications
myCamera = null;
}
}

public class MyCameraSurfaceView extends SurfaceView implements SurfaceHolder.Callback{

private SurfaceHolder mHolder;
private Camera mCamera;

public MyCameraSurfaceView(Context context, Camera camera) {
super(context);
mCamera = camera;

// Install a SurfaceHolder.Callback so we get notified when the
// underlying surface is created and destroyed.
mHolder = getHolder();
mHolder.addCallback(this);
// deprecated setting, but required on Android versions prior to 3.0
mHolder.setType(SurfaceHolder.SURFACE_TYPE_PUSH_BUFFERS);
}

@Override
public void surfaceChanged(SurfaceHolder holder, int format, int weight,
int height) {
// If your preview can change or rotate, take care of those events here.
// Make sure to stop the preview before resizing or reformatting it.

if (mHolder.getSurface() == null){
// preview surface does not exist
return;
}

// stop preview before making changes
try {
mCamera.stopPreview();
} catch (Exception e){
// ignore: tried to stop a non-existent preview
}

// make any resize, rotate or reformatting changes here

// start preview with new settings
try {
mCamera.setPreviewDisplay(mHolder);
mCamera.startPreview();

} catch (Exception e){
}
}

@Override
public void surfaceCreated(SurfaceHolder holder) {
// TODO Auto-generated method stub
// The Surface has been created, now tell the camera where to draw the preview.
try {
mCamera.setPreviewDisplay(holder);
mCamera.startPreview();
} catch (IOException e) {
}
}

@Override
public void surfaceDestroyed(SurfaceHolder holder) {
// TODO Auto-generated method stub

}
}
}


main.xml
<?xml version="1.0" encoding="utf-8"?>
<LinearLayout xmlns:android="http://schemas.android.com/apk/res/android"
android:orientation="vertical"
android:layout_width="fill_parent"
android:layout_height="fill_parent"
>
<LinearLayout
android:orientation="horizontal"
android:layout_width="fill_parent"
android:layout_height="fill_parent"
>
<FrameLayout
android:id="@+id/videoview"
android:layout_width="720px"
android:layout_height="480px"/>
<Button
android:id="@+id/mybutton"
android:layout_width="fill_parent"
android:layout_height="wrap_content"
android:text="REC"
android:textSize="12dp"/>
</LinearLayout>
</LinearLayout>


AndroidManifest.xml
<?xml version="1.0" encoding="utf-8"?>
<manifest xmlns:android="http://schemas.android.com/apk/res/android"
package="com.exercise.AndroidVideoCapture"
android:versionCode="1"
android:versionName="1.0">
<uses-sdk android:minSdkVersion="10" />
<uses-permission android:name="android.permission.RECORD_AUDIO"></uses-permission>
<uses-permission android:name="android.permission.CAMERA"></uses-permission>
<uses-permission android:name="android.permission.WRITE_EXTERNAL_STORAGE"></uses-permission>
<application android:icon="@drawable/icon" android:label="@string/app_name">
<activity android:name=".AndroidVideoCapture"
android:label="@string/app_name"
android:theme="@android:style/Theme.NoTitleBar.Fullscreen"
android:screenOrientation="landscape">
<intent-filter>
<action android:name="android.intent.action.MAIN" />
<category android:name="android.intent.category.LAUNCHER" />
</intent-filter>
</activity>

</application>
</manifest>


Download the files.

next:
- Video Capture using MediaRecorder with Flash Light

Reference:
- Android Dev Guide: Camera

Friday, October 21, 2011

Android 4.0 on Nexus One

ICS Android 4.0 for Nexus One


What's LTE (3GPP Long Term Evolution)?

3GPP Long Term Evolution (LTE) is a standard for wireless communication of high-speed data. It is based upon GSM/EDGE and Universal Mobile Telecommunications System/High Speed Packet Access (UMTS/HSPA) network technologies.[1][2] The standard is maintained as a project of the 3rd Generation Partnership Project (3GPP), operating under a name trademarked by one of the associations within the partnership, the European Telecommunications Standards Institute (ETSI).

The goal of LTE is to increase the capacity and speed of wireless data networks utilizing cutting-edge hardware and Digital Signal Processing (DSP) techniques that have recently been developed. Its wireless interface is incompatible with 2G and 3G networks, and so it must be operated on separate wireless spectrum.

Features of LTE include an all-IP flat network architecture, end-to-end QoS including provisions for low-latency communications, peak download rates nearing 300 Mbps and upload rates of 75 Mbps, capacity exceeding 200 active users per cell, the ability to manage fast-moving mobiles, and support for multi-cast and broadcast streams.


- Read more from Wikipedia - 3GPP Long Term Evolution

Thursday, October 20, 2011

Call JavaScript inside WebView from Android activity, with parameter passed.

The last exercise "Run Android Java code from Webpage" show how to call from WebView JavaScript to Android activity. Here will show how to call in reverse direction: Call JavaScript inside WebView from Android activity, with parameter passed.

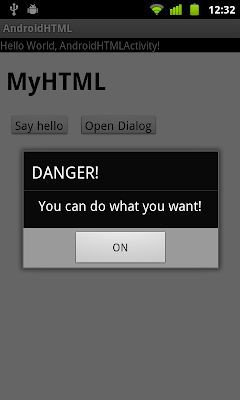
Call JavaScript inside WebView from Android activity, with parameter passed.

/assets/mypage.html
<!DOCTYPE html>
<html>
<head>
<meta charset="UTF-8">
<meta name="viewport" content="width=device-width; user-scalable=0;" />
<title>My HTML</title>
</head>
<body>
<h1>MyHTML</h1>
<p id="mytext">Hello!</p>
<input type="button" value="Say hello" onClick="showAndroidToast('Hello Android!')" />
<input type="button" value="Open Dialog" onClick="openAndroidDialog()" />
<script language="javascript">
   function showAndroidToast(toast) {
       AndroidFunction.showToast(toast);
   }

   function openAndroidDialog() {
       AndroidFunction.openAndroidDialog();
   }
  
   function callFromActivity(msg){
 document.getElementById("mytext").innerHTML = msg;
   }
</script>

</body>
</html>


main.xml
<?xml version="1.0" encoding="utf-8"?>
<LinearLayout xmlns:android="http://schemas.android.com/apk/res/android"
   android:orientation="vertical"
   android:layout_width="fill_parent"
   android:layout_height="fill_parent"
   >
<TextView 
   android:layout_width="fill_parent"
   android:layout_height="wrap_content"
   android:text="@string/hello"
   />
<EditText
   android:id="@+id/msg"
   android:layout_width="fill_parent"
   android:layout_height="wrap_content" />
<Button
 android:id="@+id/sendmsg"
   android:layout_width="fill_parent"
   android:layout_height="wrap_content"
   android:text="Msg to JavaScript"
   />
<WebView
   android:id="@+id/mybrowser"
   android:layout_width="fill_parent"
   android:layout_height="fill_parent"
  />
</LinearLayout>


main code:
package com.exercise.AndroidHTML;

import android.app.Activity;
import android.app.AlertDialog;
import android.content.Context;
import android.os.Bundle;
import android.view.View;
import android.webkit.WebView;
import android.widget.Button;
import android.widget.EditText;
import android.widget.Toast;

public class AndroidHTMLActivity extends Activity {
 
 WebView myBrowser;
 EditText Msg;
 Button btnSendMsg;
 
 /** Called when the activity is first created. */
   @Override
   public void onCreate(Bundle savedInstanceState) {
       super.onCreate(savedInstanceState);
       setContentView(R.layout.main);
       myBrowser = (WebView)findViewById(R.id.mybrowser);
      
       final MyJavaScriptInterface myJavaScriptInterface
        = new MyJavaScriptInterface(this);
       myBrowser.addJavascriptInterface(myJavaScriptInterface, "AndroidFunction");
      
       myBrowser.getSettings().setJavaScriptEnabled(true); 
       myBrowser.loadUrl("file:///android_asset/mypage.html");
      
       Msg = (EditText)findViewById(R.id.msg);
    btnSendMsg = (Button)findViewById(R.id.sendmsg);
    btnSendMsg.setOnClickListener(new Button.OnClickListener(){

   @Override
   public void onClick(View arg0) {
    // TODO Auto-generated method stub
    String msgToSend = Msg.getText().toString();
    myBrowser.loadUrl("javascript:callFromActivity(\""+msgToSend+"\")");
    
   }});

   }
  
 public class MyJavaScriptInterface {
  Context mContext;

     MyJavaScriptInterface(Context c) {
         mContext = c;
     }
    
     public void showToast(String toast){
         Toast.makeText(mContext, toast, Toast.LENGTH_SHORT).show();
     }
    
     public void openAndroidDialog(){
      AlertDialog.Builder myDialog
      = new AlertDialog.Builder(AndroidHTMLActivity.this);
      myDialog.setTitle("DANGER!");
      myDialog.setMessage("You can do what you want!");
      myDialog.setPositiveButton("ON", null);
      myDialog.show();
     }

 }
}


Download the files.

Updated: Read the updated example with @JavascriptInterface.


Run Android Java code from Webpage

Using JavascriptInterface you can create interfaces between webpage's JavaScript code and Android Java code. For example, your JavaScript code can call a method in your Android code to display a Dialog, or Toast.

To bind a new interface between your JavaScript and Android code, call addJavascriptInterface(), passing it a class instance to bind to your JavaScript and an interface name that your JavaScript can call to access the class.

Caution: Using addJavascriptInterface() allows JavaScript to control your Android application. This can be a very useful feature or a dangerous security issue. When the HTML in the WebView is untrustworthy (for example, part or all of the HTML is provided by an unknown person or process), then an attacker can include HTML that executes your client-side code and possibly any code of the attacker's choosing. As such, you should not use addJavascriptInterface() unless you wrote all of the HTML and JavaScript that appears in your WebView. You should also not allow the user to navigate to other web pages that are not your own, within your WebView (instead, allow the user's default browser application to open foreign links—by default, the user's web browser opens all URL links, so be careful only if you handle page navigation as described in the following section).

Example:

Run Android Java code from Webpage

Modify from last exercise "Load local HTML webpage inside APK":

Modify /assets/mypage.html to add two button to call JavascriptInterface in Android Java code.
<!DOCTYPE html>
<html>
<head>
<meta charset="UTF-8">
<meta name="viewport" content="width=device-width; user-scalable=0;" />
<title>My HTML</title>
</head>
<body>
<h1>MyHTML</h1>

<input type="button" value="Say hello" onClick="showAndroidToast('Hello Android!')" />

<script type="text/javascript">
 function showAndroidToast(toast) {
     AndroidFunction.showToast(toast);
 }
</script>

<input type="button" value="Open Dialog" onClick="openAndroidDialog()" />

<script type="text/javascript">
 function openAndroidDialog() {
     AndroidFunction.openAndroidDialog();
 }
</script>

</body>
</html>


Keep using main.xml from last exercise.

Main code, to add our JavascriptInterface.
package com.exercise.AndroidHTML;

import android.app.Activity;
import android.app.AlertDialog;
import android.content.Context;
import android.os.Bundle;
import android.webkit.WebView;
import android.widget.Toast;

public class AndroidHTMLActivity extends Activity {

WebView myBrowser;

 /** Called when the activity is first created. */
 @Override
 public void onCreate(Bundle savedInstanceState) {
     super.onCreate(savedInstanceState);
     setContentView(R.layout.main);
     myBrowser = (WebView)findViewById(R.id.mybrowser);
     myBrowser.addJavascriptInterface(new MyJavaScriptInterface(this), "AndroidFunction");
  
     myBrowser.getSettings().setJavaScriptEnabled(true);
     myBrowser.loadUrl("file:///android_asset/mypage.html");

 }

public class MyJavaScriptInterface {
 Context mContext;

    MyJavaScriptInterface(Context c) {
        mContext = c;
    }

    public void showToast(String toast){
        Toast.makeText(mContext, toast, Toast.LENGTH_SHORT).show();
    }
 
    public void openAndroidDialog(){
     AlertDialog.Builder myDialog
     = new AlertDialog.Builder(AndroidHTMLActivity.this);
     myDialog.setTitle("DANGER!");
     myDialog.setMessage("You can do what you want!");
     myDialog.setPositiveButton("ON", null);
     myDialog.show();
    }

}
}


download filesDownload the files.


next:
- Call JavaScript inside WebView from Android activity, with parameter passed.

Updated: Read the updated example with @JavascriptInterface.

Load local HTML webpage inside APK

Using WebView, your app can load local HTML file (inside your APK).

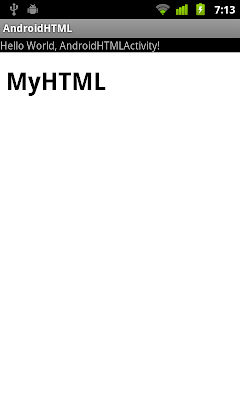
Load local HTML webpage inside APK

Create your own HTML file under /assets/ folder.

/assets/mypage.html
<!DOCTYPE html>
<html>
<head>
<meta charset="UTF-8">
<meta name="viewport" content="width=device-width; user-scalable=0;" />
<title>My HTML</title>
</head>
<body>
<h1>MyHTML</h1>
</body>
</html>


Modify main.xml to add a WebView
<?xml version="1.0" encoding="utf-8"?>
<LinearLayout xmlns:android="http://schemas.android.com/apk/res/android"
android:orientation="vertical"
android:layout_width="fill_parent"
android:layout_height="fill_parent"
>
<TextView
android:layout_width="fill_parent"
android:layout_height="wrap_content"
android:text="@string/hello"
/>
<WebView
android:id="@+id/mybrowser"
android:layout_width="fill_parent"
android:layout_height="fill_parent"
/>
</LinearLayout>


Java code
package com.exercise.AndroidHTML;

import android.app.Activity;
import android.os.Bundle;
import android.webkit.WebView;

public class AndroidHTMLActivity extends Activity {

WebView myBrowser;

/** Called when the activity is first created. */
@Override
public void onCreate(Bundle savedInstanceState) {
super.onCreate(savedInstanceState);
setContentView(R.layout.main);
myBrowser = (WebView)findViewById(R.id.mybrowser);

myBrowser.loadUrl("file:///android_asset/mypage.html");

}
}


Download the files.

Related article:
- AndroidBrowser, implement a Android Browser using WebView
- Run Android Java code from Webpage


Wednesday, October 19, 2011

Error in creating Emulator for Android 4.0

Android SDK for version 4.0 was just released. The setup procedure is almost same as before, so I don't want to repeat again.

But - after you install the SDK components and try to create AVD for Android 4.0, may be you will prompted with the error:

Unable to find a 'userdata.img' file for ABI armeabi to copy into the AVD folder.

It's because you have no Android 4 system image installed!

Solution:
Start Android SDK Manager, expand Android 4.0, click to select install ARM EABI v7a System Image. May be you have to re-start Eclipse after new component installed.
install ARM EABI v7a System Image
Good Luck.

Tuesday, October 18, 2011

Android 4.0 Platform and Updated SDK Tools

Android 4.0 Platform
Today Google are announcing Android 4.0, Ice Cream Sandwich — a new version of the platform that brings a refined, unified user experience for phones, tablets, and more.

For developers, Android 4.0 introduces many new capabilities and APIs. Here are some highlights:
  • Unified UI toolkit: A single set of UI components, styles, and capabilities for phones, tablets, and other devices.
  • Rich communication and sharing: New social and calendar APIs, Android Beam for NFC-based instant sharing, Wi-Fi Direct support, Bluetooth Health Device Profile support.
  • Deep interactivity and customization: Improved notifications, lockscreen with camera and music controls, and improved app management in the launcher.
  • New graphics, camera, and media capabilities: Image and video effects, precise camera metering and face detection, new media codecs and containers.
  • Interface and input: Hardware-accelerated 2D drawing, new grid-based layout, improved soft keyboard, spell-checker API, stylus input support, and better mouse support.
  • Improved accessibility: New accessibility APIs and text-to-speech APIs for writing new engines.
  • Enhancements for enterprise: Keychain and VPN APIs for managing credentials and connections, a new administrator policy for disabling the camera.

For a complete overview of what’s new for users and developers, please read the Android 4.0 Platform Highlights.

Alongside the new Android platform, we are releasing new versions of the SDK Tools (r14) and ADT Plugin (14.0) for Eclipse. Among the highlights are:
  • Improved build performance in Ant and Eclipse
  • Improved layout and XML editors


Read more: http://android-developers.blogspot.com/2011/10/android-40-platform-and-updated-sdk.html

Delete file in Internal Storage

The method deleteFile() delete the given private file associated with this Context's application package.

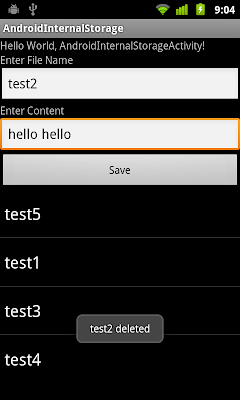
Modify the code in last exercise "Read file from Internal Storage via FileInputStream", add OnClickListener DeleteListener called by an additional button "Delete" inside fileDialog.

Delete file in Internal Storage

package com.exercise.AndroidInternalStorage;

import java.io.FileInputStream;
import java.io.FileNotFoundException;
import java.io.FileOutputStream;
import java.io.IOException;

import android.app.Activity;
import android.app.AlertDialog;
import android.content.Context;
import android.content.DialogInterface;
import android.content.DialogInterface.OnClickListener;
import android.os.Bundle;
import android.view.View;
import android.view.ViewGroup.LayoutParams;
import android.widget.AdapterView;
import android.widget.AdapterView.OnItemClickListener;
import android.widget.ArrayAdapter;
import android.widget.Button;
import android.widget.EditText;
import android.widget.ListView;
import android.widget.TextView;
import android.widget.Toast;

public class AndroidInternalStorageActivity extends Activity {

EditText edFileName, edContent;
Button btnSave;
ListView listSavedFiles;

String[] SavedFiles;

/** Called when the activity is first created. */
@Override
public void onCreate(Bundle savedInstanceState) {
super.onCreate(savedInstanceState);
setContentView(R.layout.main);
edFileName = (EditText)findViewById(R.id.filename);
edContent = (EditText)findViewById(R.id.content);
btnSave = (Button)findViewById(R.id.save);
listSavedFiles = (ListView)findViewById(R.id.list);

ShowSavedFiles();

btnSave.setOnClickListener(new Button.OnClickListener(){

@Override
public void onClick(View arg0) {
// TODO Auto-generated method stub
String fileName = edFileName.getText().toString();
String content = edContent.getText().toString();

FileOutputStream fos;
try {
fos = openFileOutput(fileName, Context.MODE_PRIVATE);
fos.write(content.getBytes());
fos.close();

Toast.makeText(
AndroidInternalStorageActivity.this,
fileName + " saved",
Toast.LENGTH_LONG).show();

} catch (FileNotFoundException e) {
// TODO Auto-generated catch block
e.printStackTrace();
} catch (IOException e) {
// TODO Auto-generated catch block
e.printStackTrace();
}

ShowSavedFiles();

}});

listSavedFiles.setOnItemClickListener(listSavedFilesOnItemClickListener);

}

void ShowSavedFiles(){
SavedFiles = getApplicationContext().fileList();
ArrayAdapter<String> adapter
= new ArrayAdapter<String>(this,
android.R.layout.simple_list_item_1,
SavedFiles);

listSavedFiles.setAdapter(adapter);
}

OnItemClickListener listSavedFilesOnItemClickListener
= new OnItemClickListener(){

@Override
public void onItemClick(AdapterView<?> parent, View view, int position,
long id) {
// TODO Auto-generated method stub
String clickedFile = (String) parent.getItemAtPosition(position);
OpenFileDialog(clickedFile);
}

};

void OpenFileDialog(final String file){

//Read file in Internal Storage
FileInputStream fis;
String content = "";
try {
fis = openFileInput(file);
byte[] input = new byte[fis.available()];
while (fis.read(input) != -1) {}
content += new String(input);
} catch (FileNotFoundException e) {
e.printStackTrace();
} catch (IOException e) {
e.printStackTrace();
}

//Create a custom Dialog
AlertDialog.Builder fileDialog
= new AlertDialog.Builder(AndroidInternalStorageActivity.this);
fileDialog.setTitle(file);

TextView textContent = new TextView(AndroidInternalStorageActivity.this);
textContent.setText(content);
LayoutParams textViewLayoutParams
= new LayoutParams(LayoutParams.WRAP_CONTENT, LayoutParams.WRAP_CONTENT);
textContent.setLayoutParams(textViewLayoutParams);

fileDialog.setView(textContent);

fileDialog.setPositiveButton("OK", null);

//Delete file in Internal Storage
OnClickListener DeleteListener = new OnClickListener(){

@Override
public void onClick(DialogInterface dialog, int which) {
// TODO Auto-generated method stub
deleteFile(file);
Toast.makeText(
AndroidInternalStorageActivity.this,
file + " deleted",
Toast.LENGTH_LONG).show();
ShowSavedFiles();
}

};
fileDialog.setNeutralButton("DELETE", DeleteListener);

fileDialog.show();
}
}


Download the files.


Sunday, October 16, 2011

Read file from Internal Storage via FileInputStream

The file in Internal Storage can be read using read() method of FileInputStream class.

Further work on last exercise "List the saved files in Internal Storage"; once any item in the ListView of saved files is clicked, the file will be opened using FileInputStream.read(), and the content will be displayed in a custom dialog.

Read file from Internal Storage via FileInputStream

package com.exercise.AndroidInternalStorage;

import java.io.FileInputStream;
import java.io.FileNotFoundException;
import java.io.FileOutputStream;
import java.io.IOException;

import android.app.Activity;
import android.app.AlertDialog;
import android.content.Context;
import android.os.Bundle;
import android.view.View;
import android.view.ViewGroup.LayoutParams;
import android.widget.AdapterView;
import android.widget.AdapterView.OnItemClickListener;
import android.widget.ArrayAdapter;
import android.widget.Button;
import android.widget.EditText;
import android.widget.ListView;
import android.widget.TextView;
import android.widget.Toast;

public class AndroidInternalStorageActivity extends Activity {

EditText edFileName, edContent;
Button btnSave;
ListView listSavedFiles;

String[] SavedFiles;

/** Called when the activity is first created. */
@Override
public void onCreate(Bundle savedInstanceState) {
super.onCreate(savedInstanceState);
setContentView(R.layout.main);
edFileName = (EditText)findViewById(R.id.filename);
edContent = (EditText)findViewById(R.id.content);
btnSave = (Button)findViewById(R.id.save);
listSavedFiles = (ListView)findViewById(R.id.list);

ShowSavedFiles();

btnSave.setOnClickListener(new Button.OnClickListener(){

@Override
public void onClick(View arg0) {
// TODO Auto-generated method stub
String fileName = edFileName.getText().toString();
String content = edContent.getText().toString();

FileOutputStream fos;
try {
fos = openFileOutput(fileName, Context.MODE_PRIVATE);
fos.write(content.getBytes());
fos.close();

Toast.makeText(
AndroidInternalStorageActivity.this,
fileName + " saved",
Toast.LENGTH_LONG).show();

} catch (FileNotFoundException e) {
// TODO Auto-generated catch block
e.printStackTrace();
} catch (IOException e) {
// TODO Auto-generated catch block
e.printStackTrace();
}

ShowSavedFiles();

}});

listSavedFiles.setOnItemClickListener(listSavedFilesOnItemClickListener);

}

void ShowSavedFiles(){
SavedFiles = getApplicationContext().fileList();
ArrayAdapter<String> adapter
= new ArrayAdapter<String>(this,
android.R.layout.simple_list_item_1,
SavedFiles);

listSavedFiles.setAdapter(adapter);
}

OnItemClickListener listSavedFilesOnItemClickListener
= new OnItemClickListener(){

@Override
public void onItemClick(AdapterView<?> parent, View view, int position,
long id) {
// TODO Auto-generated method stub
String clickedFile = (String) parent.getItemAtPosition(position);
OpenFileDialog(clickedFile);
}

};

void OpenFileDialog(String file){

//Read file in Internal Storage
FileInputStream fis;
String content = "";
try {
fis = openFileInput(file);
byte[] input = new byte[fis.available()];
while (fis.read(input) != -1) {}
content += new String(input);
} catch (FileNotFoundException e) {
e.printStackTrace();
} catch (IOException e) {
e.printStackTrace();
}

//Create a custom Dialog
AlertDialog.Builder fileDialog
= new AlertDialog.Builder(AndroidInternalStorageActivity.this);
fileDialog.setTitle(file);

TextView textContent = new TextView(AndroidInternalStorageActivity.this);
textContent.setText(content);
LayoutParams textViewLayoutParams
= new LayoutParams(LayoutParams.WRAP_CONTENT, LayoutParams.WRAP_CONTENT);
textContent.setLayoutParams(textViewLayoutParams);

fileDialog.setView(textContent);

fileDialog.setPositiveButton("OK", null);

fileDialog.show();
}
}


Download the files.

next:
- Delete file in Internal Storage


List the saved files in Internal Storage

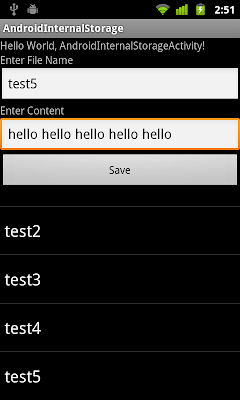
To list the saved files in Internal Storage, the method fileList() can be used. It returns an array of strings naming the private files associated with this Context's application package.

It's a example, in ShowSavedFiles() method, get the saved file name and list in ListView.

List the saved files in Internal Storage

package com.exercise.AndroidInternalStorage;

import java.io.FileNotFoundException;
import java.io.FileOutputStream;
import java.io.IOException;

import android.app.Activity;
import android.content.Context;
import android.os.Bundle;
import android.view.View;
import android.widget.ArrayAdapter;
import android.widget.Button;
import android.widget.EditText;
import android.widget.ListView;
import android.widget.Toast;

public class AndroidInternalStorageActivity extends Activity {

EditText edFileName, edContent;
Button btnSave;
ListView listSavedFiles;

String[] SavedFiles;

/** Called when the activity is first created. */
@Override
public void onCreate(Bundle savedInstanceState) {
super.onCreate(savedInstanceState);
setContentView(R.layout.main);
edFileName = (EditText)findViewById(R.id.filename);
edContent = (EditText)findViewById(R.id.content);
btnSave = (Button)findViewById(R.id.save);
listSavedFiles = (ListView)findViewById(R.id.list);

ShowSavedFiles();

btnSave.setOnClickListener(new Button.OnClickListener(){

@Override
public void onClick(View arg0) {
// TODO Auto-generated method stub
String fileName = edFileName.getText().toString();
String content = edContent.getText().toString();

FileOutputStream fos;
try {
fos = openFileOutput(fileName, Context.MODE_PRIVATE);
fos.write(content.getBytes());
fos.close();

Toast.makeText(
AndroidInternalStorageActivity.this,
fileName + " saved",
Toast.LENGTH_LONG).show();

} catch (FileNotFoundException e) {
// TODO Auto-generated catch block
e.printStackTrace();
} catch (IOException e) {
// TODO Auto-generated catch block
e.printStackTrace();
}

ShowSavedFiles();

}});

}

void ShowSavedFiles(){
SavedFiles = getApplicationContext().fileList();
ArrayAdapter<String> adapter
= new ArrayAdapter<String>(this,
android.R.layout.simple_list_item_1,
SavedFiles);

listSavedFiles.setAdapter(adapter);
}
}


<?xml version="1.0" encoding="utf-8"?>
<LinearLayout xmlns:android="http://schemas.android.com/apk/res/android"
android:orientation="vertical"
android:layout_width="fill_parent"
android:layout_height="fill_parent"
>
<TextView
android:layout_width="fill_parent"
android:layout_height="wrap_content"
android:text="@string/hello"
/>
<TextView
android:layout_width="fill_parent"
android:layout_height="wrap_content"
android:text="Enter File Name" />
<EditText
android:id="@+id/filename"
android:layout_width="fill_parent"
android:layout_height="wrap_content" />
<TextView
android:layout_width="fill_parent"
android:layout_height="wrap_content"
android:text="Enter Content" />
<EditText
android:id="@+id/content"
android:layout_width="fill_parent"
android:layout_height="wrap_content" />
<Button
android:id="@+id/save"
android:layout_width="fill_parent"
android:layout_height="wrap_content"
android:text="Save"/>
<ListView
android:id="@+id/list"
android:layout_width="fill_parent"
android:layout_height="wrap_content"
/>
</LinearLayout>


Download the files.

next:
- Read file from Internal Storage via FileInputStream


Saturday, October 15, 2011

Internal Storage

In the exercise "Save and Read Bitmap in Internal Storage" we have involved little bit about Internal Storage. We will have more exercise about Internal Storage now.

You can save files directly on the device's internal storage. By default, files saved to the internal storage are private to your application and other applications cannot access them (nor can the user). When the user uninstalls your application, these files are removed.

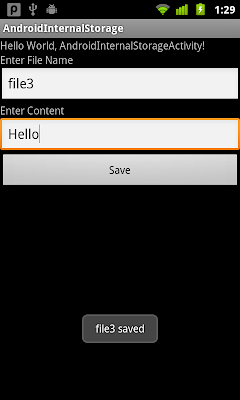
Here is a example of saving file in Internal Storage.

Internal Storage

package com.exercise.AndroidInternalStorage;

import java.io.FileNotFoundException;
import java.io.FileOutputStream;
import java.io.IOException;

import android.app.Activity;
import android.content.Context;
import android.os.Bundle;
import android.view.View;
import android.widget.Button;
import android.widget.EditText;
import android.widget.Toast;

public class AndroidInternalStorageActivity extends Activity {

EditText edFileName, edContent;
Button btnSave;

/** Called when the activity is first created. */
@Override
public void onCreate(Bundle savedInstanceState) {
super.onCreate(savedInstanceState);
setContentView(R.layout.main);
edFileName = (EditText)findViewById(R.id.filename);
edContent = (EditText)findViewById(R.id.content);
btnSave = (Button)findViewById(R.id.save);

btnSave.setOnClickListener(new Button.OnClickListener(){

@Override
public void onClick(View arg0) {
// TODO Auto-generated method stub
String fileName = edFileName.getText().toString();
String content = edContent.getText().toString();

FileOutputStream fos;
try {
fos = openFileOutput(fileName, Context.MODE_PRIVATE);
fos.write(content.getBytes());
fos.close();

Toast.makeText(
AndroidInternalStorageActivity.this,
fileName + " saved",
Toast.LENGTH_LONG).show();

} catch (FileNotFoundException e) {
// TODO Auto-generated catch block
e.printStackTrace();
} catch (IOException e) {
// TODO Auto-generated catch block
e.printStackTrace();
}

}});

}
}


main.xml
<?xml version="1.0" encoding="utf-8"?>
<LinearLayout xmlns:android="http://schemas.android.com/apk/res/android"
android:orientation="vertical"
android:layout_width="fill_parent"
android:layout_height="fill_parent"
>
<TextView
android:layout_width="fill_parent"
android:layout_height="wrap_content"
android:text="@string/hello"
/>
<TextView
android:layout_width="fill_parent"
android:layout_height="wrap_content"
android:text="Enter File Name" />
<EditText
android:id="@+id/filename"
android:layout_width="fill_parent"
android:layout_height="wrap_content" />
<TextView
android:layout_width="fill_parent"
android:layout_height="wrap_content"
android:text="Enter Content" />
<EditText
android:id="@+id/content"
android:layout_width="fill_parent"
android:layout_height="wrap_content" />
<Button
android:id="@+id/save"
android:layout_width="fill_parent"
android:layout_height="wrap_content"
android:text="Save"/>
</LinearLayout>


Download the files.

next:
- List the saved files in Internal Storage


Friday, October 14, 2011

Share Bitmap between activities as global common resources

Refer to the last exercises, we can "Pass Bitmap between activities (as Extra)" and "Save and Read Bitmap in Internal Storage"; here is one more alternative, share as global common resources.

Create one more class, CommonResources, with public static Bitmap. Such that it can be direct access by all activities of the same APK.

CommonResources.java
package com.exercise.AndroidBitmap;

import android.graphics.Bitmap;

public class CommonResources {
public static Bitmap bmA = null;
public static Bitmap bmB = null;
public static Bitmap bmC = null;
}


AndroidBitmapActivity.java
package com.exercise.AndroidBitmap;

import android.app.Activity;
import android.content.Intent;
import android.graphics.Bitmap;
import android.graphics.BitmapFactory;
import android.os.Bundle;
import android.view.View;
import android.widget.Button;
import android.widget.ImageView;

public class AndroidBitmapActivity extends Activity {

ImageView image1, image2, image3, image4;
Button buttonSwitch;

/** Called when the activity is first created. */
@Override
public void onCreate(Bundle savedInstanceState) {
super.onCreate(savedInstanceState);
setContentView(R.layout.main);
image1 = (ImageView)findViewById(R.id.image1);
image2 = (ImageView)findViewById(R.id.image2);
image3 = (ImageView)findViewById(R.id.image3);
image4 = (ImageView)findViewById(R.id.image4);
buttonSwitch = (Button)findViewById(R.id.switchactivity);

Bitmap bmOriginal = BitmapFactory.decodeResource(getResources(), R.drawable.icon);
image1.setImageBitmap(bmOriginal);

int width = bmOriginal.getWidth();
int height = bmOriginal.getHeight();

final Bitmap bmDulicated2 = Bitmap.createBitmap(width, height, Bitmap.Config.ARGB_8888);
final Bitmap bmDulicated3 = Bitmap.createBitmap(width, height, Bitmap.Config.ARGB_8888);
final Bitmap bmDulicated4 = Bitmap.createBitmap(width, height, Bitmap.Config.ARGB_8888);
int[] srcPixels = new int[width * height];
bmOriginal.getPixels(srcPixels, 0, width, 0, 0, width, height);
int[] destPixels = new int[width * height];

swapGB(srcPixels, destPixels);
bmDulicated2.setPixels(destPixels, 0, width, 0, 0, width, height);
image2.setImageBitmap(bmDulicated2);

swapRB(srcPixels, destPixels);
bmDulicated3.setPixels(destPixels, 0, width, 0, 0, width, height);
image3.setImageBitmap(bmDulicated3);

swapRG(srcPixels, destPixels);
bmDulicated4.setPixels(destPixels, 0, width, 0, 0, width, height);
image4.setImageBitmap(bmDulicated4);

buttonSwitch.setOnClickListener(new Button.OnClickListener(){

@Override
public void onClick(View arg0) {
// TODO Auto-generated method stub

CommonResources.bmA = bmDulicated2;
CommonResources.bmB = bmDulicated3;
CommonResources.bmC = bmDulicated4;

Intent intent = new Intent(AndroidBitmapActivity.this, SecondActivity.class);
startActivity(intent);
}});

}

void swapGB(int[] src, int[] dest){
for(int i = 0; i < src.length; i++){
dest[i] = (src[i] & 0xffff0000)
| ((src[i] & 0x000000ff)<<8)
| ((src[i] & 0x0000ff00)>>8);
}
}

void swapRB(int[] src, int[] dest){
for(int i = 0; i < src.length; i++){
dest[i] = (src[i] & 0xff00ff00)
| ((src[i] & 0x000000ff)<<16)
| ((src[i] & 0x00ff0000)>>16);
}
}

void swapRG(int[] src, int[] dest){
for(int i = 0; i < src.length; i++){
dest[i] = (src[i] & 0xff0000ff)
| ((src[i] & 0x0000ff00)<<8)
| ((src[i] & 0x00ff0000)>>8);
}
}
}


SecondActivity.java
package com.exercise.AndroidBitmap;

import android.app.Activity;
import android.graphics.Bitmap;
import android.os.Bundle;
import android.widget.ImageView;

public class SecondActivity extends Activity {

ImageView imageA, imageB, imageC;

@Override
protected void onCreate(Bundle savedInstanceState) {
// TODO Auto-generated method stub
super.onCreate(savedInstanceState);
setContentView(R.layout.second);
imageA = (ImageView)findViewById(R.id.imagea);
imageB = (ImageView)findViewById(R.id.imageb);
imageC = (ImageView)findViewById(R.id.imagec);

Bitmap bitmapA = CommonResources.bmA;
Bitmap bitmapB = CommonResources.bmB;
Bitmap bitmapC = CommonResources.bmC;

imageA.setImageBitmap(bitmapA);
imageB.setImageBitmap(bitmapB);
imageC.setImageBitmap(bitmapC);

}

}


Download the files.

Thursday, October 13, 2011

Save and Read Bitmap in Internal Storage

Refer to the last exercise "Pass Bitmap between activities", pass Bitmap as extra is not recommended for large bitmap. Saving in Internal Storage and read in second activity is an alternative.

It's a example to save and read bitmap in Internal Storage. In AndroidBitmapActivity class, the bitmaps are saved in Internal Storage, in MODE_PRIVATE (where the created file can only be accessed by the calling application). The bitmaps will be read in SecondActivity class.

AndroidBitmapActivity.java
package com.exercise.AndroidBitmap;

import java.io.FileNotFoundException;
import java.io.FileOutputStream;
import java.io.IOException;

import android.app.Activity;
import android.content.Context;
import android.content.Intent;
import android.graphics.Bitmap;
import android.graphics.BitmapFactory;
import android.os.Bundle;
import android.view.View;
import android.widget.Button;
import android.widget.ImageView;

public class AndroidBitmapActivity extends Activity {

ImageView image1, image2, image3, image4;
Button buttonSwitch;

/** Called when the activity is first created. */
@Override
public void onCreate(Bundle savedInstanceState) {
super.onCreate(savedInstanceState);
setContentView(R.layout.main);
image1 = (ImageView)findViewById(R.id.image1);
image2 = (ImageView)findViewById(R.id.image2);
image3 = (ImageView)findViewById(R.id.image3);
image4 = (ImageView)findViewById(R.id.image4);
buttonSwitch = (Button)findViewById(R.id.switchactivity);

Bitmap bmOriginal = BitmapFactory.decodeResource(getResources(), R.drawable.icon);
image1.setImageBitmap(bmOriginal);

int width = bmOriginal.getWidth();
int height = bmOriginal.getHeight();

final Bitmap bmDulicated2 = Bitmap.createBitmap(width, height, Bitmap.Config.ARGB_8888);
final Bitmap bmDulicated3 = Bitmap.createBitmap(width, height, Bitmap.Config.ARGB_8888);
final Bitmap bmDulicated4 = Bitmap.createBitmap(width, height, Bitmap.Config.ARGB_8888);
int[] srcPixels = new int[width * height];
bmOriginal.getPixels(srcPixels, 0, width, 0, 0, width, height);
int[] destPixels = new int[width * height];

swapGB(srcPixels, destPixels);
bmDulicated2.setPixels(destPixels, 0, width, 0, 0, width, height);
image2.setImageBitmap(bmDulicated2);

swapRB(srcPixels, destPixels);
bmDulicated3.setPixels(destPixels, 0, width, 0, 0, width, height);
image3.setImageBitmap(bmDulicated3);

swapRG(srcPixels, destPixels);
bmDulicated4.setPixels(destPixels, 0, width, 0, 0, width, height);
image4.setImageBitmap(bmDulicated4);

buttonSwitch.setOnClickListener(new Button.OnClickListener(){

@Override
public void onClick(View arg0) {
// TODO Auto-generated method stub

FileOutputStream fos;
try {
fos = openFileOutput("BITMAP_A", Context.MODE_PRIVATE);
bmDulicated2.compress(Bitmap.CompressFormat.PNG, 100, fos);
fos.close();

fos = openFileOutput("BITMAP_B", Context.MODE_PRIVATE);
bmDulicated3.compress(Bitmap.CompressFormat.PNG, 100, fos);
fos.close();

fos = openFileOutput("BITMAP_C", Context.MODE_PRIVATE);
bmDulicated4.compress(Bitmap.CompressFormat.PNG, 100, fos);
fos.close();

} catch (FileNotFoundException e) {
// TODO Auto-generated catch block
e.printStackTrace();
} catch (IOException e) {
// TODO Auto-generated catch block
e.printStackTrace();
}

Intent intent = new Intent(AndroidBitmapActivity.this, SecondActivity.class);
startActivity(intent);
}});

}

void swapGB(int[] src, int[] dest){
for(int i = 0; i < src.length; i++){
dest[i] = (src[i] & 0xffff0000)
| ((src[i] & 0x000000ff)<<8)
| ((src[i] & 0x0000ff00)>>8);
}
}

void swapRB(int[] src, int[] dest){
for(int i = 0; i < src.length; i++){
dest[i] = (src[i] & 0xff00ff00)
| ((src[i] & 0x000000ff)<<16)
| ((src[i] & 0x00ff0000)>>16);
}
}

void swapRG(int[] src, int[] dest){
for(int i = 0; i < src.length; i++){
dest[i] = (src[i] & 0xff0000ff)
| ((src[i] & 0x0000ff00)<<8)
| ((src[i] & 0x00ff0000)>>8);
}
}
}


SecondActivity.java
package com.exercise.AndroidBitmap;

import java.io.FileInputStream;
import java.io.FileNotFoundException;
import java.io.IOException;

import android.app.Activity;
import android.graphics.Bitmap;
import android.graphics.BitmapFactory;
import android.os.Bundle;
import android.widget.ImageView;

public class SecondActivity extends Activity {

ImageView imageA, imageB, imageC;

@Override
protected void onCreate(Bundle savedInstanceState) {
// TODO Auto-generated method stub
super.onCreate(savedInstanceState);
setContentView(R.layout.second);
imageA = (ImageView)findViewById(R.id.imagea);
imageB = (ImageView)findViewById(R.id.imageb);
imageC = (ImageView)findViewById(R.id.imagec);

Bitmap bitmapA = null;
Bitmap bitmapB = null;
Bitmap bitmapC = null;
FileInputStream fis;

try {
fis = openFileInput("BITMAP_A");
bitmapA = BitmapFactory.decodeStream(fis);
fis.close();

fis = openFileInput("BITMAP_B");
bitmapB = BitmapFactory.decodeStream(fis);
fis.close();

fis = openFileInput("BITMAP_C");
bitmapC = BitmapFactory.decodeStream(fis);
fis.close();

} catch (FileNotFoundException e) {
// TODO Auto-generated catch block
e.printStackTrace();
} catch (IOException e) {
// TODO Auto-generated catch block
e.printStackTrace();
}

imageA.setImageBitmap(bitmapA);
imageB.setImageBitmap(bitmapB);
imageC.setImageBitmap(bitmapC);

}

}


Download the files.

Related article:
- Share Bitmap between activities as global common resources
- Internal Storage