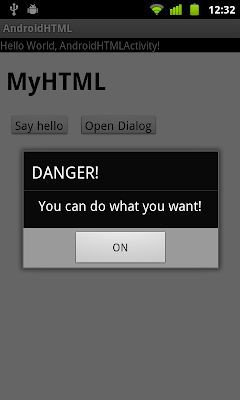
To bind a new interface between your JavaScript and Android code, call addJavascriptInterface(), passing it a class instance to bind to your JavaScript and an interface name that your JavaScript can call to access the class.
Caution: Using addJavascriptInterface() allows JavaScript to control your Android application. This can be a very useful feature or a dangerous security issue. When the HTML in the WebView is untrustworthy (for example, part or all of the HTML is provided by an unknown person or process), then an attacker can include HTML that executes your client-side code and possibly any code of the attacker's choosing. As such, you should not use addJavascriptInterface() unless you wrote all of the HTML and JavaScript that appears in your WebView. You should also not allow the user to navigate to other web pages that are not your own, within your WebView (instead, allow the user's default browser application to open foreign links—by default, the user's web browser opens all URL links, so be careful only if you handle page navigation as described in the following section).
Example:

Modify from last exercise "Load local HTML webpage inside APK":
Modify /assets/mypage.html to add two button to call JavascriptInterface in Android Java code.
<!DOCTYPE html>
<html>
<head>
<meta charset="UTF-8">
<meta name="viewport" content="width=device-width; user-scalable=0;" />
<title>My HTML</title>
</head>
<body>
<h1>MyHTML</h1>

<input type="button" value="Say hello" onClick="showAndroidToast('Hello Android!')" />

<script type="text/javascript">
 function showAndroidToast(toast) {
     AndroidFunction.showToast(toast);
 }
</script>

<input type="button" value="Open Dialog" onClick="openAndroidDialog()" />

<script type="text/javascript">
 function openAndroidDialog() {
     AndroidFunction.openAndroidDialog();
 }
</script>

</body>
</html>
Keep using main.xml from last exercise.
Main code, to add our JavascriptInterface.
package com.exercise.AndroidHTML;

import android.app.Activity;
import android.app.AlertDialog;
import android.content.Context;
import android.os.Bundle;
import android.webkit.WebView;
import android.widget.Toast;

public class AndroidHTMLActivity extends Activity {

WebView myBrowser;

 /** Called when the activity is first created. */
 @Override
 public void onCreate(Bundle savedInstanceState) {
     super.onCreate(savedInstanceState);
     setContentView(R.layout.main);
     myBrowser = (WebView)findViewById(R.id.mybrowser);
     myBrowser.addJavascriptInterface(new MyJavaScriptInterface(this), "AndroidFunction");

     myBrowser.getSettings().setJavaScriptEnabled(true);
     myBrowser.loadUrl("file:///android_asset/mypage.html");

 }

public class MyJavaScriptInterface {
 Context mContext;

    MyJavaScriptInterface(Context c) {
        mContext = c;
    }

    public void showToast(String toast){
        Toast.makeText(mContext, toast, Toast.LENGTH_SHORT).show();
    }

    public void openAndroidDialog(){
     AlertDialog.Builder myDialog
     = new AlertDialog.Builder(AndroidHTMLActivity.this);
     myDialog.setTitle("DANGER!");
     myDialog.setMessage("You can do what you want!");
     myDialog.setPositiveButton("ON", null);
     myDialog.show();
    }

}
}next:
- Call JavaScript inside WebView from Android activity, with parameter passed.
Updated: Read the updated example with @JavascriptInterface.
6 comments:
Thanks for this tutorial.
The "download file" link doesn't work.
Please upload the source again.
Thanks
Download link fixed.
Thx
Hi This is not work in my application error:"VM aborting"
what is the problem plz help me
Thank you for your post.Awesome tutorial.
Post a Comment