Tuesday, July 28, 2009

Simple Compiler And Runtime, BASIC for Android

Simple is a BASIC dialect for developing Android applications. It is particularly well suited for non-professional programmers (but not limited to). Simple allows programmers to quickly write Android applications by using the components supplied by its runtime system.

Simple programs are form definitions (which contain components) and code (which contains the program logic). The interaction between the components and the program logic happens through events triggered by the components. The program logic consists of event handlers which contain code reacting to the events.

Simple Project Home
To know How To Write A Simple Application

Thursday, July 23, 2009

Configure Eclipse to work with local cvs server

In previous article, Setup cvs server on Ubuntu, I described how to setup cvs server. In this article, I will describe how to setup Eclipse to work with the local cvs server.

OS: Ubuntu 9.04
Eclipse version: 3.5 Galileo, with CVS installed.

Firstly, open your project and switch to CVS Perspective
Click the Eclipse Menu Bar Window > Open Perspective > Other...

Select CVS Perspective Expoloring


Right click on the empty are of CVS Perspective wiindow,
select New Perspective Location

Enter the setting:
Host: localhost
Repository path: /myrepos
User: cvsuser
Password: ********
Connection Type: pserver
Use the default port


Click Finish


Switch back to java Perspective

Right click project, select Team > Share Project...


Use existing repository location:
:pserver:cvsuser@local:/myrepos
and click Next


Accept the default setting, click Next


And click Finish


Enter your comment and click Finish


Now, your Eclipse project is linked with your local CVS sserver.

Wednesday, July 22, 2009

Setup cvs server on Ubuntu

In this article, I describe steps to setup cvs server on Ubuntu.

Install cvs and cvsd, start Synaptic Package Manager from ubuntu menu bar
System > Administration > Synaptic Package Manager

typ cvs in Quick Search box, select cvs and cvsd, click Apply.


When installing cvsd, you will be asked to enter Repositories to serve, the default setting is /demo:/myrepos, just accept it and click Forward.


After changes applied, you can close Synaptic Package Manager.

Next, open a Terminal.

Type the command to create /myrepos
#cd /var/lib/cvsd
#sudo mkdir myrepos

Initial /myrepos
#sudo cvs -d /var/lib/cvsd/myrepos init

Modify the file /var/lib/cvsd/myrepos/CVSROOT/config
(May be you have to change the permission to writable)

#sudo gedit /var/lib/cvsd/myrepos/CVSROOT/config
Add the line into it:

SystemAuth=no
PamAuth=no
LockDir=/tmp/myrepos

Save and Exit editor

Create LockDir
#sudo mkdir /var/lib/cvsd/tmp/myrepos

Add a user, named cvsuser
#sudo cvsd-passwd /var/lib/cvsd/myrepos cvsuser
You will be ask to input password.

Modify /etc/cvsd/cvsd.conf
#sudo gedit /etc/cvsd/cvsd.conf

Scroll to end of the file, find the text

Listen * 2401
Repos /demo
Repos /myrepos


change to

Listen 127.0.0.1 2401
Repos /demo
Repos /myrepos


where 127.0.0.1 is my local static IP, 2401 is the default port used by cvs.

and then, set the right.
#sudo chown cvsd:cvsd /var/lib/cvsd -R

Restart cvsd
#sudo /etc/init.d/cvsd restart

You can check the cvsd status using the command,
#sudo /etc/init.d/cvsd status

Make sure it's running.


Now your cvs server is up and running, in the comming article, I will describe how to configure Eclipse to work with this local cvs server.

Tuesday, July 21, 2009

Eclipse Local History

Using Eclipse to develop Android, you can have some useful tools to improve your working. Eclipse's Local History and CVS help much in keep record/version in development.

Local History

Local history of a file is maintained when you create or modify a file. Each time you edit and save a file, a copy of it is saved. This allows you to compare your current file state to a previous state, or replace the file with a previous state. Each state in the local history is identified by the date and time the file was saved.

Neither projects nor folders have local history.

Local History is displayed in the History View. Here is a look at what the local history of a Workbench file might look like:


To view the local history of a file, choose Team > Show Local History from the pop-up menu. This will bring up the History view and populate it with the revisions of the selected file. You can open different revisions from the table (by using Open from the context menu or by double clicking on a revision), compare them against the latest revision or against a previous revisions (by using Compare With Revision from the context menu), and replace the current revision with the contents of a previous revisions (by using Get Contents from the context menu).


For more details, refer to your Eclipse's Help Workbench User Guide > Reference > User interface information > Development environment > Local history or Eclipse on-line help here


In comming articles, I will describe how to set-up a CVS server on Ubuntu, and configure Eclipse to work on local CVS server.

Sunday, July 19, 2009

HTC Hero - First Look


A glimpse from HTC of what their third-generation Google/Android smartphone will look like. This model, the Hero, is designed for European customers. A version (or versions) of this phone, especially designed for the U.S. market, is said to be in the works for release by the end of 2009.

Change UI elements by changing main.xml

In the previous article, "Exercise: Hello World with EditText input", all the elements are placed in a single LinearLayout, both the OK and Cancel button's width are defined as wrap_content. It can be noted that the layout is not good aligned.

The layout can be changed by changing main.xml, without any modification on the java code.

<?xml version="1.0" encoding="utf-8"?>
<LinearLayout xmlns:android="http://schemas.android.com/apk/res/android"
android:orientation="vertical"
android:layout_width="fill_parent"
android:layout_height="fill_parent"
>
<TextView
android:layout_width="fill_parent"
android:layout_height="wrap_content"
android:text="@string/hello"
/>
<TextView
android:layout_width="fill_parent"
android:layout_height="wrap_content"
android:text="Who you are?"
/>
<EditText
android:id = "@+id/message_text"
android:layout_width="fill_parent"
android:layout_height="wrap_content"
/>
<Button
android:id = "@+id/ok"
android:layout_width="fill_parent"
android:layout_height="wrap_content"
android:text="OK" />
<Button
android:id = "@+id/cancel"
android:layout_width="fill_parent"
android:layout_height="wrap_content"
android:text="Cancel" />
</LinearLayout>


<?xml version="1.0" encoding="utf-8"?>
<LinearLayout xmlns:android="http://schemas.android.com/apk/res/android"
android:orientation="vertical"
android:layout_width="fill_parent"
android:layout_height="fill_parent"
>
<TextView
android:layout_width="fill_parent"
android:layout_height="wrap_content"
android:text="@string/hello"
/>
<TextView
android:layout_width="fill_parent"
android:layout_height="wrap_content"
android:text="Who you are?"
/>
<EditText
android:id = "@+id/message_text"
android:layout_width="fill_parent"
android:layout_height="wrap_content"
/>
<LinearLayout
android:orientation="horizontal"
android:layout_width="fill_parent"
android:layout_height="fill_parent"
>
<Button
android:id = "@+id/ok"
android:layout_width="wrap_content"
android:layout_height="wrap_content"
android:text="OK" />
<Button
android:id = "@+id/cancel"
android:layout_width="wrap_content"
android:layout_height="wrap_content"
android:text="Cancel" />
</LinearLayout>
</LinearLayout>


<?xml version="1.0" encoding="utf-8"?>
<LinearLayout xmlns:android="http://schemas.android.com/apk/res/android"
android:orientation="vertical"
android:layout_width="fill_parent"
android:layout_height="fill_parent"
>
<TextView
android:layout_width="fill_parent"
android:layout_height="wrap_content"
android:text="@string/hello"
/>
<TextView
android:layout_width="fill_parent"
android:layout_height="wrap_content"
android:text="Who you are?"
/>
<EditText
android:id = "@+id/message_text"
android:layout_width="fill_parent"
android:layout_height="wrap_content"
/>
<LinearLayout
android:orientation="horizontal"
android:layout_width="fill_parent"
android:layout_height="fill_parent"
android:gravity="right|bottom"
>
<Button
android:id = "@+id/ok"
android:layout_width="wrap_content"
android:layout_height="wrap_content"
android:text="OK" />
<Button
android:id = "@+id/cancel"
android:layout_width="wrap_content"
android:layout_height="wrap_content"
android:text="Cancel" />
</LinearLayout>
</LinearLayout>


Download the project files

Exercise: Hello World with EditText input


In this exercise, I will implement a simply Hello World Andrid application; there is a EditText, after user enter name and click OK button, the Title of the application will be changed accordingly.

First of all, generate a Android Project in Eclipse, as described in the previous article, Install Android SDK on Eclipse 3.5 Galileo.

Modify the main.xml to change the UI screen.


<?xml version="1.0" encoding="utf-8"?>
<LinearLayout xmlns:android="http://schemas.android.com/apk/res/android"
android:orientation="vertical"
android:layout_width="fill_parent"
android:layout_height="fill_parent"
>
<TextView
android:layout_width="fill_parent"
android:layout_height="wrap_content"
android:text="@string/hello"
/>
<TextView
android:layout_width="fill_parent"
android:layout_height="wrap_content"
android:text="Who you are?"
/>
<EditText
android:id = "@+id/message_text"
android:layout_width="fill_parent"
android:layout_height="wrap_content"
/>
<Button
android:id = "@+id/ok"
android:layout_width="wrap_content"
android:layout_height="wrap_content"
android:text="OK" />
<Button
android:id = "@+id/cancel"
android:layout_width="wrap_content"
android:layout_height="wrap_content"
android:text="Cancel" />
</LinearLayout>
main.xml

And then, change the HelloAndroid.java as follow:


package com.example.helloandroid;

import android.app.Activity;
import android.os.Bundle;
import android.view.View;
import android.widget.Button;
import android.widget.EditText;

public class HelloAndroid extends Activity {
/** Called when the activity is first created. */
@Override
public void onCreate(Bundle savedInstanceState) {
super.onCreate(savedInstanceState);
setContentView(R.layout.main);


Button okButton = (Button) findViewById(R.id.ok);
okButton.setOnClickListener(okOnClickListener);
Button cancelButton = (Button) findViewById(R.id.cancel);
cancelButton.setOnClickListener(cancelOnClickListener);
}
private Button.OnClickListener okOnClickListener =
new Button.OnClickListener(){
@Override
public void onClick(View v) {
EditText edit_text = (EditText)
findViewById(R.id.message_text);
CharSequence edit_text_value =
edit_text.getText();
setTitle("Hello:"+edit_text_value);
}
};

private Button.OnClickListener cancelOnClickListener =
new
Button.OnClickListener(){
@Override
public void onClick(View v) {
finish();
}
};
}
HelloAndroid.java

Friday, July 17, 2009

Install Android SDK on Eclipse 3.5 Galileo

In this article, the procedure to install Android SDK on Eclipse Galileo will be described:


Android 1.6 SDK is available now, the setup procedure is same:)

If you have installed Android SDK 1.5 with Eclipse already,
here is the procedure to upgrade from Android 1.5 to 1.6.

--- Erik edited@2009-09-16 ---


Android 2.0 is available.
In order to develope application for Android, Android SDK Tools, Revision 3 is need.
The setup procedure is same.
:)

If you have installed Android 1.6 SDK with Eclipse already,
here is the procedure to upgrade to Android SDK Tools, Revision 3.

--- Erik edited@2009-10-28

It you are going to install Android SDK release 3 + Eclipse 3.5 + Ubuntu 9.10
Refer here: http://android-er.blogspot.com/2009/11/install-android-sdk-release-3-on.html

--- Erik edited@2009-11-06


OS: Ubuntu 9.04
Java: Sun JDK 6
Eclipse version: 3.5 Galileo
Android SDK: Android 1.5 SDK r3 (Also applied on Android 1.6 and 2.0 SDK)

Before you can start, you have to install jdk, type the following command in Terminal:
sudo apt-get install sun-java6-jdk

Sun's JDK 6 will be installed automatically.

Download Eclipse IDE for Java Developers from http://www.eclipse.org/downloads/, the current version is 3.5 Galileo. Extract to any location you want.
Download Android SDK http://developer.android.com/sdk/index.html, extract to any location you want.


http://developer.android.com/sdk/1.6_r1/index.html for Android SDK 1.6.


Here is page to Download the Android SDK for Android 2.0 SDK.


You are suggested to add the location of the SDK's primary tools directory to your system PATH. In my case, used on ubuntu 9.05, modify the file ~/.bashrc to include the statement:

export PATH=${PATH}:android-sdk-linux_x86-1.5_r3/tools

where android-sdk-linux_x86-1.5_r3/ is the location of my android sdk.

Now, it's the time to Installing the ADT Plugin for Eclipse:

Start Eclipse, click Help>Install New Software...
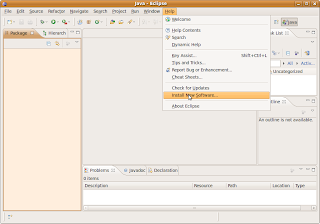

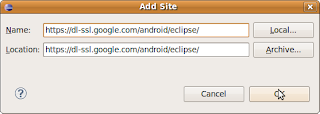
click ADD to add ADT site
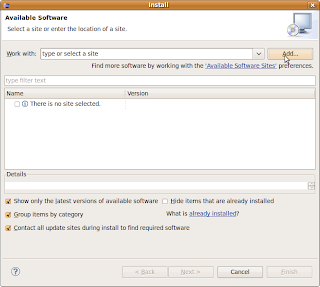
insert https://dl-ssl.google.com/android/eclipse/ in the location box, and click OK.
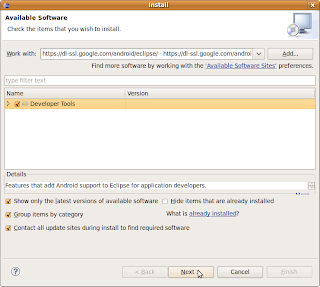
Make sure to enable Developer Tools and click Next.
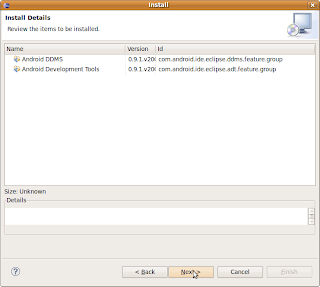
and Next again.
Accept the terms and click Finish.
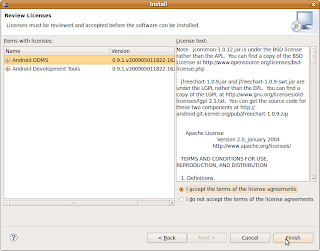
You will be asked to restart Eclipse, just restart it.

Then you have to set Eclipse preferences for Android SDK.

Click Window>preference
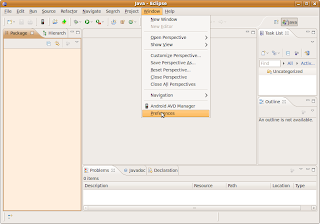
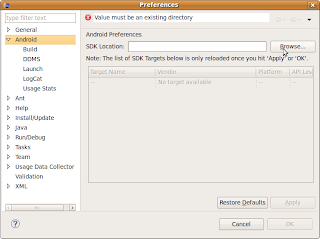
Browse to the location where you install the Android SDK.
Click Apply, and wait for a moment, the list of SDK will be displayed, click OK.
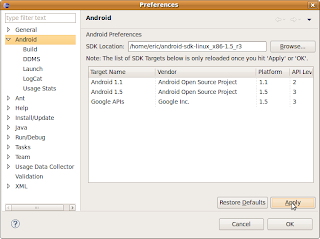
Basically, your Eclipse+Android development IDE is finished.

Before you can Run your Android application on emulator, you have to create your Android Virtual Device (AVD).

Open a terminal, navigate to the /tools directory in the SDK package and execute:

android create avd --target 2 --name my_avd

It's time to implement a HelloAndroid to check if it's work OK.

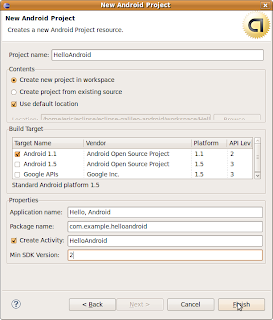
Click File>New>Project... then select Android>Android Project... and click next.

Fill in the project details with the following values:
  • Project name: HelloAndroid
  • Application name: Hello, Android
  • Package name: com.example.helloandroid
  • Create Activity: HelloAndroid
  • Min SDK Version: 2
And click Finish.


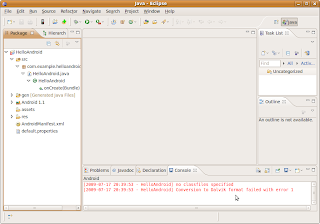
Oop!
no classfiles specified
Conversion to Dalvik format failed with error 1

If you see the error (I suppose you will), add Android in the Build Path.

Right click you project, Build Path>>Configure Build Path...
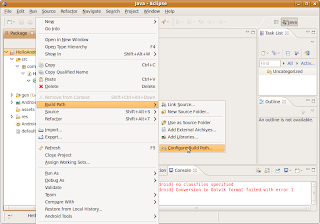

Enable Android 1.1 and click OK.
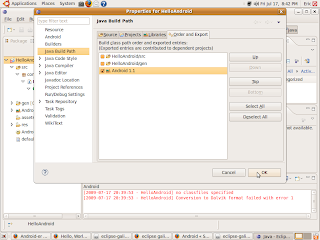
Wait a moment, you project will be re-built. Suppose your project will be built without error.

Right click the project, Run As>>Android Application


Wait! Wait! your first HelloAndroid will be run on Android Emulator.
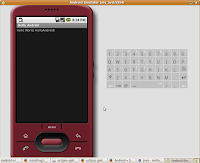
Thursday, July 16, 2009

Android 1.5 SDK r3 released


Android 1.5 SDK r3

Android 1.5 SDK is now available. It includes new APIs for Android 1.5, updated developer tools, multiple platform versions, and a Google APIs add-on.

Download Android 1.5 SDK »

Wednesday, July 15, 2009

Sony Ericsson Rachael UI


A demo showing the customizations Sony Ericsson applied to Android in its forthcoming uberphone - codenamed "Rachael".

Tuesday, July 14, 2009

live-android, A LiveCD for Android


LiveAndroid, is a LiveCD for Android running on x86 platforms.

Want to give Google Android a try, but don't feel like buying a T-Mobile G1? LiveAndroid lets you download a LiveCD disc image of the Google Android operating system. Just burn the image to a disc, stick it in a CD-ROM drive, and reboot your computer and you can check out Android without installing it or affecting any files on your PC.

You can also use the disc image in a virtualization application like VirtualBox or Microsoft Virtual PC if you want to try the operating system without even rebooting your computer.

The current version is 0.2.

To know more about LiveAndroid>>

Wednesday, July 8, 2009

Android 1.5 NDK, R1 released

What is the Android NDK?

The Android NDK provides tools that allow Android application developers to embed components that make use of native code in their Android applications.

Android applications run in the Dalvik virtual machine. The NDK allows developers to implement parts of their applications using native-code languages such as C and C++. This can provide benefits to certain classes of applications, in the form of reuse of existing code and in some cases increased speed.

The NDK provides:

  • A set of tools and build files used to generate native code libraries from C and C++ sources
  • A way to embed the corresponding native libraries into application package files (.apks) that can be deployed on Android devices
  • A set of native system headers and libraries that will be supported in all future versions of the Android platform, starting from Android 1.5
  • Documentation, samples, and tutorials


Download Android 1.5 NDK, Release 1>>

Android 1.5


The latest version of the Android platform brings new features, improvements, and enhancements to Android-powered phones.

Highlights

  • Fast, smooth typing with the on-screen virtual keyboard
  • Easy access to favorite apps, contacts, bookmarks, and more via home screen widgets and live folders
  • Video recording, playback, and sharing
  • Full web experience with enhanced browser
  • Hands-free calls and listening with stereo bluetooth
  • Lots of UI refinements and performance improvements to the overall phone experience
  • New APIs and elements to enable even more innovative apps from developers