Android 1.6 SDK is available now, the setup procedure is same:)

If you have installed Android SDK 1.5 with Eclipse already,
here is the procedure to upgrade from Android 1.5 to 1.6.

--- Erik edited@2009-09-16 ---
Android 2.0 is available.
In order to develope application for Android, Android SDK Tools, Revision 3 is need.
The setup procedure is same.
:)

If you have installed Android 1.6 SDK with Eclipse already,
here is the procedure to upgrade to Android SDK Tools, Revision 3.

--- Erik edited@2009-10-28

It you are going to install Android SDK release 3 + Eclipse 3.5 + Ubuntu 9.10
Refer here: http://android-er.blogspot.com/2009/11/install-android-sdk-release-3-on.html

--- Erik edited@2009-11-06
OS: Ubuntu 9.04
Java: Sun JDK 6
Eclipse version: 3.5 Galileo
Android SDK: Android 1.5 SDK r3 (Also applied on Android 1.6 and 2.0 SDK)
Before you can start, you have to install jdk, type the following command in Terminal:
sudo apt-get install sun-java6-jdk
Sun's JDK 6 will be installed automatically.
Download Eclipse IDE for Java Developers from http://www.eclipse.org/downloads/, the current version is 3.5 Galileo. Extract to any location you want.
Download Android SDK http://developer.android.com/sdk/index.html, extract to any location you want.
http://developer.android.com/sdk/1.6_r1/index.html for Android SDK 1.6.
Here is page to Download the Android SDK for Android 2.0 SDK.
You are suggested to add the location of the SDK's primary tools directory to your system PATH. In my case, used on ubuntu 9.05, modify the file ~/.bashrc to include the statement:
export PATH=${PATH}:android-sdk-linux_x86-1.5_r3/tools
where android-sdk-linux_x86-1.5_r3/ is the location of my android sdk.
Now, it's the time to Installing the ADT Plugin for Eclipse:
Start Eclipse, click Help>Install New Software...
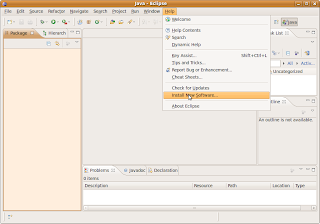
click ADD to add ADT site
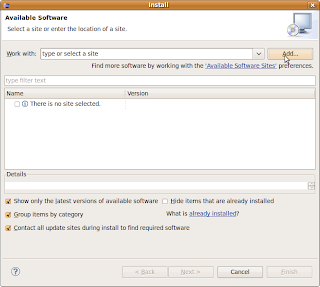
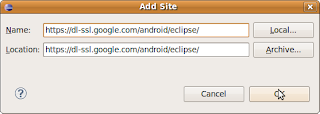
insert https://dl-ssl.google.com/android/eclipse/ in the location box, and click OK.
Make sure to enable Developer Tools and click Next.
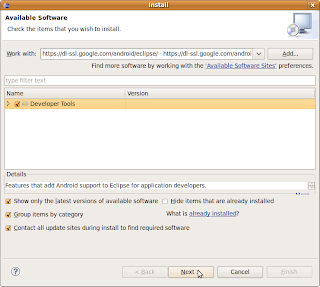
and Next again.
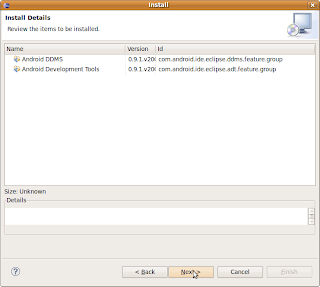
Accept the terms and click Finish.
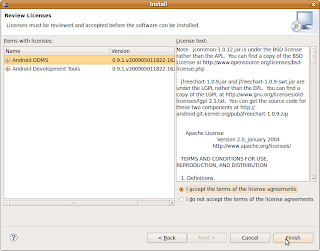 You will be asked to restart Eclipse, just restart it.
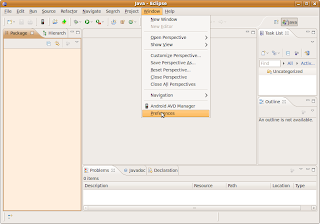
Then you have to set Eclipse preferences for Android SDK.
Click Window>preference
Browse to the location where you install the Android SDK.
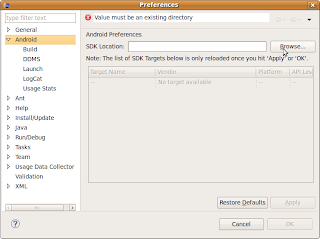
Click Apply, and wait for a moment, the list of SDK will be displayed, click OK.
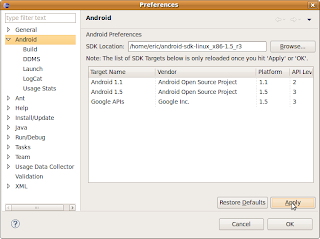 Basically, your Eclipse+Android development IDE is finished.
Before you can Run your Android application on emulator, you have to create your Android Virtual Device (AVD).
Open a terminal, navigate to the /tools directory in the SDK package and execute:
android create avd --target 2 --name my_avd
It's time to implement a HelloAndroid to check if it's work OK.
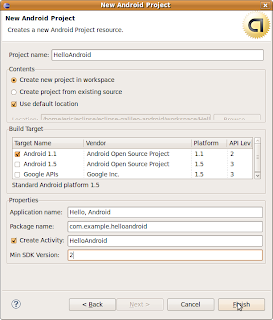
Click File>New>Project... then select Android>Android Project... and click next.
Fill in the project details with the following values:
- Project name: HelloAndroid
- Application name: Hello, Android
- Package name: com.example.helloandroid
- Create Activity: HelloAndroid
- Min SDK Version: 2
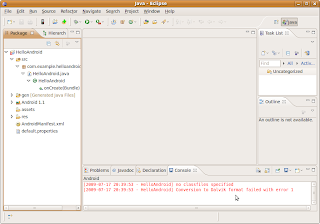
Oop!
no classfiles specified
Conversion to Dalvik format failed with error 1
If you see the error (I suppose you will), add Android in the Build Path.
Right click you project, Build Path>>Configure Build Path...
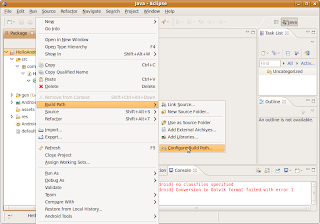
Enable Android 1.1 and click OK.
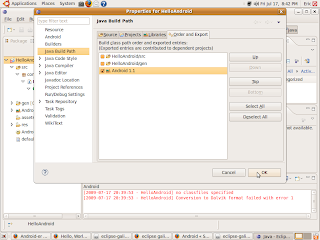 Wait a moment, you project will be re-built. Suppose your project will be built without error.
Right click the project, Run As>>Android Application

Wait! Wait! your first HelloAndroid will be run on Android Emulator.
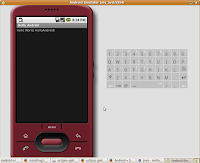
22 comments:
Awesome! Thanks for such an elaborate how-to. Works perfectly!
Superb many thanks for excellent guide
Congratulations for this great guide!
Total novice here. How do I "open a terminal" so I can proceed with the below instructions?
"Before you can Run your Android application on emulator, you have to create your Android Virtual Device (AVD).
Open a terminal, navigate to the /tools directory in the SDK package and execute:
android create avd --target 2 --name my_avd"
Thx all.
Reply eggroll:
Do you run on Ubuntu?
Click Applications on the top menu, expend Accessories, then you can see the application Terminal.
Hi.
I have Eclipse 3.5 and Ubuntu 9.04
When i specify path to android, eclipse
say: 'Could not find /opt/android/tools/adb!' (i setup android in /opt/android)
Please, tell me what I need do
Im so sorry)
Im unpacked sdk archive as root, eclipse was ran with user privileges, so eclipse dont have access to android.
I changed owner and now all works fine!
Thanks
Thank You very much for your howto. I saved a lot of time with it. Thanks again
When I try to install the Development Tools,I get a failure with the error message below. Any suggestions?
Cannot complete the install because one or more required items could not be found.
Software being installed: Android Development Tools 0.9.1.v200905011822-1621 (com.android.ide.eclipse.adt.feature.group 0.9.1.v200905011822-1621)
Missing requirement: Android Development Tools 0.9.1.v200905011822-1621 (com.android.ide.eclipse.adt.feature.group 0.9.1.v200905011822-1621) requires 'org.eclipse.gef 0.0.0' but it could not be found
Reply to goyishekop:
I didn't seen this problem in my case.
Is it happen in downloading ADT Plugin for Eclipse?
I think that it's some problem in downloading files, as mentioned in Android site:
Note: If you have trouble aqcuiring the plugin, you can try using "http" in the URL, instead of "https" (https is preferred for security reasons).
Hope can help.
Follow to the problem of goyishekop:
It's should be some components missed in Eclipse setup, depends on the package installed.
Try to include "http://download.eclipse.org/releases/galileo" in the Available Software Sites.
How I overcame the Android SDK install on 9.10 x64:
1.Install eclipse, Sun JDK, and Ant with Synaptic Package Manager as required:
http://developer.android.com/sdk/requirements.html
2.Download and unzip the SDK somewhere:
http://developer.android.com/sdk/index.html
3.Add a path variable to your ~/.bashrc file
gedit ~/.bashrc
* add: export ANDROID_HOME=/opt/android-sdk
* add: export PATH=$PATH:$ANDROID_HOME/tools
4.If you get errors running .../tools/android try to select force HTTP instead of HTTPS (you must hit apply, if the button does not gray out hit return after clicking. You may have to do this elsewhere in this program)
If you still cannot get it to work try the steps outlined here:
http://groups.google.com/group/android-developers/browse_thread/thread/63a44163a8d07cd9/1c3291aeb973d0bb
First, I had to force http: echo "sdkman.force.http=true" > ~/.android/androidtool.cfg
still problems?
Then, create a tmp directory on the same level as the android_sdk_linux/ directory: mkdir tmp && chmod a+rwx tmp
Lastly, change the ownership of the android_sdk_linux/ directory, to me: chown -R me:users android_sdk_linux/
5.Install the ADT Plugin:
http://developer.android.com/sdk/eclipse-adt.html#installing
Fix the org.eclipse.wst.sse.ui eclipse error (if you get it):
http://code.google.com/eclipse/docs/faq.html#wstinstallerror
6.Do #5 again.
Try to create a VM in android.
I had the same problem as goyishekop. Android Er Solution worked for me. Thanks.
Following happened at installation process:
An error occurred while installing the items
session context was:(profile=PlatformProfile, phase=org.eclipse.equinox.internal.provisional.p2.engine.phases.Install, operand=null --> [R]org.eclipse.ant.ui 3.4.1.v20090901_r351, action=org.eclipse.equinox.internal.p2.touchpoint.eclipse.actions.InstallBundleAction).
The artifact file for osgi.bundle,org.eclipse.ant.ui,3.4.1.v20090901_r351 was not found.
this is one of the most elaborately explained notes on ADT setup.
But i am having some problems.
i have followed all the steps specified.. the android virtual device also shows up.
but it doesnt show up properly.
~ i am using android 2.1 API-7.
~ i am using linux ubuntu 9.10 karmic
~ i am using eclipse 3.5
the problem is
1. upon setting up the AVD from AVD Manager in eclipse - the defaul skin HVGA cannot be used. it says "Skin HVGA does not exist"
2. upon starting the AVD with a different skin the screen does not appear right.... the AVD doesn't have any physical body showing; it shows just the black screen. and the black screen has written "ANDROID" with a blinking cursor at the end... no battery icon, no nothing
3. i tried making a helloWORLD application following the developer.android.com help reference. it compiles properly. but doesn't show anything when RUN over the AVD. it shows a black screen with just "ANDROID" written on it and a blinking cursor at the end. no battery icon.... no signal icong..... nothing
4. the keyboard inputs and the interaction buttons on the AVD don't function at all.
please help.....
please help.....
please help.....
Александр: Sorry, I have no idea on your problem!
Syed Rakib Al Hasan: The emulator show "ANDROID" only --- the bootup process of Android Emulator is a very very long time process, please wait more.
Personally, I will use Ubuntu's menu -> System -> Administration -> System Monitor to set higher priority to emulator. But I don't know is it really improve or not.
hey Android-Er....
thanks for the reply.... i was actually being too impatient for the android to boot up. it's fine now.
but yet again, how do i solve the error of my problem no.1
1. upon setting up a new AVD from the SDK and AVD Manager (using eclipse) - the defaul skin HVGA cannot be used. it says "Skin HVGA does not exist"
how do i solve this???
Hy all..here you got step by step installation of Android SDK and Eclipse with screen shots.Visit
Android Er's solution also worked for me, but you must close and reopen the Install dialog.mer
Hello I have a problem.. when i run the project as android application the error is displayed .. the error is as follows
invalid command-line parameter: Files\android-sdk\tools/emulator-arm.exe.
Hint: use '@foo' to launch a virtual device named 'foo'.
please use -help for more information
Post a Comment