Tuesday, May 31, 2011

HelloGallery, read picture files from SD, display in ImageView, and set as Wallpaper

Modify the exercise "HelloGallery, read picture files from SD, display in ImageView". When user click on the displayedImageView, it will be set as Wallpaper, using using WallpaperManager.

HelloGallery, read picture files from SD, display in ImageView, and set as Wallpaper

package com.exercise.HelloGallery;

import java.io.File;
import java.io.IOException;
import java.util.ArrayList;
import java.util.List;

import android.app.Activity;
import android.app.WallpaperManager;
import android.content.Context;
import android.content.res.TypedArray;
import android.graphics.Bitmap;
import android.graphics.BitmapFactory;
import android.os.Bundle;
import android.view.View;
import android.view.ViewGroup;
import android.view.View.OnClickListener;
import android.widget.AdapterView;
import android.widget.BaseAdapter;
import android.widget.Gallery;
import android.widget.ImageView;
import android.widget.Toast;
import android.widget.AdapterView.OnItemClickListener;

public class HelloGallery extends Activity {

Bitmap bitmap;

/** Called when the activity is first created. */
@Override
public void onCreate(Bundle savedInstanceState) {
super.onCreate(savedInstanceState);
setContentView(R.layout.main);

final ImageView imageView = (ImageView)findViewById(R.id.imageview);

Gallery g = (Gallery) findViewById(R.id.gallery);
final List<String> SD = ReadSDCard();
g.setAdapter(new ImageAdapter(this, SD));

g.setOnItemClickListener(new OnItemClickListener() {
public void onItemClick(AdapterView<?> parent,
View v, int position, long id) {

String imageInSD = SD.get(position);

Toast.makeText(HelloGallery.this,
imageInSD,
Toast.LENGTH_LONG).show();

bitmap = BitmapFactory.decodeFile(imageInSD);
imageView.setImageBitmap(bitmap);

}
});

imageView.setOnClickListener(new OnClickListener(){

@Override
public void onClick(View view) {
// TODO Auto-generated method stub
WallpaperManager myWallpaperManager
= WallpaperManager.getInstance(getApplicationContext());
try {
myWallpaperManager.setBitmap(bitmap);
} catch (IOException e) {
// TODO Auto-generated catch block
e.printStackTrace();
}
}});
}

private List<String> ReadSDCard()
{
List<String> tFileList = new ArrayList<String>();

//It have to be matched with the directory in SDCard
File f = new File("/sdcard/pictures/");

File[] files=f.listFiles();

for(int i=0; i<files.length; i++)
{
File file = files[i];
//add the selected file type only
String curFile=file.getPath();
String ext=curFile.substring(curFile.lastIndexOf(".")+1,
curFile.length()).toLowerCase();
if(ext.equals("jpg")||ext.equals("gif")||ext.equals("png"))
tFileList.add(file.getPath());
}

return tFileList;
}

public class ImageAdapter extends BaseAdapter {
int mGalleryItemBackground;
private Context mContext;
private List<String> FileList;

public ImageAdapter(Context c, List<String> fList) {
mContext = c;
FileList = fList;
TypedArray a = obtainStyledAttributes(R.styleable.Theme);
mGalleryItemBackground = a.getResourceId(
R.styleable.Theme_android_galleryItemBackground,
0);
a.recycle();
}

public int getCount() {
return FileList.size();
}

public Object getItem(int position) {
return position;
}

public long getItemId(int position) {
return position;
}

public View getView(int position, View convertView,
ViewGroup parent) {
ImageView i = new ImageView(mContext);

Bitmap bm = BitmapFactory.decodeFile(
FileList.get(position).toString());
i.setImageBitmap(bm);

i.setLayoutParams(new Gallery.LayoutParams(150, 100));
i.setScaleType(ImageView.ScaleType.FIT_XY);
i.setBackgroundResource(mGalleryItemBackground);

return i;
}
}
}


* Please note that in order to use WallpaperManager, minimum API level have to be set to 5.
* In order to access system wallpaper, AndroidManifest.xml have t be modified to grant permission of "android.permission.SET_WALLPAPER".

<?xml version="1.0" encoding="utf-8"?>
<manifest xmlns:android="http://schemas.android.com/apk/res/android"
package="com.exercise.HelloGallery"
android:versionCode="1"
android:versionName="1.0">
<uses-sdk android:minSdkVersion="7" />
<uses-permission android:name="android.permission.SET_WALLPAPER"></uses-permission>

<application android:icon="@drawable/icon" android:label="@string/app_name">
<activity android:name=".HelloGallery"
android:label="@string/app_name">
<intent-filter>
<action android:name="android.intent.action.MAIN" />
<category android:name="android.intent.category.LAUNCHER" />
</intent-filter>
</activity>

</application>
</manifest>


Download the files.

Play audio using MediaPlayer

To play audio in Android, we can use MediaPlayer. Base on the audio file from last exercise "Start audio recording with intent of MediaStore.Audio.Media.RECORD_SOUND_ACTION", modify to add a Play button to start audio playback using MediaPlayer. Additionally, we have to implement MediaPlayer.OnCompletionListener() method to handle the OnCompletion event.

Play audio using MediaPlayer

package com.exercise.AndroidIntentAudioRecording;

import android.app.Activity;
import android.content.Intent;
import android.media.MediaPlayer;
import android.net.Uri;
import android.os.Bundle;
import android.provider.MediaStore;
import android.view.View;
import android.widget.Button;
import android.widget.Toast;

public class AndroidIntentAudioRecording extends Activity {

final static int RQS_RECORDING = 1;

Uri savedUri;

Button buttonRecord, buttonPlay;

/** Called when the activity is first created. */
@Override
public void onCreate(Bundle savedInstanceState) {
super.onCreate(savedInstanceState);
setContentView(R.layout.main);
buttonRecord = (Button)findViewById(R.id.record);
buttonPlay = (Button)findViewById(R.id.play);
buttonPlay.setEnabled(false);

buttonRecord.setOnClickListener(new Button.OnClickListener(){

@Override
public void onClick(View arg0) {
// TODO Auto-generated method stub
Intent intent =
new Intent(MediaStore.Audio.Media.RECORD_SOUND_ACTION);
startActivityForResult(intent, RQS_RECORDING);
}});

buttonPlay.setOnClickListener(new Button.OnClickListener(){

@Override
public void onClick(View arg0) {
// TODO Auto-generated method stub
MediaPlayer mediaPlayer = MediaPlayer.create(AndroidIntentAudioRecording.this, savedUri);
mediaPlayer.setOnCompletionListener(completionListener);
mediaPlayer.start();
buttonRecord.setEnabled(false);
buttonPlay.setEnabled(false);
}});
}

@Override
protected void onActivityResult(int requestCode, int resultCode, Intent data) {
// TODO Auto-generated method stub
if(requestCode == RQS_RECORDING){
if(resultCode == RESULT_OK){
savedUri = data.getData();
buttonPlay.setEnabled(true);
Toast.makeText(AndroidIntentAudioRecording.this,
"Saved: " + savedUri.getPath(),
Toast.LENGTH_LONG).show();
}else{
buttonPlay.setEnabled(false);
Toast.makeText(AndroidIntentAudioRecording.this,
"User Cancelled!",
Toast.LENGTH_LONG).show();
}

}
}

MediaPlayer.OnCompletionListener completionListener
= new MediaPlayer.OnCompletionListener(){

@Override
public void onCompletion(MediaPlayer arg0) {
// TODO Auto-generated method stub
buttonRecord.setEnabled(true);
buttonPlay.setEnabled(true);
}};

}


<?xml version="1.0" encoding="utf-8"?>
<LinearLayout xmlns:android="http://schemas.android.com/apk/res/android"
android:orientation="vertical"
android:layout_width="fill_parent"
android:layout_height="fill_parent"
>
<TextView
android:layout_width="fill_parent"
android:layout_height="wrap_content"
android:text="@string/hello"
/>
<Button
android:id="@+id/record"
android:layout_width="fill_parent"
android:layout_height="wrap_content"
android:text="Record"
/>
<Button
android:id="@+id/play"
android:layout_width="fill_parent"
android:layout_height="wrap_content"
android:text="Play"
/>
</LinearLayout>


Download the files.

Start audio recording with intent of MediaStore.Audio.Media.RECORD_SOUND_ACTION

Start audio recording with intent of MediaStore.Audio.Media.RECORD_SOUND_ACTION
package com.exercise.AndroidIntentAudioRecording;

import android.app.Activity;
import android.content.Intent;
import android.net.Uri;
import android.os.Bundle;
import android.provider.MediaStore;
import android.view.View;
import android.widget.Button;
import android.widget.Toast;

public class AndroidIntentAudioRecording extends Activity {

final static int RQS_RECORDING = 1;

Uri savedUri;

Button buttonRecord;

/** Called when the activity is first created. */
@Override
public void onCreate(Bundle savedInstanceState) {
super.onCreate(savedInstanceState);
setContentView(R.layout.main);
buttonRecord = (Button)findViewById(R.id.record);

buttonRecord.setOnClickListener(new Button.OnClickListener(){

@Override
public void onClick(View arg0) {
// TODO Auto-generated method stub
Intent intent =
new Intent(MediaStore.Audio.Media.RECORD_SOUND_ACTION);
startActivityForResult(intent, RQS_RECORDING);
}});
}

@Override
protected void onActivityResult(int requestCode, int resultCode, Intent data) {
// TODO Auto-generated method stub
if(requestCode == RQS_RECORDING){
savedUri = data.getData();
Toast.makeText(AndroidIntentAudioRecording.this,
"Saved: " + savedUri.getPath(),
Toast.LENGTH_LONG).show();
}
}
}


<?xml version="1.0" encoding="utf-8"?>
<LinearLayout xmlns:android="http://schemas.android.com/apk/res/android"
android:orientation="vertical"
android:layout_width="fill_parent"
android:layout_height="fill_parent"
>
<TextView
android:layout_width="fill_parent"
android:layout_height="wrap_content"
android:text="@string/hello"
/>
<Button
android:id="@+id/record"
android:layout_width="fill_parent"
android:layout_height="wrap_content"
android:text="Record"
/>
</LinearLayout>


Download the files.

Related:
- Play audio using MediaPlayer

Friday, May 27, 2011

Scan Bluetooth Devices

To start scan bluetooth device, simple call bluetoothAdapter.startDiscovery().

In order to receive the list of found bluetooth devices, we have to implement a BroadcastReceiver for BluetoothDevice.ACTION_FOUND.

Scan Bluetooth Devices

AndroidBluetooth.java
package com.exercise.AndroidBluetooth;

import android.app.Activity;
import android.bluetooth.BluetoothAdapter;
import android.bluetooth.BluetoothDevice;
import android.content.BroadcastReceiver;
import android.content.Context;
import android.content.Intent;
import android.content.IntentFilter;
import android.os.Bundle;
import android.view.View;
import android.widget.ArrayAdapter;
import android.widget.Button;
import android.widget.ListView;
import android.widget.TextView;

public class AndroidBluetooth extends Activity {
 
 private static final int REQUEST_ENABLE_BT = 1;
 
    ListView listDevicesFound;
 Button btnScanDevice;
 TextView stateBluetooth;
 BluetoothAdapter bluetoothAdapter;
 
 ArrayAdapter<String> btArrayAdapter;
 
 /** Called when the activity is first created. */
    @Override
    public void onCreate(Bundle savedInstanceState) {
        super.onCreate(savedInstanceState);
        setContentView(R.layout.main);
        
        btnScanDevice = (Button)findViewById(R.id.scandevice);
        
        stateBluetooth = (TextView)findViewById(R.id.bluetoothstate);
        bluetoothAdapter = BluetoothAdapter.getDefaultAdapter();
        
        listDevicesFound = (ListView)findViewById(R.id.devicesfound);
        btArrayAdapter = new ArrayAdapter<String>(AndroidBluetooth.this, android.R.layout.simple_list_item_1);
        listDevicesFound.setAdapter(btArrayAdapter);
        
        CheckBlueToothState();
        
        btnScanDevice.setOnClickListener(btnScanDeviceOnClickListener);

        registerReceiver(ActionFoundReceiver, 
          new IntentFilter(BluetoothDevice.ACTION_FOUND));
    }
    
    @Override
 protected void onDestroy() {
  // TODO Auto-generated method stub
  super.onDestroy();
  unregisterReceiver(ActionFoundReceiver);
 }

 private void CheckBlueToothState(){
     if (bluetoothAdapter == null){
         stateBluetooth.setText("Bluetooth NOT support");
        }else{
         if (bluetoothAdapter.isEnabled()){
          if(bluetoothAdapter.isDiscovering()){
           stateBluetooth.setText("Bluetooth is currently in device discovery process.");
          }else{
           stateBluetooth.setText("Bluetooth is Enabled.");
           btnScanDevice.setEnabled(true);
          }
         }else{
          stateBluetooth.setText("Bluetooth is NOT Enabled!");
          Intent enableBtIntent = new Intent(BluetoothAdapter.ACTION_REQUEST_ENABLE);
             startActivityForResult(enableBtIntent, REQUEST_ENABLE_BT);
         }
        }
    }
    
    private Button.OnClickListener btnScanDeviceOnClickListener
    = new Button.OnClickListener(){

  @Override
  public void onClick(View arg0) {
   // TODO Auto-generated method stub
   btArrayAdapter.clear();
   bluetoothAdapter.startDiscovery();
  }};

 @Override
 protected void onActivityResult(int requestCode, int resultCode, Intent data) {
  // TODO Auto-generated method stub
  if(requestCode == REQUEST_ENABLE_BT){
   CheckBlueToothState();
  }
 }
    
 private final BroadcastReceiver ActionFoundReceiver = new BroadcastReceiver(){

  @Override
  public void onReceive(Context context, Intent intent) {
   // TODO Auto-generated method stub
   String action = intent.getAction();
   if(BluetoothDevice.ACTION_FOUND.equals(action)) {
             BluetoothDevice device = intent.getParcelableExtra(BluetoothDevice.EXTRA_DEVICE);
             btArrayAdapter.add(device.getName() + "\n" + device.getAddress());
             btArrayAdapter.notifyDataSetChanged();
         }
  }};
    
}


main.xml
<?xml version="1.0" encoding="utf-8"?>
<LinearLayout xmlns:android="http://schemas.android.com/apk/res/android"
    android:orientation="vertical"
    android:layout_width="fill_parent"
    android:layout_height="fill_parent"
    >
<TextView  
    android:layout_width="fill_parent" 
    android:layout_height="wrap_content" 
    android:text="@string/hello"
    />
<TextView 
    android:id="@+id/bluetoothstate" 
    android:layout_width="fill_parent" 
    android:layout_height="wrap_content" 
    />
<TextView
    android:id="@+id/bluetoothstate" 
    android:layout_width="fill_parent" 
    android:layout_height="wrap_content" 
    />
<TextView
    android:layout_width="fill_parent" 
    android:layout_height="wrap_content" 
    android:text="Set Discoverable Duration" 
    />
<Button
    android:id="@+id/scandevice" 
    android:layout_width="fill_parent" 
    android:layout_height="wrap_content"
    android:text="Scan Bluetooth Devices" 
    android:enabled="false"
    /> 
<ListView
    android:id="@+id/devicesfound" 
    android:layout_width="fill_parent" 
    android:layout_height="fill_parent"
    /> 
</LinearLayout>


Modify AndroidManifest.xml to grant permission of "android.permission.BLUETOOTH", and "android.permission.BLUETOOTH_ADMIN".
<?xml version="1.0" encoding="utf-8"?>
<manifest xmlns:android="http://schemas.android.com/apk/res/android"
      package="com.exercise.AndroidBluetooth"
      android:versionCode="1"
      android:versionName="1.0">
    <uses-sdk android:minSdkVersion="7" />
    <uses-permission android:name="android.permission.BLUETOOTH"></uses-permission>
    <uses-permission android:name="android.permission.BLUETOOTH_ADMIN"></uses-permission>

    <application android:icon="@drawable/icon" android:label="@string/app_name">
        <activity android:name=".AndroidBluetooth"
                  android:label="@string/app_name">
            <intent-filter>
                <action android:name="android.intent.action.MAIN" />
                <category android:name="android.intent.category.LAUNCHER" />
            </intent-filter>
        </activity>
    </application>
</manifest>


Download the files.


Related:
- Start Bluetooth Discoverable and register BroadcastReceiver for ACTION_SCAN_MODE_CHANGED


Updated@2016-03-07: 
Android 6.0 Changes - Access to Hardware Identifier

To provide users with greater data protection, starting in this release, Android removes programmatic access to the device’s local hardware identifier for apps using the Wi-Fi and Bluetooth APIs. The WifiInfo.getMacAddress() and the BluetoothAdapter.getAddress() methods now return a constant value of 02:00:00:00:00:00.

To access the hardware identifiers of nearby external devices via Bluetooth and Wi-Fi scans, your app must now have the ACCESS_FINE_LOCATION or ACCESS_COARSE_LOCATION permissions:

WifiManager.getScanResults()
BluetoothDevice.ACTION_FOUND
BluetoothLeScanner.startScan()

Note: When a device running Android 6.0 (API level 23) initiates a background Wi-Fi or Bluetooth scan, the operation is visible to external devices as originating from a randomized MAC address.

link: http://developer.android.com/about/versions/marshmallow/android-6.0-changes.html#behavior-hardware-id

I have no Android 6.0 devices, So I can't figure it out if it is related!


Thursday, May 26, 2011

Start Bluetooth Discoverable and register BroadcastReceiver for ACTION_SCAN_MODE_CHANGED

To enable Bluetooth Discoverable, we can start activity with intent of BluetoothAdapter.ACTION_REQUEST_DISCOVERABLE. we can also provide expected discoverable duration via Extra.

To monitor the scan mode change in Bluetooth device, we can register our BroadcastReceiver for BluetoothAdapter.ACTION_SCAN_MODE_CHANGED. The BroadcastReceiver have t be unregister in onDestroy().

Here is a exercise to Start Bluetooth Discoverable.

Start Bluetooth Discoverable and register BroadcastReceiver for ACTION_SCAN_MODE_CHANGED

AndroidBluetooth.java
package com.exercise.AndroidBluetooth;

import android.app.Activity;
import android.bluetooth.BluetoothAdapter;
import android.content.BroadcastReceiver;
import android.content.Context;
import android.content.Intent;
import android.content.IntentFilter;
import android.os.Bundle;
import android.view.View;
import android.widget.ArrayAdapter;
import android.widget.Button;
import android.widget.Spinner;
import android.widget.TextView;
import android.widget.Toast;

public class AndroidBluetooth extends Activity {

private static final int REQUEST_ENABLE_BT = 1;
private static final int REQUEST_Turn_On_Discoverable = 3;

Spinner spnDiscoverableDuration;
Button btnTurnOnDiscoverable;
TextView stateBluetooth;
BluetoothAdapter bluetoothAdapter;

String[] optDiscoverableDur = {"10 sec", "60 sec", "120 sec", "240 sec", "300 sec"};
int[] valueDiscoverableDur = {10, 60, 120, 240, 300};

/** Called when the activity is first created. */
@Override
public void onCreate(Bundle savedInstanceState) {
super.onCreate(savedInstanceState);
setContentView(R.layout.main);

spnDiscoverableDuration = (Spinner)findViewById(R.id.discoverableduration);
btnTurnOnDiscoverable = (Button)findViewById(R.id.turnondiscoverable);

stateBluetooth = (TextView)findViewById(R.id.bluetoothstate);
bluetoothAdapter = BluetoothAdapter.getDefaultAdapter();

CheckBlueToothState();

btnTurnOnDiscoverable.setOnClickListener(btnTurnOnDiscoverableOnClickListener);

ArrayAdapter<String> adapterDiscoverableDur = new ArrayAdapter<String>(this,
android.R.layout.simple_list_item_1, optDiscoverableDur);
adapterDiscoverableDur.setDropDownViewResource(android.R.layout.simple_spinner_dropdown_item);
spnDiscoverableDuration.setAdapter(adapterDiscoverableDur);

registerReceiver(ScanModeChangedReceiver,
new IntentFilter(BluetoothAdapter.ACTION_SCAN_MODE_CHANGED));
}

@Override
protected void onDestroy() {
// TODO Auto-generated method stub
super.onDestroy();
unregisterReceiver(ScanModeChangedReceiver);
}

private void CheckBlueToothState(){
if (bluetoothAdapter == null){
stateBluetooth.setText("Bluetooth NOT support");
}else{
if (bluetoothAdapter.isEnabled()){
if(bluetoothAdapter.isDiscovering()){
stateBluetooth.setText("Bluetooth is currently in device discovery process.");
}else{
stateBluetooth.setText("Bluetooth is Enabled.");
btnTurnOnDiscoverable.setEnabled(true);
}
}else{
stateBluetooth.setText("Bluetooth is NOT Enabled!");
Intent enableBtIntent = new Intent(BluetoothAdapter.ACTION_REQUEST_ENABLE);
startActivityForResult(enableBtIntent, REQUEST_ENABLE_BT);
}
}
}

private Button.OnClickListener btnTurnOnDiscoverableOnClickListener
= new Button.OnClickListener(){

@Override
public void onClick(View arg0) {
// TODO Auto-generated method stub
Intent discoverableIntent
= new Intent(BluetoothAdapter.ACTION_REQUEST_DISCOVERABLE);
int dur = valueDiscoverableDur[(int)spnDiscoverableDuration.getSelectedItemId()];
discoverableIntent.putExtra(BluetoothAdapter.EXTRA_DISCOVERABLE_DURATION, dur);
startActivityForResult(discoverableIntent, REQUEST_Turn_On_Discoverable);
}};

@Override
protected void onActivityResult(int requestCode, int resultCode, Intent data) {
// TODO Auto-generated method stub
if(requestCode == REQUEST_ENABLE_BT){
CheckBlueToothState();
}if (requestCode == REQUEST_Turn_On_Discoverable){
if(resultCode == RESULT_OK){

}else if (resultCode == RESULT_CANCELED){
Toast.makeText(AndroidBluetooth.this,
"User Canceled",
Toast.LENGTH_LONG).show();
}
}
}

private final BroadcastReceiver ScanModeChangedReceiver = new BroadcastReceiver(){

@Override
public void onReceive(Context context, Intent intent) {
// TODO Auto-generated method stub
String action = intent.getAction();
if(BluetoothAdapter.ACTION_SCAN_MODE_CHANGED.equals(action)) {

int mode = intent.getIntExtra(BluetoothAdapter.EXTRA_SCAN_MODE,
BluetoothAdapter.ERROR);
String strMode = "";

switch(mode){
case BluetoothAdapter.SCAN_MODE_CONNECTABLE_DISCOVERABLE:
strMode = "mode changed: SCAN_MODE_CONNECTABLE_DISCOVERABLE";
break;
case BluetoothAdapter.SCAN_MODE_CONNECTABLE:
strMode = "mode changed: SCAN_MODE_CONNECTABLE";
break;
case BluetoothAdapter.SCAN_MODE_NONE:
strMode = "mode changed: SCAN_MODE_NONE";
break;
}

Toast.makeText(AndroidBluetooth.this,
strMode, Toast.LENGTH_LONG).show();
}
}};

}


main.xml
<?xml version="1.0" encoding="utf-8"?>
<LinearLayout xmlns:android="http://schemas.android.com/apk/res/android"
android:orientation="vertical"
android:layout_width="fill_parent"
android:layout_height="fill_parent"
>
<TextView
android:layout_width="fill_parent"
android:layout_height="wrap_content"
android:text="@string/hello"
/>
<TextView
android:id="@+id/bluetoothstate"
android:layout_width="fill_parent"
android:layout_height="wrap_content"
/>
<TextView
android:id="@+id/bluetoothstate"
android:layout_width="fill_parent"
android:layout_height="wrap_content"
/>
<TextView
android:layout_width="fill_parent"
android:layout_height="wrap_content"
android:text="Set Discoverable Duration"
/>
<Spinner
android:id="@+id/discoverableduration"
android:layout_width="fill_parent"
android:layout_height="wrap_content"
/>
<Button
android:id="@+id/turnondiscoverable"
android:layout_width="fill_parent"
android:layout_height="wrap_content"
android:text="Turn on Discoverable"
android:enabled="false"
/>
</LinearLayout>


Grant permission of "android.permission.BLUETOOTH" in AndroidManifest.xml
<?xml version="1.0" encoding="utf-8"?>
<manifest xmlns:android="http://schemas.android.com/apk/res/android"
package="com.exercise.AndroidBluetooth"
android:versionCode="1"
android:versionName="1.0">
<uses-sdk android:minSdkVersion="7" />
<uses-permission android:name="android.permission.BLUETOOTH"></uses-permission>

<application android:icon="@drawable/icon" android:label="@string/app_name">
<activity android:name=".AndroidBluetooth"
android:label="@string/app_name">
<intent-filter>
<action android:name="android.intent.action.MAIN" />
<category android:name="android.intent.category.LAUNCHER" />
</intent-filter>
</activity>
</application>
</manifest>

Download the files.

Related:
- Get the list of paired Bluetooth devices
- Scan Bluetooth Devices

Wednesday, May 25, 2011

BlueStacks: runs Android OS and apps on Windows PCs


BlueStacks runs Android OS and apps on Windows PCs with instant switch between Android and Windows - no reboot is required. End consumers can now enjoy their favorite Android apps on Windows PCs. Android apps can appear either as icons on the Windows desktop, or within a full-blown Android environment.

BlueStacks helps PC manufacturers to ride the Android momentum by enabling Android apps on x86-based tablets, netbooks, notebooks, convertibles and AiO Windows PCs. With the new hybrid convertible form factors, BlueStacks completely eliminates the need to carry two devices. The end consumer benefits from getting both Android and Windows at the price of a single PC.

link:
- http://bluestacks.com/

Get the list of paired Bluetooth devices

With bluetoothAdapter, the list of paired BluetoothDevice can be retrieved by calling getBondedDevices() function.

Get the list of paired Bluetooth devices

Implement a new activity ListPairedDevicesActivity.java
package com.exercise.AndroidBluetooth;

import java.util.Set;

import android.app.ListActivity;
import android.bluetooth.BluetoothAdapter;
import android.bluetooth.BluetoothClass;
import android.bluetooth.BluetoothDevice;
import android.content.Intent;
import android.os.Bundle;
import android.view.View;
import android.widget.ArrayAdapter;
import android.widget.ListView;

public class ListPairedDevicesActivity extends ListActivity {

@Override
protected void onCreate(Bundle savedInstanceState) {
// TODO Auto-generated method stub
super.onCreate(savedInstanceState);

ArrayAdapter<String> btArrayAdapter
= new ArrayAdapter<String>(this,
android.R.layout.simple_list_item_1);

BluetoothAdapter bluetoothAdapter
= BluetoothAdapter.getDefaultAdapter();
Set<BluetoothDevice> pairedDevices
= bluetoothAdapter.getBondedDevices();

if (pairedDevices.size() > 0) {
for (BluetoothDevice device : pairedDevices) {
String deviceBTName = device.getName();
String deviceBTMajorClass
= getBTMajorDeviceClass(device
.getBluetoothClass()
.getMajorDeviceClass());
btArrayAdapter.add(deviceBTName + "\n"
+ deviceBTMajorClass);
}
}
setListAdapter(btArrayAdapter);

}

private String getBTMajorDeviceClass(int major){
switch(major){
case BluetoothClass.Device.Major.AUDIO_VIDEO:
return "AUDIO_VIDEO";
case BluetoothClass.Device.Major.COMPUTER:
return "COMPUTER";
case BluetoothClass.Device.Major.HEALTH:
return "HEALTH";
case BluetoothClass.Device.Major.IMAGING:
return "IMAGING";
case BluetoothClass.Device.Major.MISC:
return "MISC";
case BluetoothClass.Device.Major.NETWORKING:
return "NETWORKING";
case BluetoothClass.Device.Major.PERIPHERAL:
return "PERIPHERAL";
case BluetoothClass.Device.Major.PHONE:
return "PHONE";
case BluetoothClass.Device.Major.TOY:
return "TOY";
case BluetoothClass.Device.Major.UNCATEGORIZED:
return "UNCATEGORIZED";
case BluetoothClass.Device.Major.WEARABLE:
return "AUDIO_VIDEO";
default: return "unknown!";
}
}

@Override
protected void onListItemClick(ListView l, View v, int position, long id) {
// TODO Auto-generated method stub
super.onListItemClick(l, v, position, id);

Intent intent = new Intent();
setResult(RESULT_OK, intent);
finish();
}

}


Modify main.xml to add a button to start ListPairedDevicesActivity.
<?xml version="1.0" encoding="utf-8"?>
<LinearLayout xmlns:android="http://schemas.android.com/apk/res/android"
android:orientation="vertical"
android:layout_width="fill_parent"
android:layout_height="fill_parent"
>
<TextView
android:layout_width="fill_parent"
android:layout_height="wrap_content"
android:text="@string/hello"
/>
<TextView
android:id="@+id/bluetoothstate"
android:layout_width="fill_parent"
android:layout_height="wrap_content"
/>
<Button
android:id="@+id/listpaireddevices"
android:layout_width="fill_parent"
android:layout_height="wrap_content"
android:text="List Paired Devices"
android:enabled="false"
/>
<TextView
android:id="@+id/bluetoothstate"
android:layout_width="fill_parent"
android:layout_height="wrap_content"
/>
</LinearLayout>


Modify AndroidBluetooth.java
package com.exercise.AndroidBluetooth;

import android.app.Activity;
import android.bluetooth.BluetoothAdapter;
import android.content.Intent;
import android.os.Bundle;
import android.view.View;
import android.widget.Button;
import android.widget.TextView;

public class AndroidBluetooth extends Activity {

private static final int REQUEST_ENABLE_BT = 1;
private static final int REQUEST_PAIRED_DEVICE = 2;

/** Called when the activity is first created. */
Button btnListPairedDevices;
TextView stateBluetooth;
BluetoothAdapter bluetoothAdapter;

@Override
public void onCreate(Bundle savedInstanceState) {
super.onCreate(savedInstanceState);
setContentView(R.layout.main);

btnListPairedDevices = (Button)findViewById(R.id.listpaireddevices);

stateBluetooth = (TextView)findViewById(R.id.bluetoothstate);
bluetoothAdapter = BluetoothAdapter.getDefaultAdapter();

CheckBlueToothState();

btnListPairedDevices.setOnClickListener(btnListPairedDevicesOnClickListener);
}

private void CheckBlueToothState(){
if (bluetoothAdapter == null){
stateBluetooth.setText("Bluetooth NOT support");
}else{
if (bluetoothAdapter.isEnabled()){
if(bluetoothAdapter.isDiscovering()){
stateBluetooth.setText("Bluetooth is currently in device discovery process.");
}else{
stateBluetooth.setText("Bluetooth is Enabled.");
btnListPairedDevices.setEnabled(true);
}
}else{
stateBluetooth.setText("Bluetooth is NOT Enabled!");
Intent enableBtIntent = new Intent(BluetoothAdapter.ACTION_REQUEST_ENABLE);
startActivityForResult(enableBtIntent, REQUEST_ENABLE_BT);
}
}
}

private Button.OnClickListener btnListPairedDevicesOnClickListener
= new Button.OnClickListener(){

@Override
public void onClick(View arg0) {
// TODO Auto-generated method stub
Intent intent = new Intent();
intent.setClass(AndroidBluetooth.this, ListPairedDevicesActivity.class);
startActivityForResult(intent, REQUEST_PAIRED_DEVICE);
}};

@Override
protected void onActivityResult(int requestCode, int resultCode, Intent data) {
// TODO Auto-generated method stub
if(requestCode == REQUEST_ENABLE_BT){
CheckBlueToothState();
}if (requestCode == REQUEST_PAIRED_DEVICE){
if(resultCode == RESULT_OK){

}
}
}
}


Modify AndroidManifest.xml to add activity ListPairedDevicesActivity, also include permission of "android.permission.BLUETOOTH".
<?xml version="1.0" encoding="utf-8"?>
<manifest xmlns:android="http://schemas.android.com/apk/res/android"
package="com.exercise.AndroidBluetooth"
android:versionCode="1"
android:versionName="1.0">
<uses-sdk android:minSdkVersion="7" />
<uses-permission android:name="android.permission.BLUETOOTH"></uses-permission>

<application android:icon="@drawable/icon" android:label="@string/app_name">
<activity android:name=".AndroidBluetooth"
android:label="@string/app_name">
<intent-filter>
<action android:name="android.intent.action.MAIN" />
<category android:name="android.intent.category.LAUNCHER" />
</intent-filter>
</activity>
<activity android:name=".ListPairedDevicesActivity"
android:label="AndroidBluetooth: List of Paired Devices"/>
</application>
</manifest>


Download the files.


Related:
- Detect Bluetooth state
- Turn-On BlueTooth using intent of BluetoothAdapter.ACTION_REQUEST_ENABLE
- Start Bluetooth Discoverable and register BroadcastReceiver for ACTION_SCAN_MODE_CHANGED

Tuesday, May 24, 2011

Turn-On BlueTooth using intent of BluetoothAdapter.ACTION_REQUEST_ENABLE

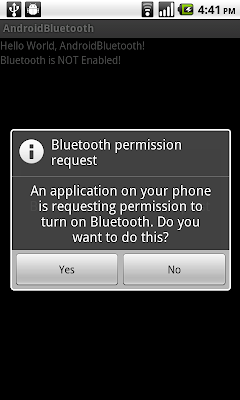
Further work on last exercise "Detect Bluetooth state". If device support bluetooth and it's currently turned OFF, will startActivity with intent of BluetoothAdapter.ACTION_REQUEST_ENABLE; to ask user accept to turn on BlueTooth.

Turn-On BlueTooth using intent of BluetoothAdapter.ACTION_REQUEST_ENABLE

Modify AndroidBluetooth.java
package com.exercise.AndroidBluetooth;

import android.app.Activity;
import android.bluetooth.BluetoothAdapter;
import android.content.Intent;
import android.os.Bundle;
import android.widget.TextView;

public class AndroidBluetooth extends Activity {

private static final int REQUEST_ENABLE_BT = 1;

/** Called when the activity is first created. */

TextView stateBluetooth;
BluetoothAdapter bluetoothAdapter;

@Override
public void onCreate(Bundle savedInstanceState) {
super.onCreate(savedInstanceState);
setContentView(R.layout.main);

stateBluetooth = (TextView)findViewById(R.id.bluetoothstate);
bluetoothAdapter = BluetoothAdapter.getDefaultAdapter();

CheckBlueToothState();
}

private void CheckBlueToothState(){
if (bluetoothAdapter == null){
stateBluetooth.setText("Bluetooth NOT support");
}else{
if (bluetoothAdapter.isEnabled()){
if(bluetoothAdapter.isDiscovering()){
stateBluetooth.setText("Bluetooth is currently in device discovery process.");
}else{
stateBluetooth.setText("Bluetooth is Enabled.");
}
}else{
stateBluetooth.setText("Bluetooth is NOT Enabled!");
Intent enableBtIntent = new Intent(BluetoothAdapter.ACTION_REQUEST_ENABLE);
startActivityForResult(enableBtIntent, REQUEST_ENABLE_BT);
}
}
}

@Override
protected void onActivityResult(int requestCode, int resultCode, Intent data) {
// TODO Auto-generated method stub
if(requestCode == REQUEST_ENABLE_BT){
CheckBlueToothState();
}

}

}


Download the files.

next;
- Get the list of paired Bluetooth devices


Monday, May 23, 2011

Detect Bluetooth state

Introduced from API Level 5, BluetoothAdapter lets you perform fundamental Bluetooth tasks, such as initiate device discovery, query a list of bonded (paired) devices, instantiate a BluetoothDevice using a known MAC address, and create a BluetoothServerSocket to listen for connection requests from other devices.

It's a exercise to detect Bluetooth state.

Detect Bluetooth state

Modify AndroidManifest.xml to grant permission of "android.permission.BLUETOOTH".
<?xml version="1.0" encoding="utf-8"?>
<manifest xmlns:android="http://schemas.android.com/apk/res/android"
package="com.exercise.AndroidBluetooth"
android:versionCode="1"
android:versionName="1.0">
<uses-sdk android:minSdkVersion="7" />
<uses-permission android:name="android.permission.BLUETOOTH"></uses-permission>

<application android:icon="@drawable/icon" android:label="@string/app_name">
<activity android:name=".AndroidBluetooth"
android:label="@string/app_name">
<intent-filter>
<action android:name="android.intent.action.MAIN" />
<category android:name="android.intent.category.LAUNCHER" />
</intent-filter>
</activity>

</application>
</manifest>


Main.xml
<?xml version="1.0" encoding="utf-8"?>
<LinearLayout xmlns:android="http://schemas.android.com/apk/res/android"
android:orientation="vertical"
android:layout_width="fill_parent"
android:layout_height="fill_parent"
>
<TextView
android:layout_width="fill_parent"
android:layout_height="wrap_content"
android:text="@string/hello"
/>
<TextView
android:id="@+id/bluetoothstate"
android:layout_width="fill_parent"
android:layout_height="wrap_content"
/>
</LinearLayout>


AndroidBluetooth.java
package com.exercise.AndroidBluetooth;

import android.app.Activity;
import android.bluetooth.BluetoothAdapter;
import android.os.Bundle;
import android.widget.TextView;

public class AndroidBluetooth extends Activity {
/** Called when the activity is first created. */

TextView stateBluetooth;
BluetoothAdapter bluetoothAdapter;

@Override
public void onCreate(Bundle savedInstanceState) {
super.onCreate(savedInstanceState);
setContentView(R.layout.main);

stateBluetooth = (TextView)findViewById(R.id.bluetoothstate);
bluetoothAdapter = BluetoothAdapter.getDefaultAdapter();

if (bluetoothAdapter == null){
stateBluetooth.setText("Bluetooth NOT support");
}else{
if (bluetoothAdapter.isEnabled()){
if(bluetoothAdapter.isDiscovering()){
stateBluetooth.setText("Bluetooth is currently in device discovery process.");
}else{
stateBluetooth.setText("Bluetooth is Enabled.");
}
}else{
stateBluetooth.setText("Bluetooth is NOT Enabled!");
}
}


}
}


Download the files.

next:
- Turn-On BlueTooth using intent of BluetoothAdapter.ACTION_REQUEST_ENABLE

Saturday, May 21, 2011

easy-peripheral-controller: a new open-source project to make connecting from android to microcontrollers


The open-source project easy-peripheral-controller is a library of abstractions for commonly used peripherals (sensors and actuators) and MCU platforms like the ADK, to make it easier to connect from your Android app to the world.

Starting out with the ADK and Demo kit in its stock form, and some example code of how to create your own sketch for an Arduino based ADK board.

Link
- Project HOME of easy-peripheral-controller

Microchip PIC24F Accessory Development Start Kit for Android

Refer to the update post: MicroChip's PIC24F Accessory Development Starter Kit for Android


The Microchip PIC24F Accessory Development Start Kit for Android™ is a standalone board used for evaluating and developing electronic accessories for Google’s Android operating system for smartphones and tablets.

Accessory Development Starter Kit for Android

link:
- http://www.microchip.com/android


This is a video demonstration of the Microchip development kit for the accessory interface of the Android(TM) OS version 2.3.4 and later. This kit, which includes the development board and the software library, allows customers to easily design, develop and prototype accessory electronics for Android(tm) phones and tablets.

Disco Droid - Android ADK Project


Dancing Android controlled by Android. Filmed and edited on Android. Hopefully you are viewing this on Android.

Friday, May 20, 2011

A Single touch view + a multi touch view in a activity

In the exercise "Detect single touch on custom View" and "Detect Multi touch on custom View", we have implemented a single touch view class and a multi touch view class. We are going to place both in a single activity.


Tested on Nexus One running 2.2.1.

The upper frame is a single touch view.
The lower frame is a multi touch view.

Keep no change on the and SingleTouchView.java in "Detect single touch on custom View", and MultiTouchView.java in "Detect Multi touch on custom View".

Modify main.xml to include both SingleTouchView and MultiTouchView.
<?xml version="1.0" encoding="utf-8"?>
<LinearLayout xmlns:android="http://schemas.android.com/apk/res/android"
android:orientation="vertical"
android:layout_width="fill_parent"
android:layout_height="fill_parent"
>
<com.exercise.AndroidTouch.SingleTouchView
android:id="@+id/stv1"
android:layout_width="fill_parent"
android:layout_height="200dp"
/>
<com.exercise.AndroidTouch.MultiTouchView
android:id="@+id/mtv2"
android:layout_width="fill_parent"
android:layout_height="fill_parent"
/>
</LinearLayout>


Modify AndroidTouch.java to set them in different background color.
package com.exercise.AndroidTouch;

import android.app.Activity;
import android.graphics.Color;
import android.os.Bundle;

public class AndroidTouch extends Activity {
/** Called when the activity is first created. */
@Override
public void onCreate(Bundle savedInstanceState) {
super.onCreate(savedInstanceState);
setContentView(R.layout.main);

SingleTouchView singleTouchView1 = (SingleTouchView)findViewById(R.id.stv1);
MultiTouchView multiTouchView2 = (MultiTouchView)findViewById(R.id.mtv2);
singleTouchView1.setBackgroundColor(Color.GRAY);
multiTouchView2.setBackgroundColor(Color.LTGRAY);

}
}


Download the files.

Place two multitouch custom view in a activity

In the exercise "Detect Multi touch on custom View", a customer view class with multitouch have been implemented. Now, we wil modify our layout to include two separated multitouch custom view, in different background color.


Tested on Nexus One running 2.2.1.


Keep no change on the MultiTouchView.java in "Detect Multi touch on custom View".

Modify main.xml to include two MultiTouchView.
<?xml version="1.0" encoding="utf-8"?>
<LinearLayout xmlns:android="http://schemas.android.com/apk/res/android"
android:orientation="vertical"
android:layout_width="fill_parent"
android:layout_height="fill_parent"
>
<com.exercise.AndroidTouch.MultiTouchView
android:id="@+id/mtv1"
android:layout_width="fill_parent"
android:layout_height="200dp"
/>
<com.exercise.AndroidTouch.MultiTouchView
android:id="@+id/mtv2"
android:layout_width="fill_parent"
android:layout_height="fill_parent"
/>
</LinearLayout>


Modify AndroidTouch.java to set them in different background color.
package com.exercise.AndroidTouch;

import android.app.Activity;
import android.graphics.Color;
import android.os.Bundle;

public class AndroidTouch extends Activity {
/** Called when the activity is first created. */
@Override
public void onCreate(Bundle savedInstanceState) {
super.onCreate(savedInstanceState);
setContentView(R.layout.main);

MultiTouchView multiTouchView1 = (MultiTouchView)findViewById(R.id.mtv1);
MultiTouchView multiTouchView2 = (MultiTouchView)findViewById(R.id.mtv2);
multiTouchView1.setBackgroundColor(Color.WHITE);
multiTouchView2.setBackgroundColor(Color.GRAY);

}
}


Download the files.

Detect Multi touch on custom View

In this exercise, we are going to create a custom view, MultiTouchView. With onTouchEvent() overrided to handle multi touch event.

Detect Multi touch on custom View


Tested on Nexus One running 2.2.1. It can be noticed that there are some problem on multitouch detection on Nexus One!

MultiTouchView.java
package com.exercise.AndroidTouch;

import android.content.Context;
import android.graphics.Canvas;
import android.graphics.Color;
import android.graphics.Paint;
import android.util.AttributeSet;
import android.view.MotionEvent;
import android.view.View;

public class MultiTouchView extends View {

private final int TOUCH_CNT = 2;

private Paint paint = new Paint(Paint.ANTI_ALIAS_FLAG);
float[] x = new float[TOUCH_CNT];
float[] y = new float[TOUCH_CNT];
boolean[] isTouch = new boolean[TOUCH_CNT];

public MultiTouchView(Context context) {
super(context);
// TODO Auto-generated constructor stub
}

public MultiTouchView(Context context, AttributeSet attrs) {
super(context, attrs);
// TODO Auto-generated constructor stub
}

public MultiTouchView(Context context, AttributeSet attrs, int defStyle) {
super(context, attrs, defStyle);
// TODO Auto-generated constructor stub
}

@Override
protected void onMeasure(int widthMeasureSpec, int heightMeasureSpec) {
// TODO Auto-generated method stub
setMeasuredDimension(MeasureSpec.getSize(widthMeasureSpec),
MeasureSpec.getSize(heightMeasureSpec));
}

@Override
protected void onDraw(Canvas canvas) {
// TODO Auto-generated method stub
if(isTouch[0]){
paint.setStrokeWidth(1);
paint.setColor(Color.RED);
paint.setStyle(Paint.Style.FILL);
canvas.drawCircle(x[0], y[0], 75f, paint);
}
if(isTouch[1]){
paint.setStrokeWidth(1);
paint.setColor(Color.BLUE);
paint.setStyle(Paint.Style.FILL);
canvas.drawCircle(x[1], y[1], 75f, paint);
}
}

@Override
public boolean onTouchEvent(MotionEvent motionEvent) {
// TODO Auto-generated method stub

int pointerIndex = ((motionEvent.getAction() & MotionEvent.ACTION_POINTER_ID_MASK)
>> MotionEvent.ACTION_POINTER_ID_SHIFT);
int pointerId = motionEvent.getPointerId(pointerIndex);
int action = (motionEvent.getAction() & MotionEvent.ACTION_MASK);
int pointCnt = motionEvent.getPointerCount();

if (pointCnt <= TOUCH_CNT){
if (pointerIndex <= TOUCH_CNT - 1){
for (int i = 0; i < pointCnt; i++) {
int id = motionEvent.getPointerId(i);
x[id] = (int)motionEvent.getX(i);
y[id] = (int)motionEvent.getY(i);
}

switch (action){
case MotionEvent.ACTION_DOWN:
case MotionEvent.ACTION_POINTER_DOWN:
case MotionEvent.ACTION_MOVE:
isTouch[pointerId] = true;
break;
default:
isTouch[pointerId] = false;
}
}
}
invalidate();
return true;
}

}


main.xml
<?xml version="1.0" encoding="utf-8"?>
<LinearLayout xmlns:android="http://schemas.android.com/apk/res/android"
android:orientation="vertical"
android:layout_width="fill_parent"
android:layout_height="fill_parent"
>
<com.exercise.AndroidTouch.MultiTouchView
android:layout_width="fill_parent"
android:layout_height="fill_parent"
/>
</LinearLayout>


AndroidTouch.java
package com.exercise.AndroidTouch;

import android.app.Activity;
import android.os.Bundle;

public class AndroidTouch extends Activity {
/** Called when the activity is first created. */
@Override
public void onCreate(Bundle savedInstanceState) {
super.onCreate(savedInstanceState);
setContentView(R.layout.main);
}
}


Download the files.

Related article:
- Detect single touch on custom View
- Place two multitouch custom view in a activity
- A Single touch view + a multi touch view in a activity

Thursday, May 19, 2011

Android Open Accessories


The Android Open Accessory APIs for Android have been announced at Google I/O last week. These APIs allow USB accessories to connect to Android devices running Android 3.1 or Android 2.3.4 without special licensing or fees. The new “accessory mode” does not require the Android device to support USB Host mode.

Android Developers Blog post a article concentrate on accessory mode, but also announced USB Host mode APIs for devices with hardware capable of supporting it.

Link:
- Android Developers Blog: A Bright Idea: Android Open Accessories

Detect single touch on custom View

In this exercise, we are going to create a custom view, SingleTouchView. With onTouchEvent() overrided to handle single touch event.

Detect single touch on custom View


SingleTouchView.java
package com.exercise.AndroidTouch;

import android.content.Context;
import android.graphics.Canvas;
import android.graphics.Color;
import android.graphics.Paint;
import android.util.AttributeSet;
import android.view.MotionEvent;
import android.view.View;

public class SingleTouchView extends View {
private Paint paint = new Paint(Paint.ANTI_ALIAS_FLAG);
private float x, y;
private boolean touching = false;

public SingleTouchView(Context context) {
super(context);
// TODO Auto-generated constructor stub
}

public SingleTouchView(Context context, AttributeSet attrs) {
super(context, attrs);
// TODO Auto-generated constructor stub
}

public SingleTouchView(Context context, AttributeSet attrs, int defStyle) {
super(context, attrs, defStyle);
// TODO Auto-generated constructor stub
}

@Override
protected void onMeasure(int widthMeasureSpec, int heightMeasureSpec) {
// TODO Auto-generated method stub
setMeasuredDimension(MeasureSpec.getSize(widthMeasureSpec),
MeasureSpec.getSize(heightMeasureSpec));
}

@Override
protected void onDraw(Canvas canvas) {
// TODO Auto-generated method stub
super.onDraw(canvas);

if(touching){
paint.setStrokeWidth(1);
paint.setColor(Color.WHITE);
paint.setStyle(Paint.Style.FILL);
canvas.drawCircle(x, y, 75f, paint);
}

}

@Override
public boolean onTouchEvent(MotionEvent motionEvent) {
// TODO Auto-generated method stub

switch(motionEvent.getAction()){
case MotionEvent.ACTION_MOVE:
case MotionEvent.ACTION_DOWN:
x = motionEvent.getX();
y = motionEvent.getY();
touching = true;
break;
default:
touching = false;
}
invalidate();
return true;
}

}


Modify main.xml to include SingleTouchView
<?xml version="1.0" encoding="utf-8"?>
<LinearLayout xmlns:android="http://schemas.android.com/apk/res/android"
android:orientation="vertical"
android:layout_width="fill_parent"
android:layout_height="fill_parent"
>
<com.exercise.AndroidTouch.SingleTouchView
android:layout_width="fill_parent"
android:layout_height="fill_parent"
/>
</LinearLayout>


Do nothing on the main activity code, AndroidTouch.java
package com.exercise.AndroidTouch;

import android.app.Activity;
import android.os.Bundle;

public class AndroidTouch extends Activity {
/** Called when the activity is first created. */
@Override
public void onCreate(Bundle savedInstanceState) {
super.onCreate(savedInstanceState);
setContentView(R.layout.main);
}
}


Download the files.


Related Article:
- Detect Multi touch on custom View

Wednesday, May 18, 2011

Android Random BeatBox


Actualy it's a random generator with TextToSpeech.

For the BeatBox, refer YouTube video "Google Demo Slam: Translate Beat Box".

The random generated phase will be speaked using TextToSpeech, in GERMANY language if available.

main.xml
<?xml version="1.0" encoding="utf-8"?>
<LinearLayout xmlns:android="http://schemas.android.com/apk/res/android"
android:orientation="vertical"
android:layout_width="fill_parent"
android:layout_height="fill_parent"
>
<TextView
android:layout_width="fill_parent"
android:layout_height="wrap_content"
android:text="@string/hello"
/>
<Button
android:id="@+id/generaterandom"
android:layout_width="fill_parent"
android:layout_height="wrap_content"
android:text="Generate Random Text"
/>
<Button
android:id="@+id/play"
android:layout_width="fill_parent"
android:layout_height="wrap_content"
android:text="Play Random Text"
/>
<EditText
android:id="@+id/beatbox"
android:layout_width="fill_parent"
android:layout_height="wrap_content"
android:text="Android Random Beat Box"
/>
</LinearLayout>


AndroidBeatBox.java
package com.exercise.AndroidBeatBox;

import java.util.Locale;
import java.util.Random;

import android.app.Activity;
import android.os.Bundle;
import android.speech.tts.TextToSpeech;
import android.speech.tts.TextToSpeech.OnInitListener;
import android.view.View;
import android.widget.Button;
import android.widget.EditText;

public class AndroidBeatBox extends Activity implements OnInitListener{

final static int NUM_TEXT = 25;
String[] beat = {"pv ",
"zk ",
"bschk ",
"kkkkkkkkkk ",
};

Button buttonGenerateRandomText, buttonPlay;
EditText RandomBeatBox;

TextToSpeech tts;
Random random;

/** Called when the activity is first created. */
@Override
public void onCreate(Bundle savedInstanceState) {
super.onCreate(savedInstanceState);
setContentView(R.layout.main);
buttonGenerateRandomText = (Button)findViewById(R.id.generaterandom);
buttonPlay = (Button)findViewById(R.id.play);
buttonPlay.setEnabled(false);
RandomBeatBox = (EditText)findViewById(R.id.beatbox);
random = new Random();
tts = new TextToSpeech(this, this);
tts.setLanguage(Locale.GERMANY);

buttonGenerateRandomText.setOnClickListener(buttonGenerateRandomTextOnClick);
buttonPlay.setOnClickListener(buttonPlayOnClick);
}

private Button.OnClickListener buttonGenerateRandomTextOnClick
= new Button.OnClickListener(){

@Override
public void onClick(View arg0) {
// TODO Auto-generated method stub
String strBeat = "";
for(int i=0; i<=NUM_TEXT; i++){
int randomInt = random.nextInt(beat.length);
strBeat = strBeat + beat[randomInt];
}

RandomBeatBox.setText(strBeat);
}};

private Button.OnClickListener buttonPlayOnClick
= new Button.OnClickListener(){

@Override
public void onClick(View arg0) {
// TODO Auto-generated method stub
tts.speak(RandomBeatBox.getText().toString(),
TextToSpeech.QUEUE_ADD,
null);
}};

@Override
public void onInit(int arg0) {
// TODO Auto-generated method stub
buttonPlay.setEnabled(true);
}

@Override
protected void onDestroy() {
// TODO Auto-generated method stub
super.onDestroy();
tts.shutdown();
}
}


Download the files.


Create Alert Dialog with OK and Cancel options

Alert Dialog with OK and Cancel options

AlertDialog.Builder myAlertDialog = new AlertDialog.Builder(AndroidAlertDialog.this);
myAlertDialog.setTitle("--- Title ---");
myAlertDialog.setMessage("Alert Dialog Message");
myAlertDialog.setPositiveButton("OK", new DialogInterface.OnClickListener() {

public void onClick(DialogInterface arg0, int arg1) {
// do something when the OK button is clicked
}});
myAlertDialog.setNegativeButton("Cancel", new DialogInterface.OnClickListener() {

public void onClick(DialogInterface arg0, int arg1) {
// do something when the Cancel button is clicked
}});
myAlertDialog.show();


Sunday, May 15, 2011

Google I/O 2011: Android Open Accessory API and Development Kit (ADK)


You have always been able to connect an Android device to your computer, but until now there was no way for Android applications to interact with other hardware via USB. In this talk we cover new support in Android 3.1 for USB input devices, as well as new APIs for applications to communicate with peripherals via USB. The APIs support both Android powered devices that act as a conventional USB host, and non-host Android devices that communicates with a new class of USB hosts known as "Android USB Accessories". Cool hardware is involved.

Thursday, May 12, 2011

Google I/O 2011: Building Android Apps for Google TV


Learn how to create new apps or enhance existing Android apps for Google TV. Session includes an overview of the platform, best practices, demos, and discussion about the fantastic opportunities Google TV creates for developers.

Google I/O 2011: Best Practices for Accessing Google APIs on Android


Integration with Google APIs (such as Buzz, Latitude and Translate) can enrich many Android applications. In this session, we will demonstrate how to do so easily, efficiently and securely using the Google API Client for Java. We'll walk you through how to authenticate for the APIs using AccountManager, how to reduce the client library size and several other Android-specific optimizations.

Wednesday, May 11, 2011

Google I/O 2011: Android Development Tools


This talk provides an in-depth look at the Android development tools, along with tips & tricks for getting the most out of them. From project support, to source editing and visual editors, to emulator execution and debugging and profiling, this talk will help you get more productive with Android development. The main focus is on Eclipse, but we will discuss other complementary tools as well. This is a demo-oriented talk, and our goal is to show the available features, and how they fit into the workflow.

Prevent activity restart when screen orientation has changed

By default, when the screen orientation has changed at runtime (the user has rotated the device), the activity is shut down and restarted; onDestroy() and onCreate() will be called.

To prevent the activity from being restarted, you can declare a android:configChanges in AndroidManifest.xml File, with "orientation" attribute. onConfigurationChanged() method of your activity will be called, if exist.

example:

onConfigurationChanged()

<?xml version="1.0" encoding="utf-8"?>
<manifest xmlns:android="http://schemas.android.com/apk/res/android"
package="com.exercise.AndroidStopOrientationChange"
android:versionCode="1"
android:versionName="1.0">
<uses-sdk android:minSdkVersion="4" />

<application android:icon="@drawable/icon" android:label="@string/app_name">
<activity android:name=".AndroidStopOrientationChange"
android:label="@string/app_name"
android:configChanges="orientation">
<intent-filter>
<action android:name="android.intent.action.MAIN" />
<category android:name="android.intent.category.LAUNCHER" />
</intent-filter>
</activity>

</application>
</manifest>


package com.exercise.AndroidStopOrientationChange;

import android.app.Activity;
import android.content.res.Configuration;
import android.os.Bundle;
import android.widget.Toast;

public class AndroidStopOrientationChange extends Activity {
/** Called when the activity is first created. */
@Override
public void onCreate(Bundle savedInstanceState) {
super.onCreate(savedInstanceState);
setContentView(R.layout.main);

Toast.makeText(AndroidStopOrientationChange.this,
"onCreate()",
Toast.LENGTH_SHORT).show();
}

@Override
protected void onDestroy() {
// TODO Auto-generated method stub
super.onDestroy();
Toast.makeText(AndroidStopOrientationChange.this,
"onDestroy()",
Toast.LENGTH_SHORT).show();
}

@Override
public void onConfigurationChanged(Configuration newConfig) {
// TODO Auto-generated method stub
super.onConfigurationChanged(newConfig);
Toast.makeText(AndroidStopOrientationChange.this,
"onConfigurationChanged(): " + newConfig.toString(),
Toast.LENGTH_SHORT).show();
}


}


Other attributes include :
"mcc", "mnc", "locale", "touchscreen", "keyboard", "keyboardHidden", "navigation", "orientation", "screenLayout", "fontScale", "uiMode".

Details refer: http://developer.android.com/guide/topics/manifest/activity-element.html#config

Now you can create App Engine-connected Android projects

With GPE 2.4, you now have the ability to create App Engine-connected Android projects. This new Eclipse project wizard generates fully functioning Android and GWT clients that are capable of talking to the same App Engine backend using the same RPC code and business logic.

Source:
- The official Google Code Blog: Android Meet App Engine, App Engine Meet Android

Tuesday, May 10, 2011

Google I/O 2011: Android Protips: Advanced Topics for Expert Android App Developers


Writing an app is easy, but with 100k competitors you need to do better than launch and cross your fingers. I'll demonstrate how to use advanced Android techniques to taek a good app and transform it into a polished product. Features advanced coding tips & tricks, design and implementation patters, and insight into some of the lesser known API features. This is an advanced session designed to help experienced developers.

Android 3.1 introduce new Android Open Accessory support

The Android 3.1 platform (also backported to Android 2.3.4) introduces Android Open Accessory support, which allows external USB hardware (an Android USB accessory) to interact with an Android-powered device in a special "accessory" mode. When an Android-powered powered device is in accessory mode, the connected accessory acts as the USB host (powers the bus and enumerates devices) and the Android-powered device acts as the device. Android USB accessories are specifically designed to attach to Android-powered devices and adhere to a simple protocol (Android accessory protocol) that allows them to detect Android-powered devices that support accessory mode.

Accessories must also provide 500mA at 5V for charging power.

Many previously released Android-powered devices are only capable of acting as a USB device and cannot initiate connections with external USB devices. Android Open Accessory support overcomes this limitation and allows you to build accessories that can interact with an assortment of Android-powered devices by allowing the accessory initiate the connection.

details:
- Android Open Accessory Development Kit

Google released Android 3.1 Platform, New SDK tools

Aannounced at Google I/O, Android 3.1 platform are being released. Android 3.1 is an incremental release that builds on the tablet-optimized UI and features introduced in Android 3.0. It adds several new features for users and developers, including:

  • Open Accessory API. This new API provides a way for Android applications to integrate and interact with a wide range of accessories such as musical equipment, exercise equipment, robotics systems, and many others.
  • USB host API. On devices that support USB host mode, applications can now manage connected USB peripherals such as audio devices. input devices, communications devices, and more.
  • Input from mice, joysticks, and gamepads. Android 3.1 extends the input event system to support a variety of new input sources and motion events such as from mice, trackballs, joysticks, gamepads, and others.
  • Resizable Home screen widgets. Developers can now create Home screen widgets that are resizeable horizontally, vertically, or both.
  • Media Transfer Protocol (MTP) Applications can now receive notifications when external cameras are attached and removed, manage files and storage on those devices, and transfer files and metadata to and from them.
  • Real-time Transport Protocol (RTP) API for audio. Developers can directly manage on-demand or interactive data streaming to enable VOIP, push-to-talk, conferencing, and audio streaming.

For a complete overview of what’s new in the platform, see the Android 3.1 Platform Highlights.


Source: http://android-developers.blogspot.com/2011/05/android-31-platform-new-sdk-tools.html